


By Jefferson Bryant – Images by the Author
If you have not been studying the progression of alternator technologies, you may not realize that since 2010 GM has been using PWM-controlled alternators in many vehicles, and all 2014-up Gen V LT-series engines use them. This is not much of an issue if you have a factory-stock vehicle, but for LT swaps and modified factory Gen V–powered Chevys it can become a big issue.
This all started back in the mid 1990s when GM started using ECM-controlled alternators. The idea was to reduce engine load when it was not needed to increase fuel economy. By the time we got LS engines they were all ECM controlled. This is why you use a separate trigger wire and resistor on the alternator for Gen III LS swaps. Gen IV/V alternators are different. These are PWM-controlled, they receive a signal from the ECM that not only turns on the charging but also changes the voltage at which the alternator outputs from 11 to 15.5 V.
The issues are twofold. First, the factory components are designed to work with the varying voltages, but many aftermarket components operate best at 14.4 V; anything lower causes problems. For example, fuel pumps may run slower, delivering lower fuel pressures, cooling fans may spin slower, electronics such as controllers and car audio may show odd behaviors.


The other issue is for swapped vehicles. The ECM sends the signal to the alternator, but it is actually the BCM that is telling the ECM what to do. Without the BCM (most swaps do not incorporate the BCM), the ECM just kind of does whatever. In our LT swaps, we have seen the voltage fluctuate willy-nilly, which is not good for sensitive electronics. You may even run into situations where the battery is not being fully charged, which is something we have experienced in a couple of LT swaps.
Solutions to this issue are rudimentary at best. The primary solution for swaps using the stock Gen V alternator is to unplug it. This puts the alt into “failsafe” mode, the voltage drops to a constant 13.6 V. It will work, but it is less than ideal. Another solution is to go into the tune, under the System tabàGeneralàAlternator settings, change the Airflow System Voltage from 12 to 14.6 V. This will set the voltage to operate at a minimum of 14.6. This does work, but it is still not consistent; we have seen fluctuations even with this setting changed
You can purchase a PWM alternator controller, but these are expensive and you are still working with a stock 150-amp alternator (170A for vehicles with the HO alt option). These certainly work to solve the issue for swaps, but there are alternatives that are much better if you are retaining the stock accessory drive. Aftermarket drives usually swap out the PWM alternator for a Gen III–style unit, problem solved. This doesn’t do much for factory-installed Gen V engines.
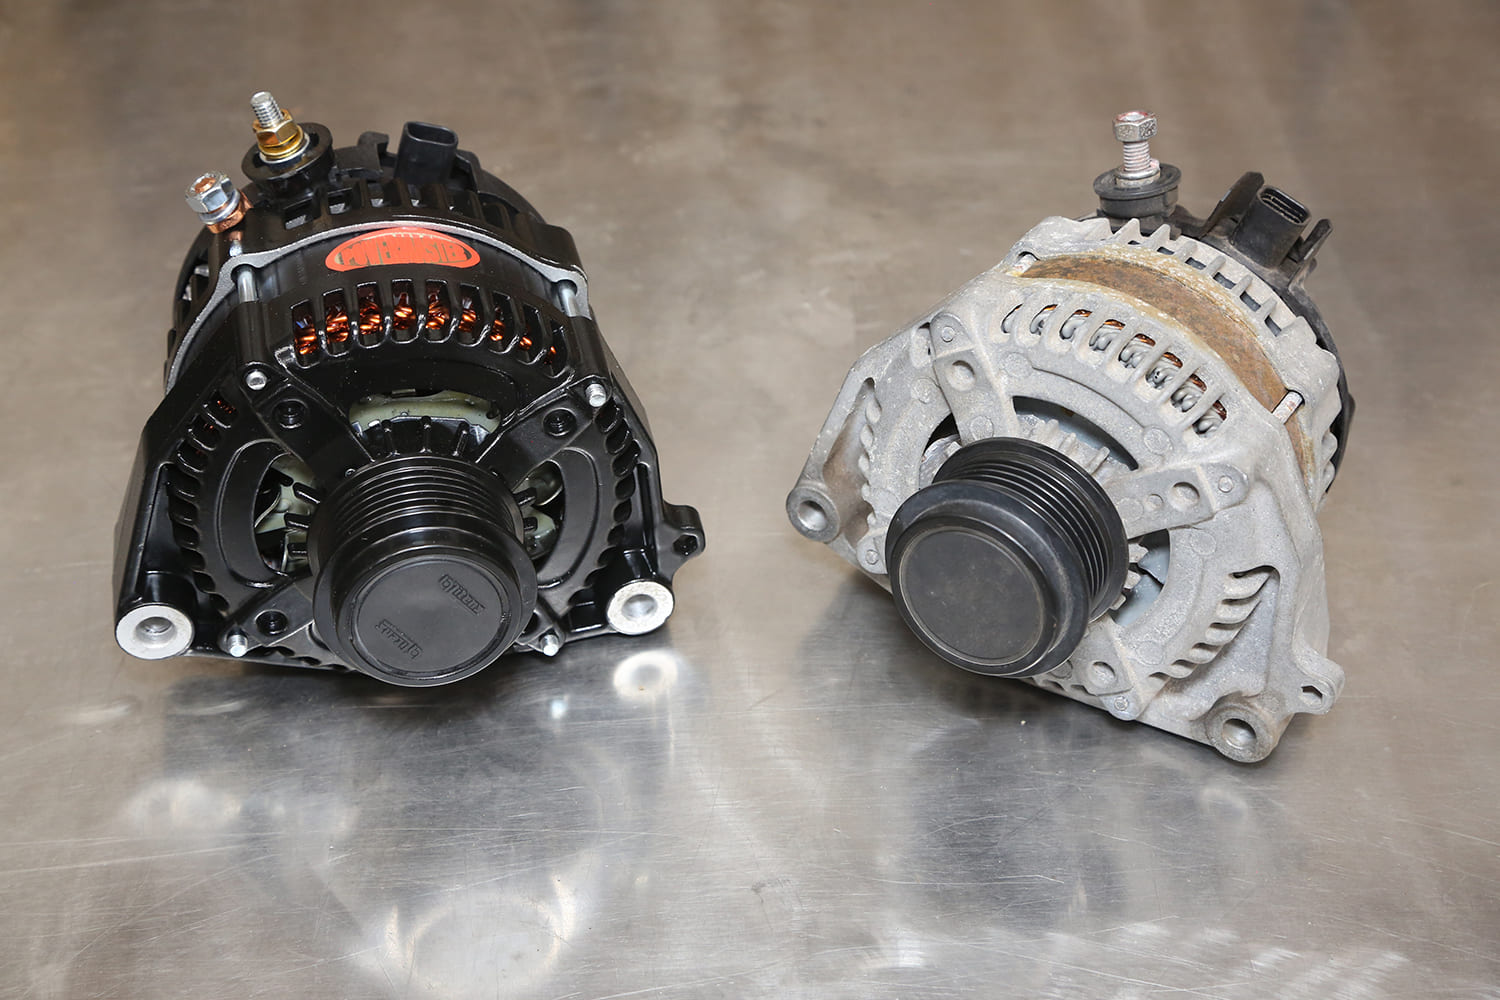
Powermaster recently released their one-wire Gen V Direct-Fit HPR alternator, which is by itself a remarkable unit. These HPR alternators can deliver up to 195 amps at 600 rpm, which is necessary for vehicles with high-powered stereo systems, lights, pumps, and so on, that have high current draw. Considering that you could be cruising at 75-plus with the engine spinning under 1,500 rpm, that high output is a game changer. Powermaster has HPR units for both ECM-controlled and one-wire applications. At 250-amp max output, these are legit high-output alternators that are incredibly reliable.

This is a 5-minute swap for most vehicles—two bolts, one plug, one charging cable—so we won’t spend much time on the installation portion of this, but there are some decisions to be made and details that need covered.
Which Type of Alternator do I Need?
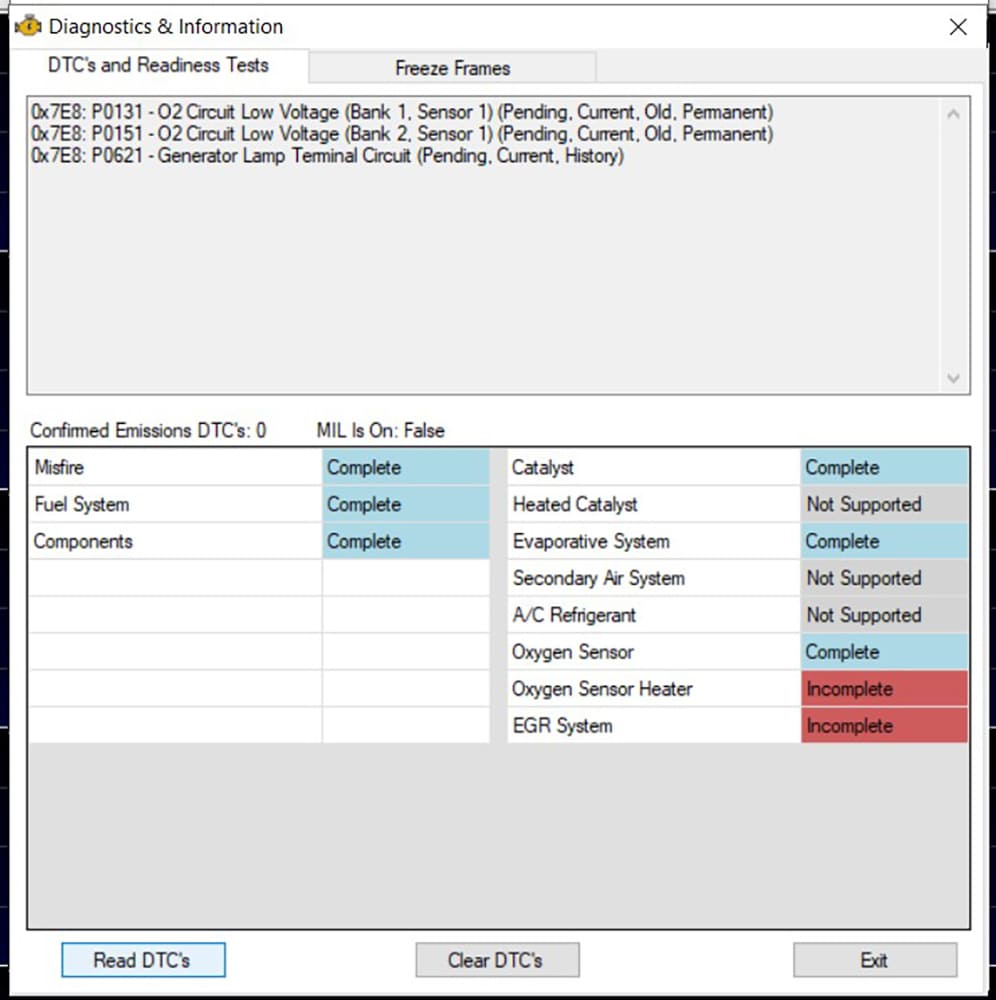
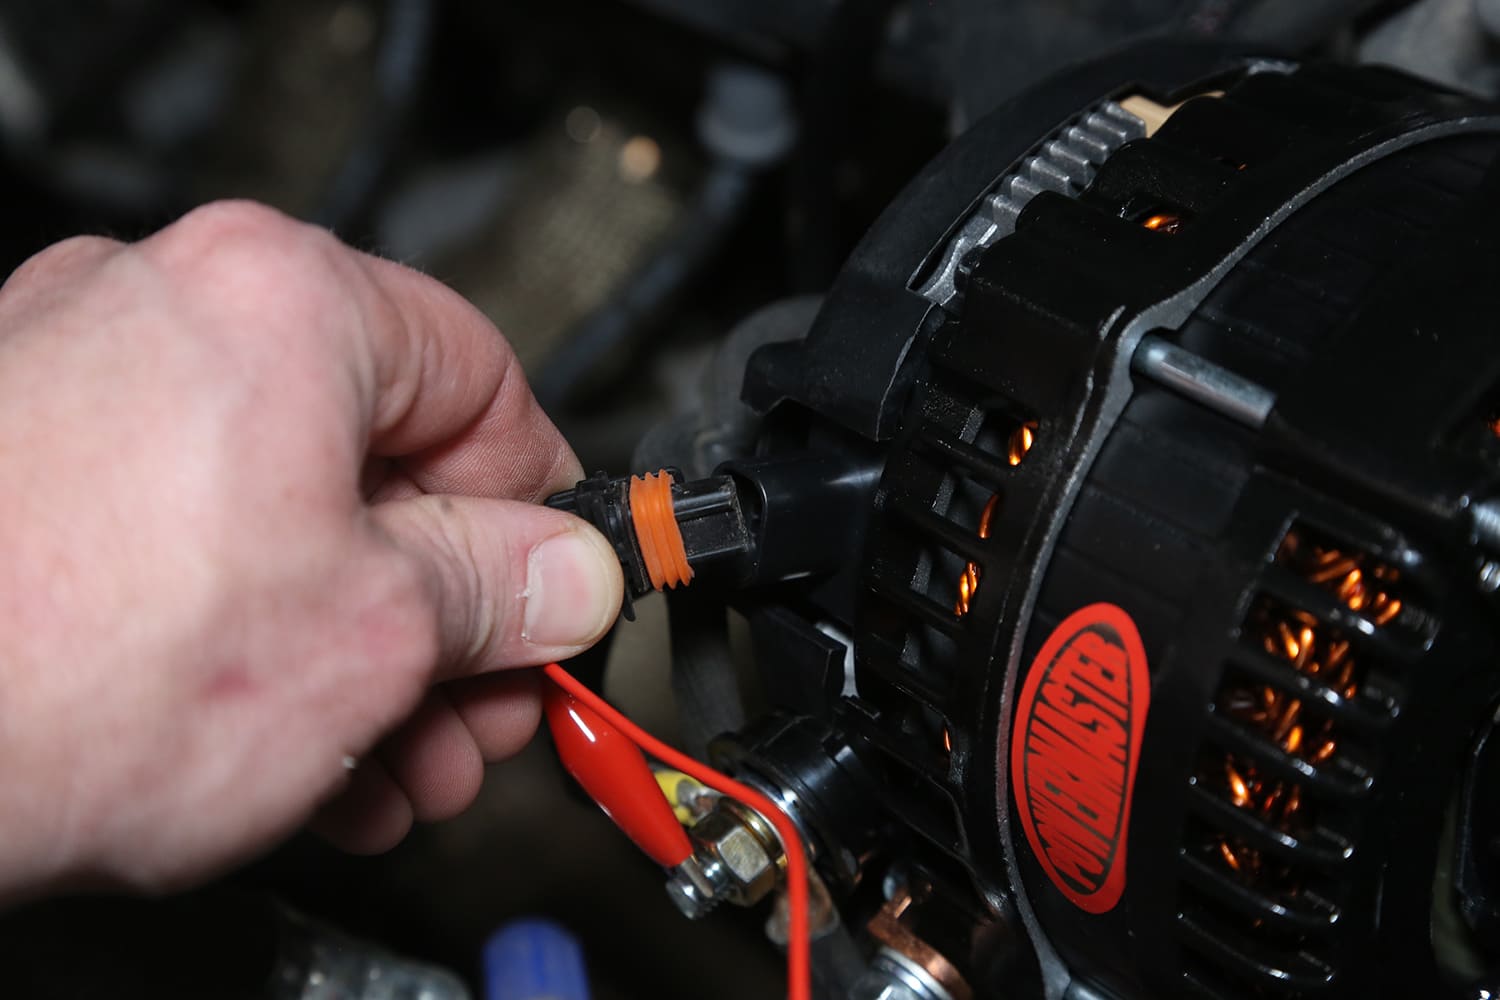
For most factory-installed Gen Vs, the standard ECM-controlled unit is suitable, as it delivers its 250 amps just as the factory unit does. If you have a lot of high-performance electrical add-ons, you may want to consider the one-wire design. For swaps, the one-wire is the obvious choice, as you don’t have to deal with the variable voltage at all; it is connect and go. There is a caveat, however; if you are using a GM ECM, you need to plug in the factory alternator plug. This turns off the “generator error” that automatically triggers when the alternator is unplugged. Even if you don’t have a factory-style dash the CEL will light, which is annoying and can mask a real problem should another CEL code set. This applies to factory Gen-Vs as well. Connecting the plug to the one-wire unit will not cause changes with the voltage or charging; it simply turns off the generator fault code. If you are using an aftermarket ECM, such as the Holley Terminator, you don’t have the generator fault system, so running the one-wire unplugged is not an issue.
My Stock Wiring is Good Enough, Right?

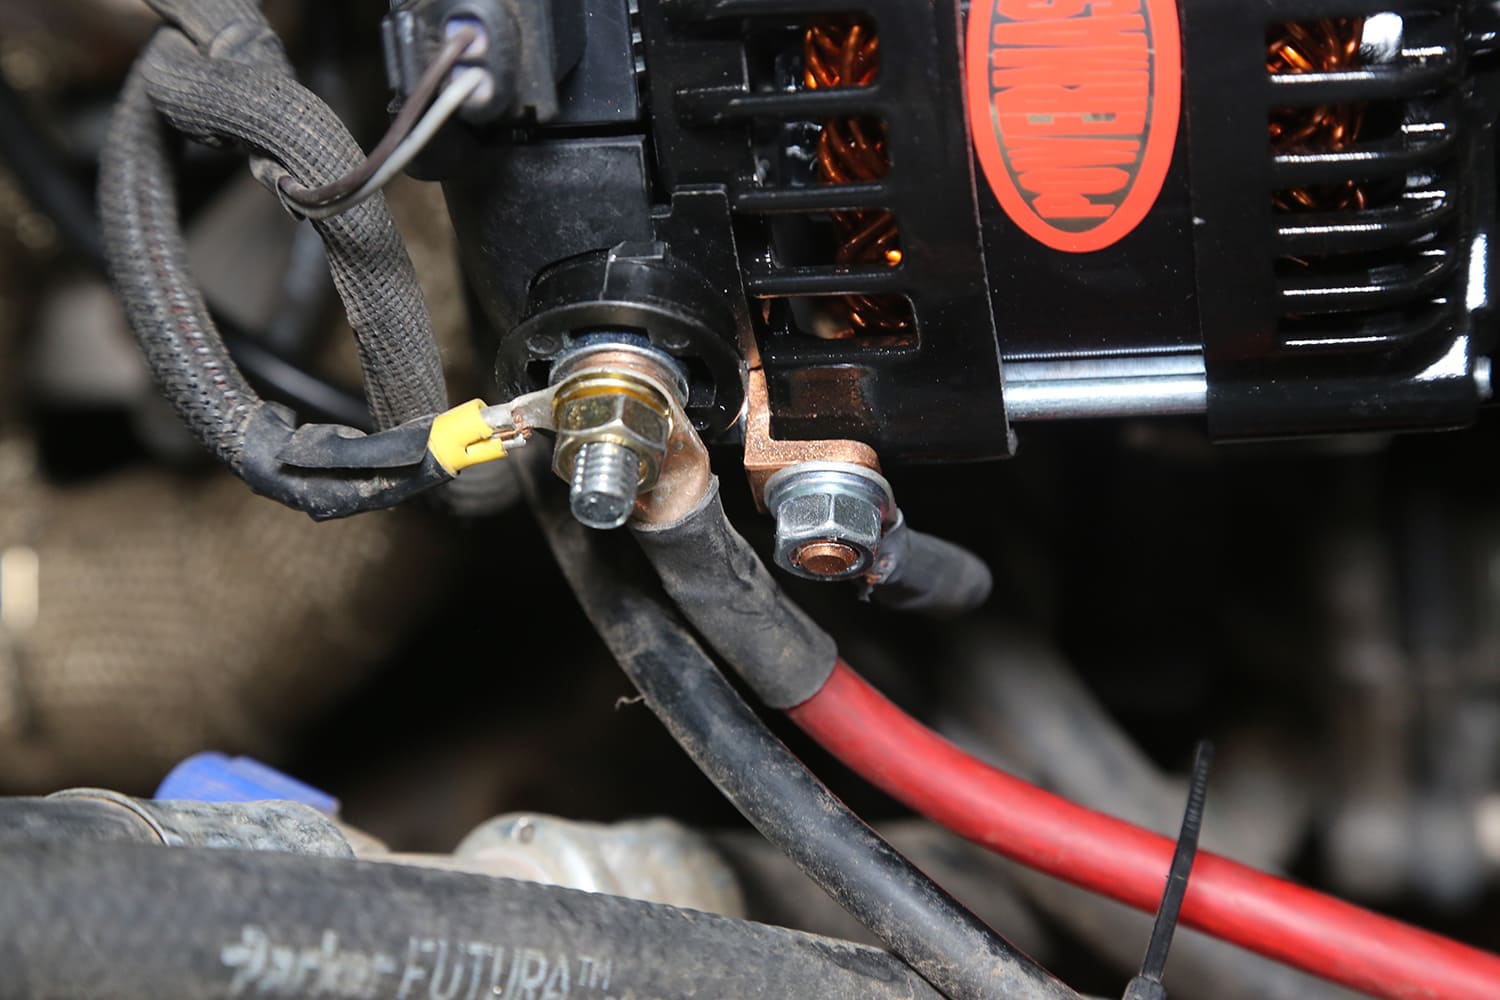
Nope. It just isn’t. In the car audio world, we have what is called the “big three,” which is replacing the alt to battery, battery ground to chassis, and battery ground to engine wires with larger-gauge wire. Powermaster recommends four-gauge wire from the alternator to the battery for any system up to 175 amps, above that you need two-gauge wire. DC current flows from negative to positive, so the grounds are equally as important as the positive side and these wires must be the same size. You can go larger than needed, which won’t cause any issues but never go smaller.
Powermaster HPR alternators have a separate ground lug for grounding the alternator body to the chassis, which fixes the poor grounding issues common with grounding through the mounts. This wire should bolt directly to the block. Use high-strand wire, which has more surface area for the current to flow through and smaller gaps between the strands where corrosion builds.
Another note about these alternators is that they are available with three different types of pulleys. The factory pulley is a decoupler type, which allows the alternator to spin down slower than the engine to reduce belt wear and vibration. The other options are clutched (same concept as the decoupler) and solid. For most applications, the decoupler pulley works best.
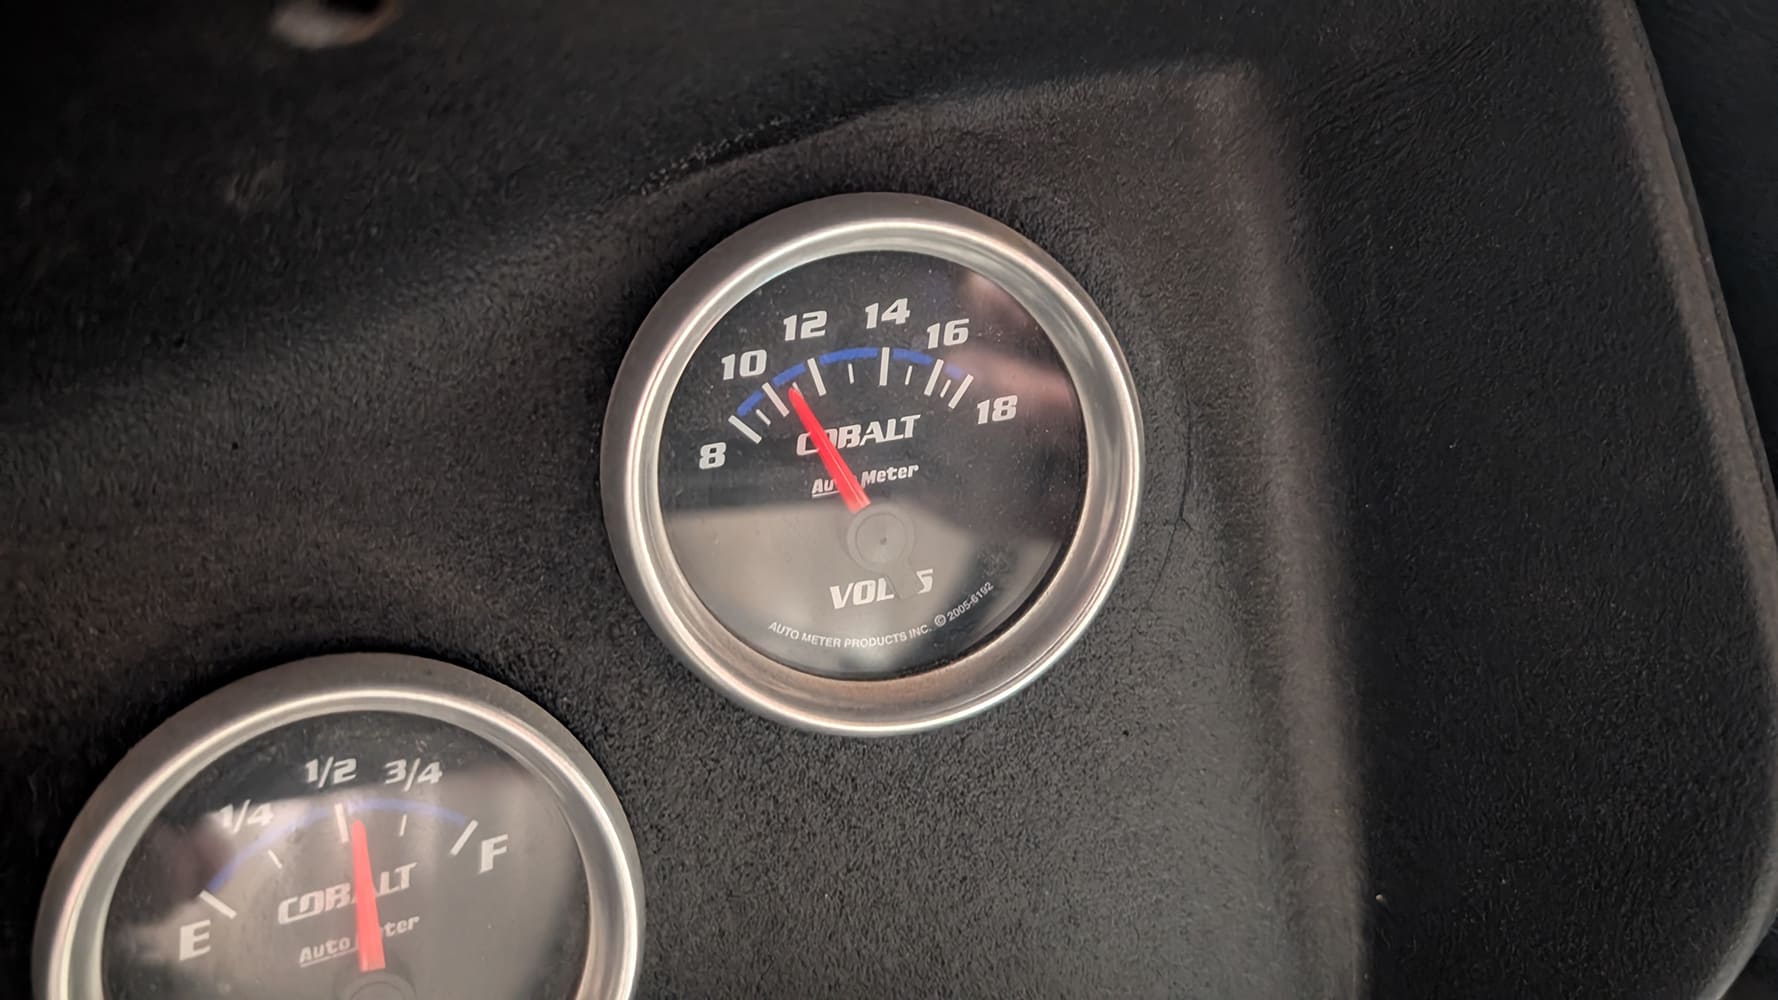
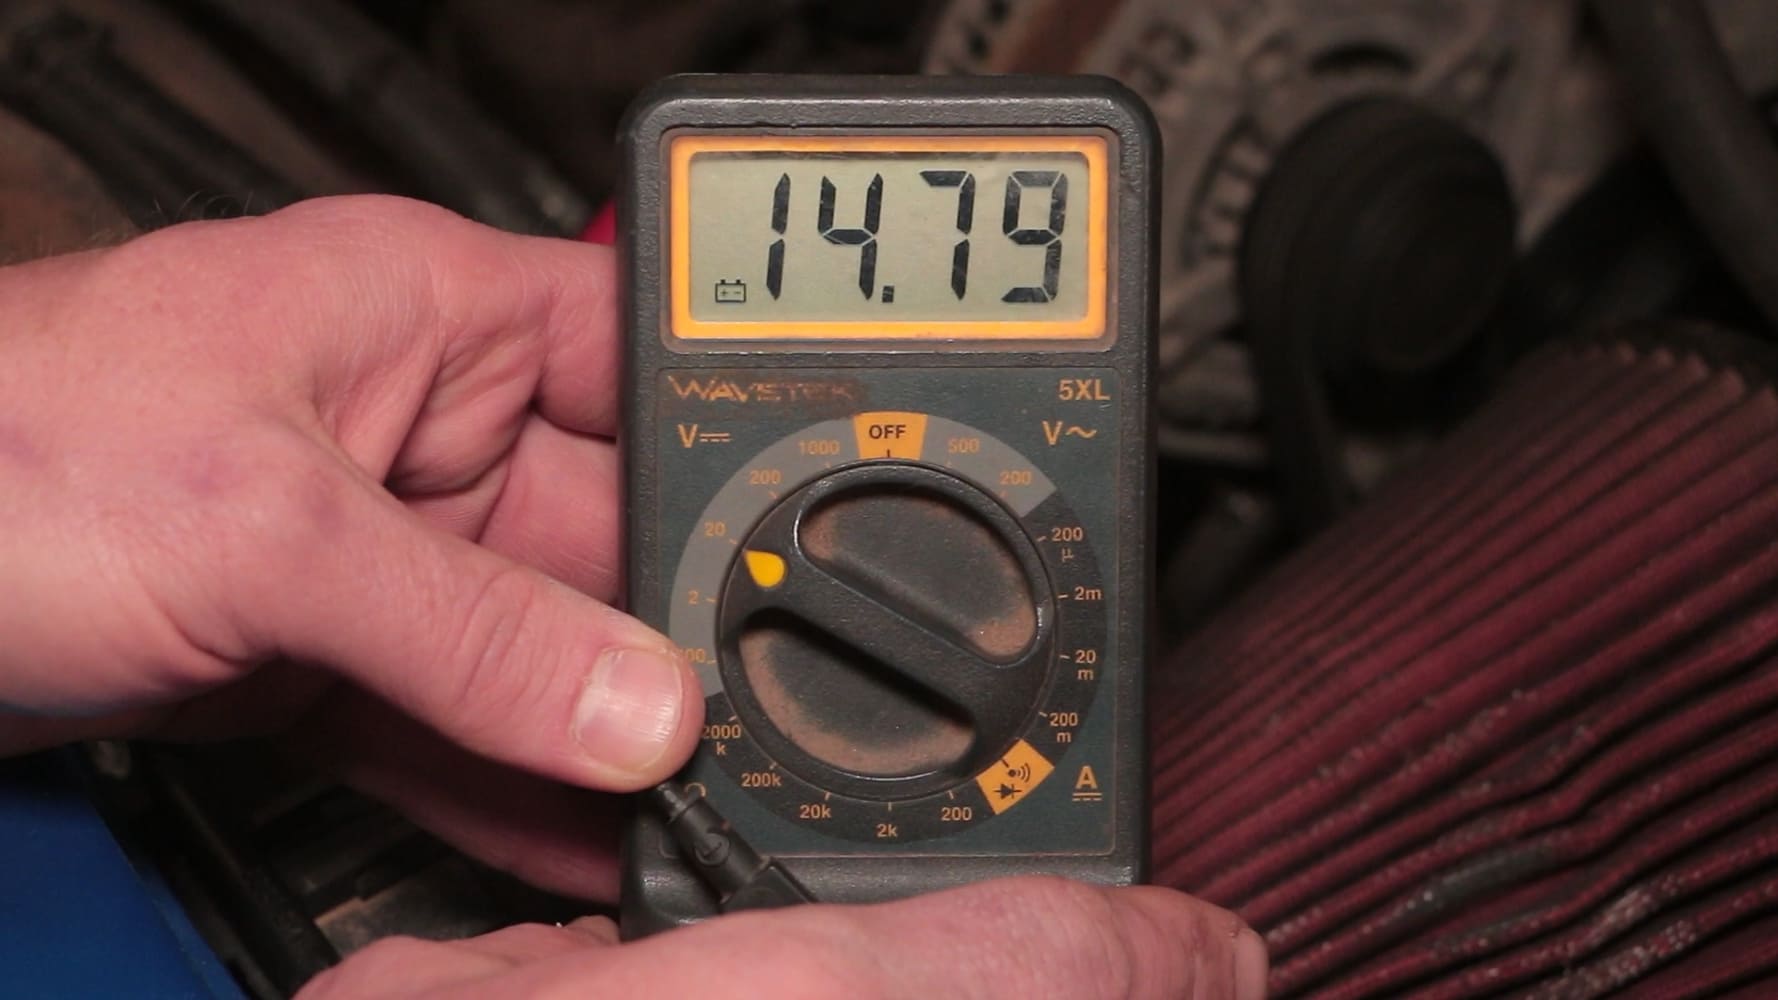
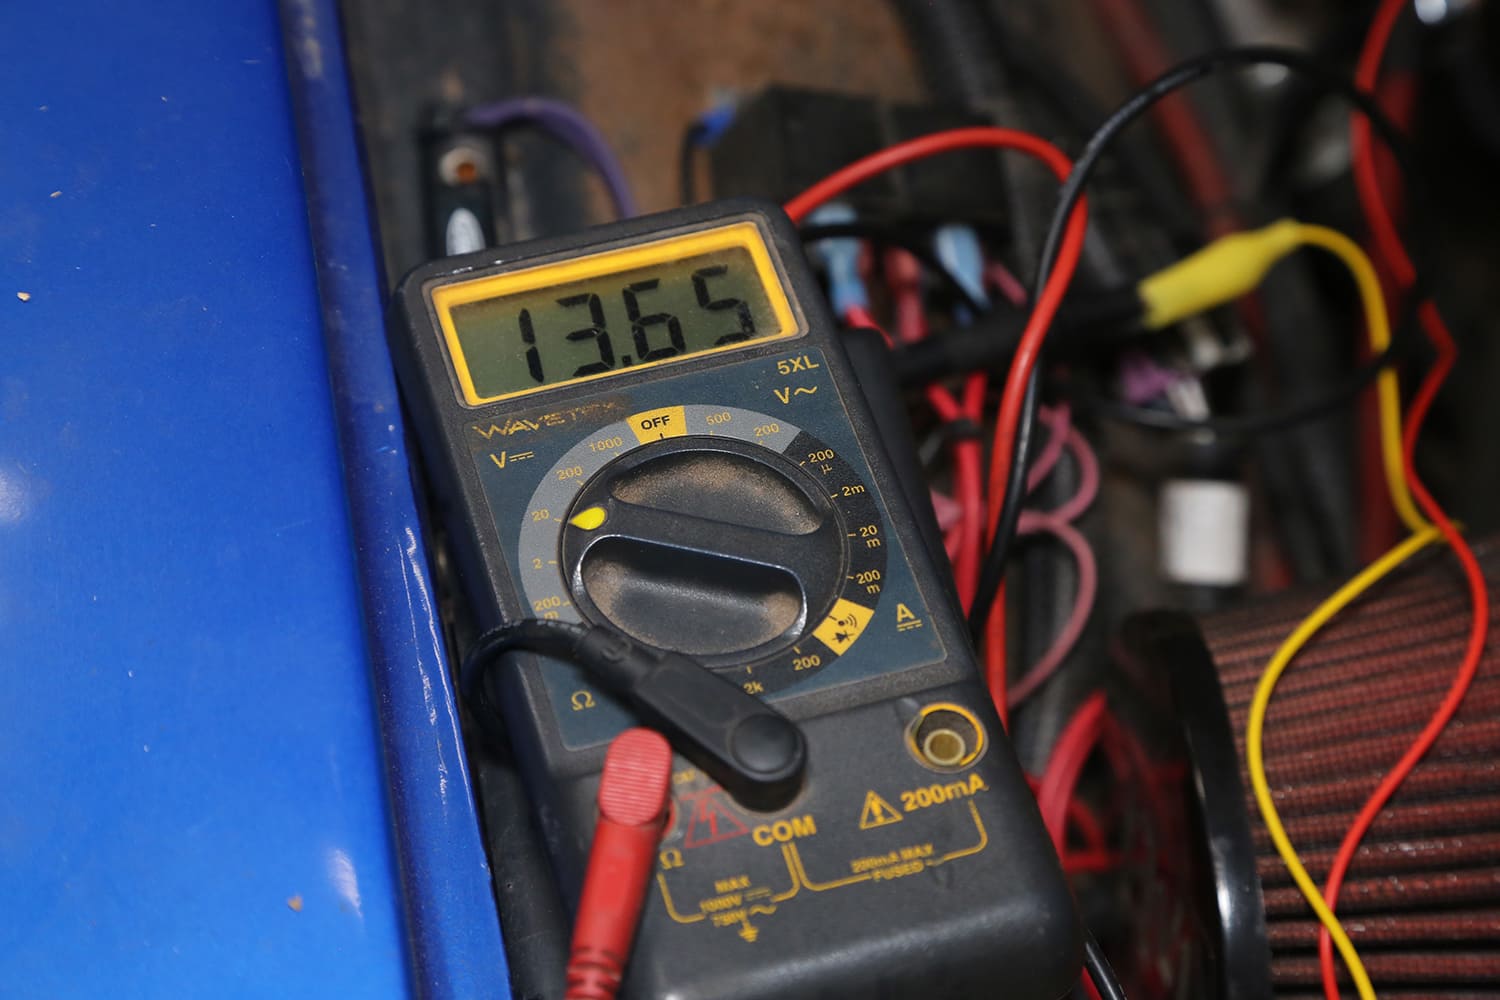
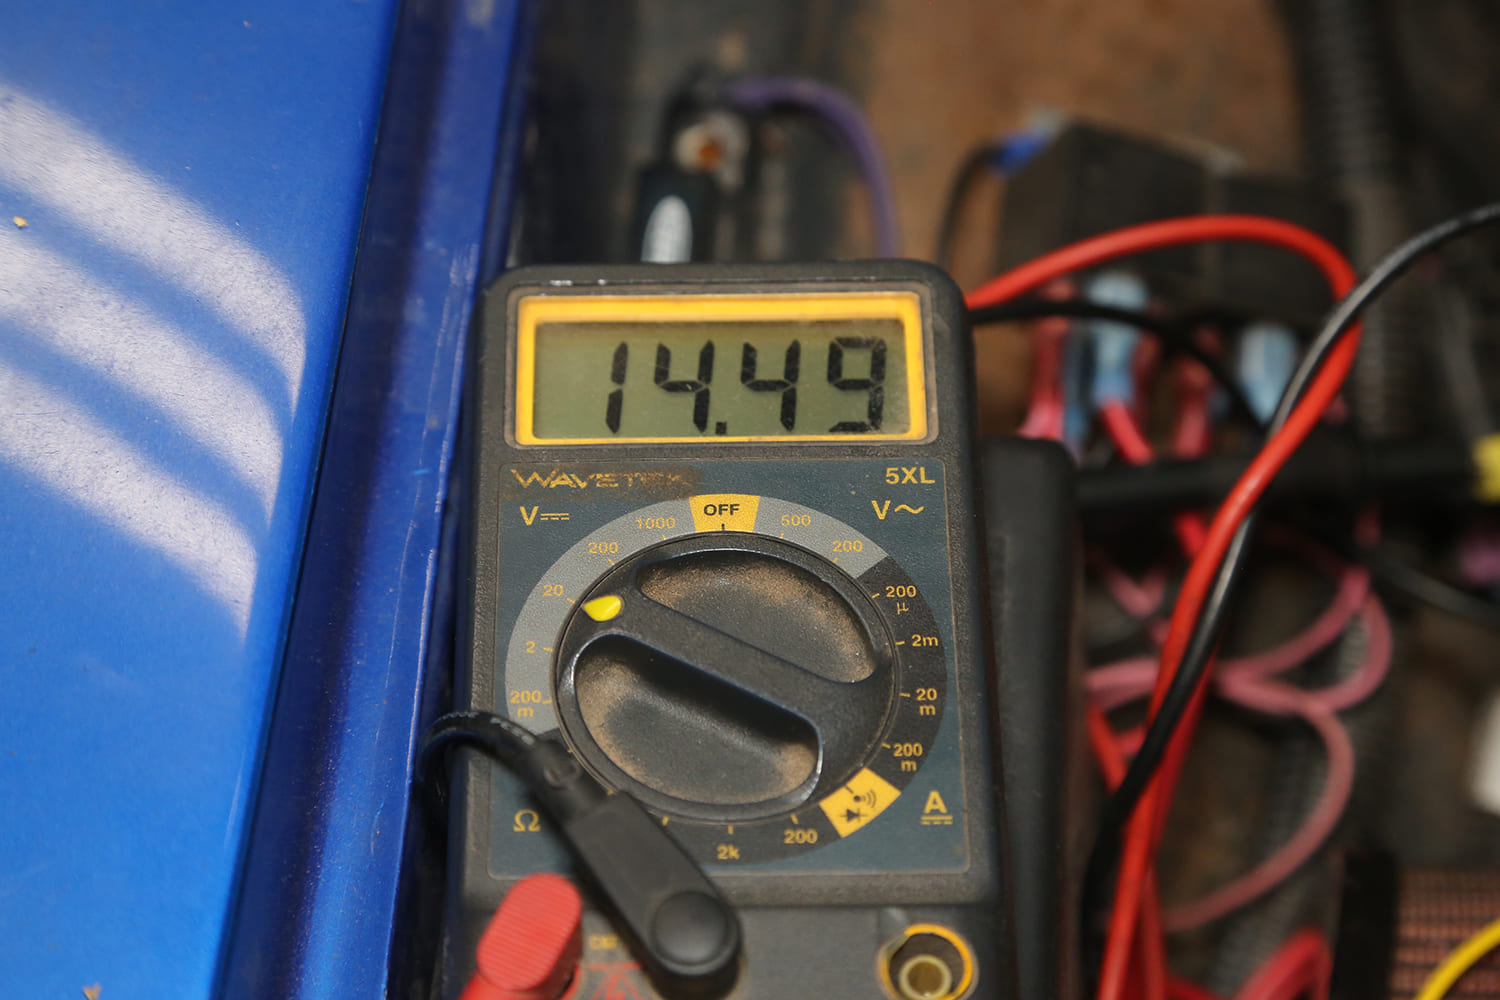
We swapped out the stock alternator on our Chevrolet Performance LT1 crate engine, which uses the Chevrolet Performance ECM and harness. The swap took less than 5 minutes. The hardest part was loosening the belt tensioner (air inlet tube and radiator hoses were in the way), the rest was easy-peasy. We tested both alternators in two configurations: ECM connected and disconnected. Both alternators tripped the generator fault code when unplugged and turned it off when connected. The biggest difference was the output voltage. The stock alternator output voltage was 13.2 unplugged and ranged from 13.9 to 14.7 when plugged in. The Powermaster alternator was more consistent, it had the same output voltage when unplugged and connected to the ECM with a range of 14.1 to 14.4 once activated. That is one minor item; one-wire alternators need to be revved to about 1,500 rpm for a couple of seconds to trigger charging. If you start the engine and just let it idle, the alternator won’t start charging on its own.
Whether you are running a big high-output stereo system or lots of sensitive electronics in your LT-powered Chevy, consistent, reliable alternator power is a necessity. Modern electrical systems are complex, but in a race car or swap situation, you don’t have all the extra modules. Swapping out the stock PWM-controlled alternator is the best way to solve these issues. Plus, you get more potential current output, which just wins all around.
Check out this story in our digital edition here.


