DIY Floor Pan Rust Repair

How To Replace a Rusty Floor Pan on this 1964 Pontiac LeMans

By Barry Kluczyk   –   Photography By the Author

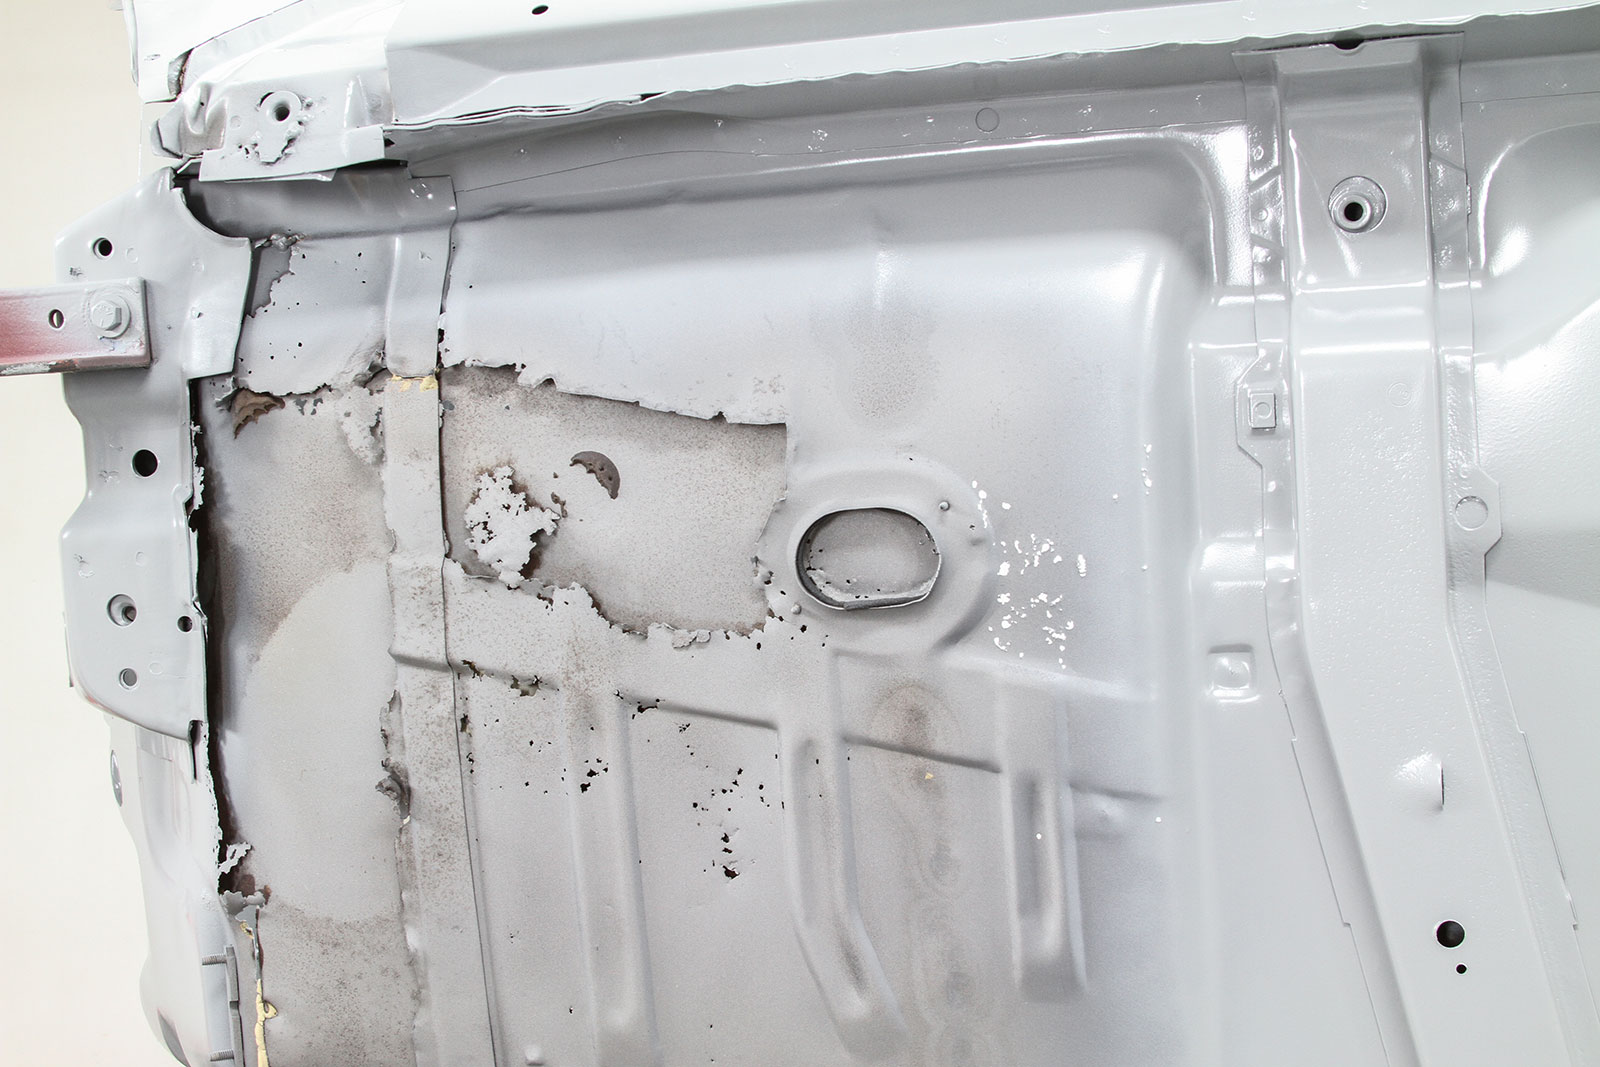
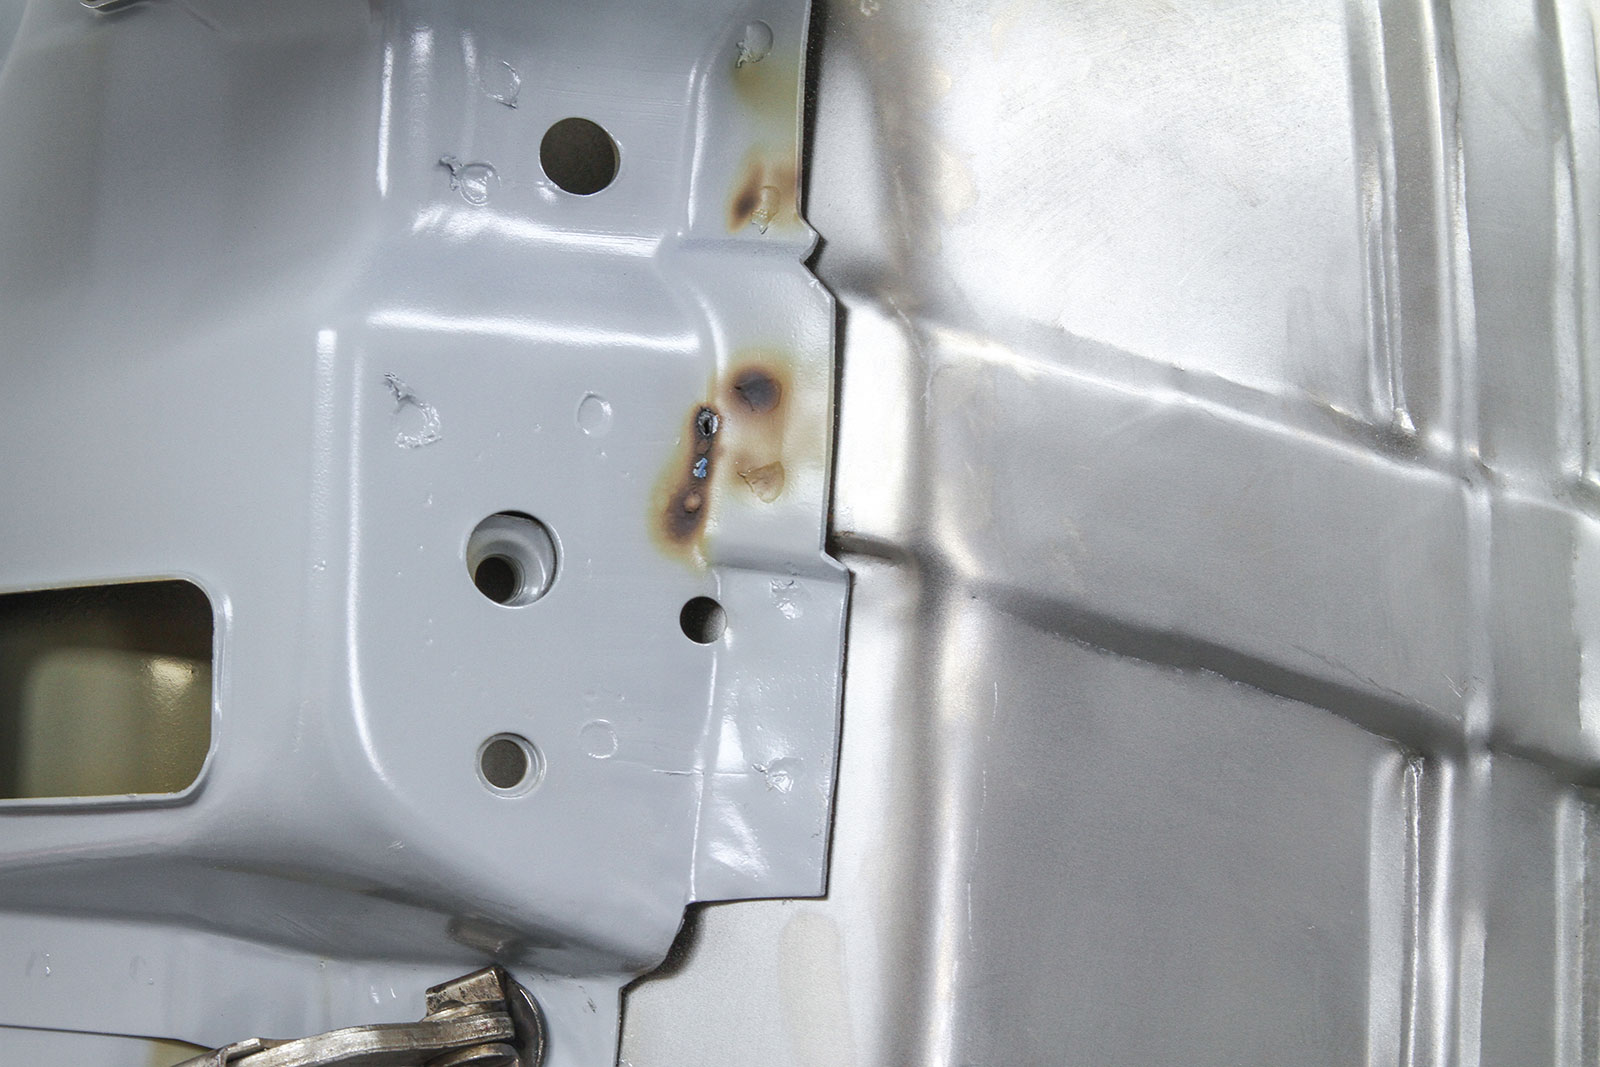
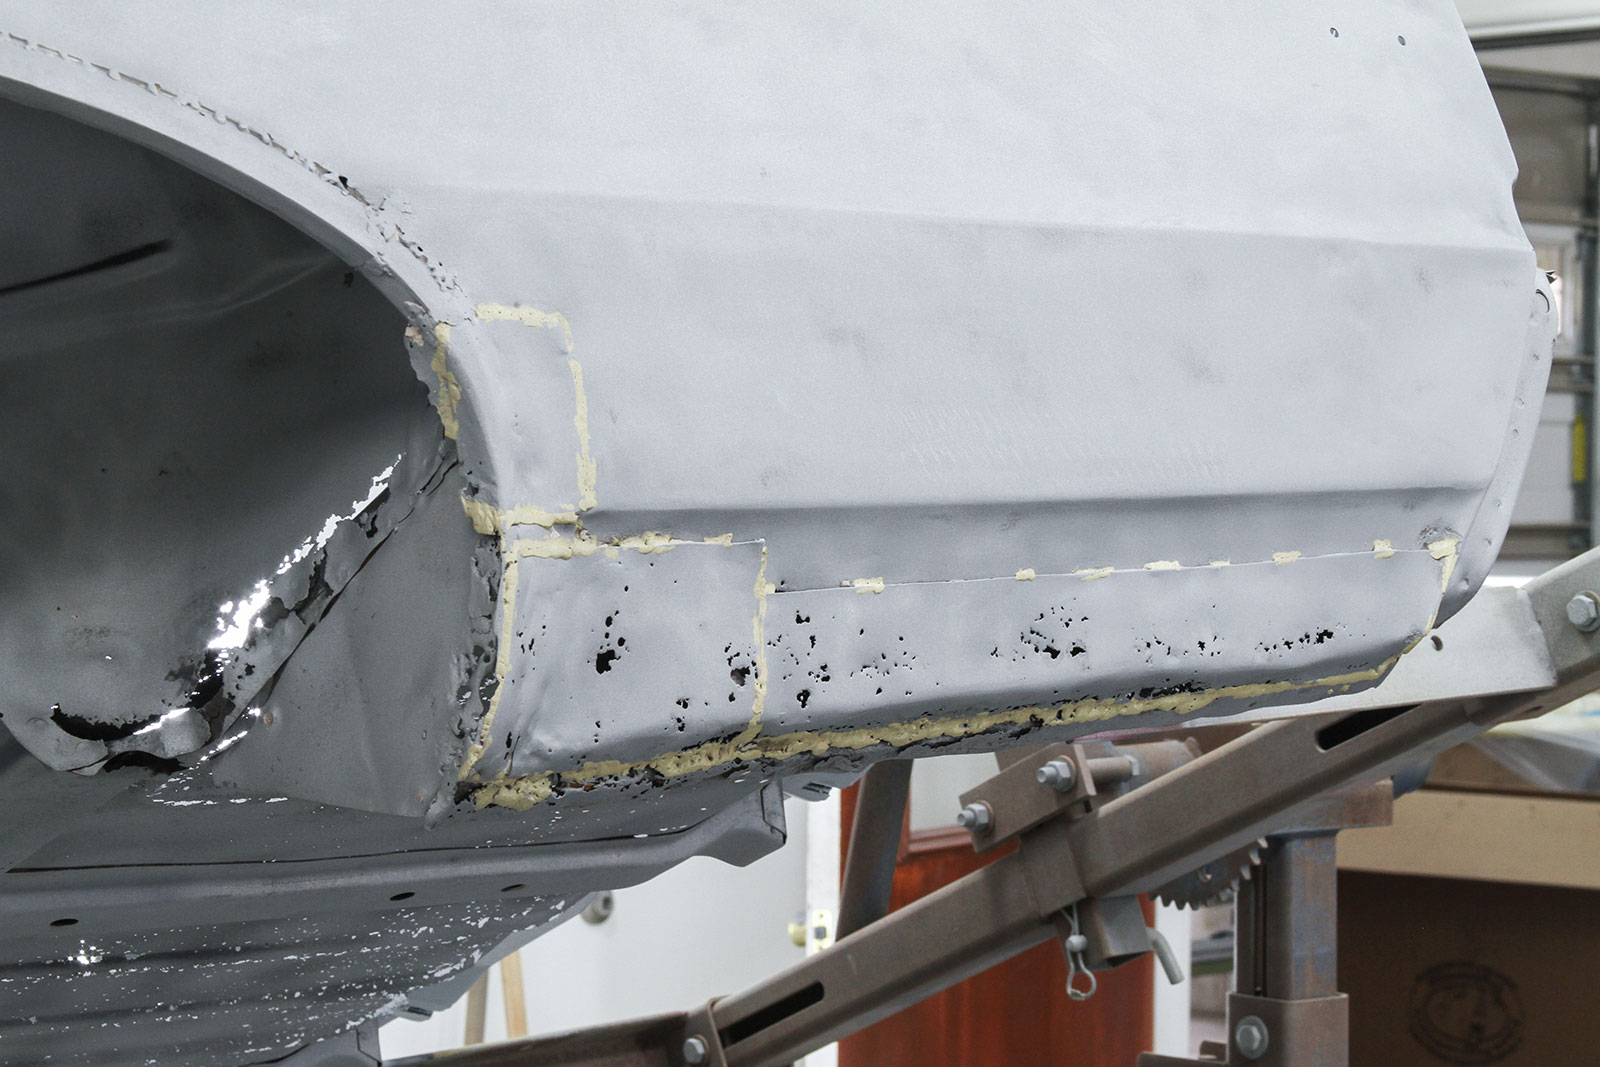
Whether it came from the bone-dry desert or the heart of the Rust Belt, corrosion is the bane of every piece of vintage car. Even if it’s not immediately visible in the quarter-panels or rockers, there’s a good chance water found its way to the crevices deep inside the body, in the toeboard panels at the front of the floor, in the plenum area in the cowl, and, very likely, beneath the trunk mat, turning the floor into sheet metal Swiss cheese.

- Advertisement -
02 A corroded 1964 Pontiac LeMans convertible after media blasting and primer application to prevent further oxidation
The starting point for the project is this comprehensively corroded 1964 Pontiac LeMans convertible, which suffers from the same rust issues as many vehicles of its era. The body was first media-blasted to reveal the extent of the corrosion. A layer of primer was sprayed on the bare sheet metal after blasting to prevent further oxidation during the bodywork stage of the restoration. Note, too, the temporary braces tacked in place from the windshield header to help keep the convertible body square as parts of its structure are removed.

Sure, there are exceptions to the rule, and we’ve all been amazed to discover rot-free steel, but if you or your preferred resto shop is planning a thorough reconditioning of your favorite chunk of Detroit iron, a measure of rust repair will more than likely figure into the project.

03 Revealed previous quick and dirty patch repair on the driver side floor pan of a 1964 Pontiac LeMans convertible
Not surprisingly, the stripped body shell revealed previous repairs, including this quick-and-dirty patch for the driver side floor pan. It was simply a sheet of steel tacked in place and surrounded by a hastily applied sealer. At least it kept the driver’s feet off the ground.

Read More: Timeless 1955 Ford Fairlane Victoria

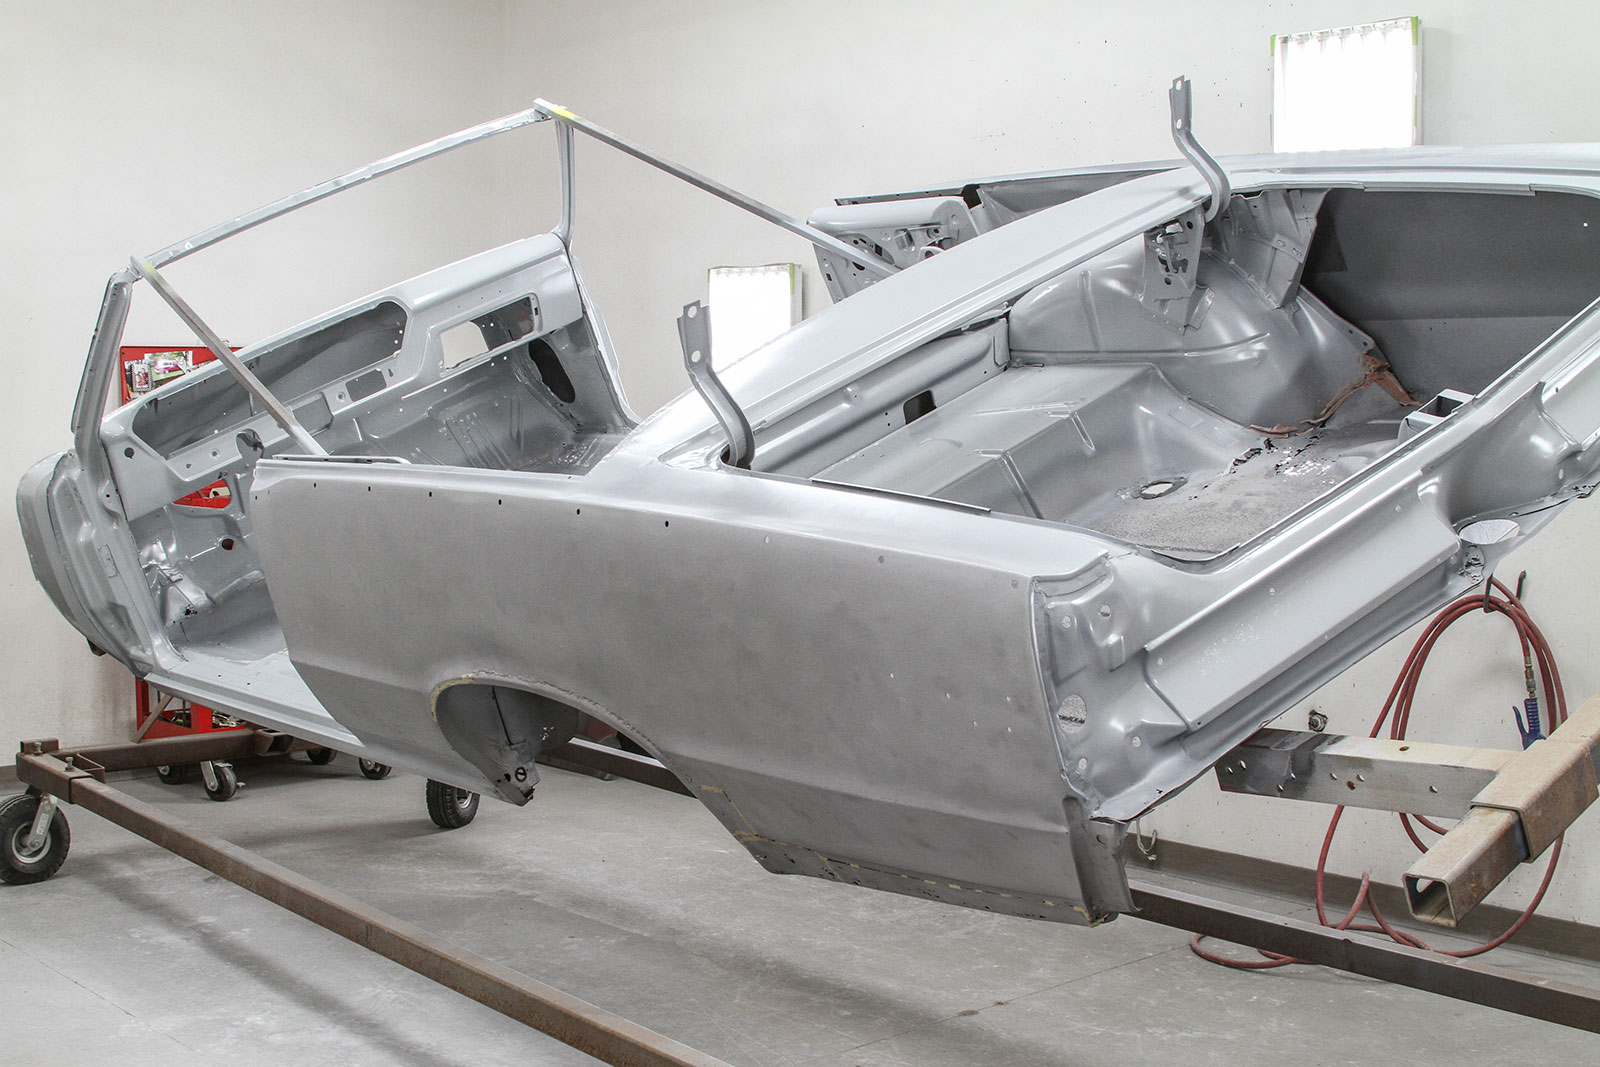
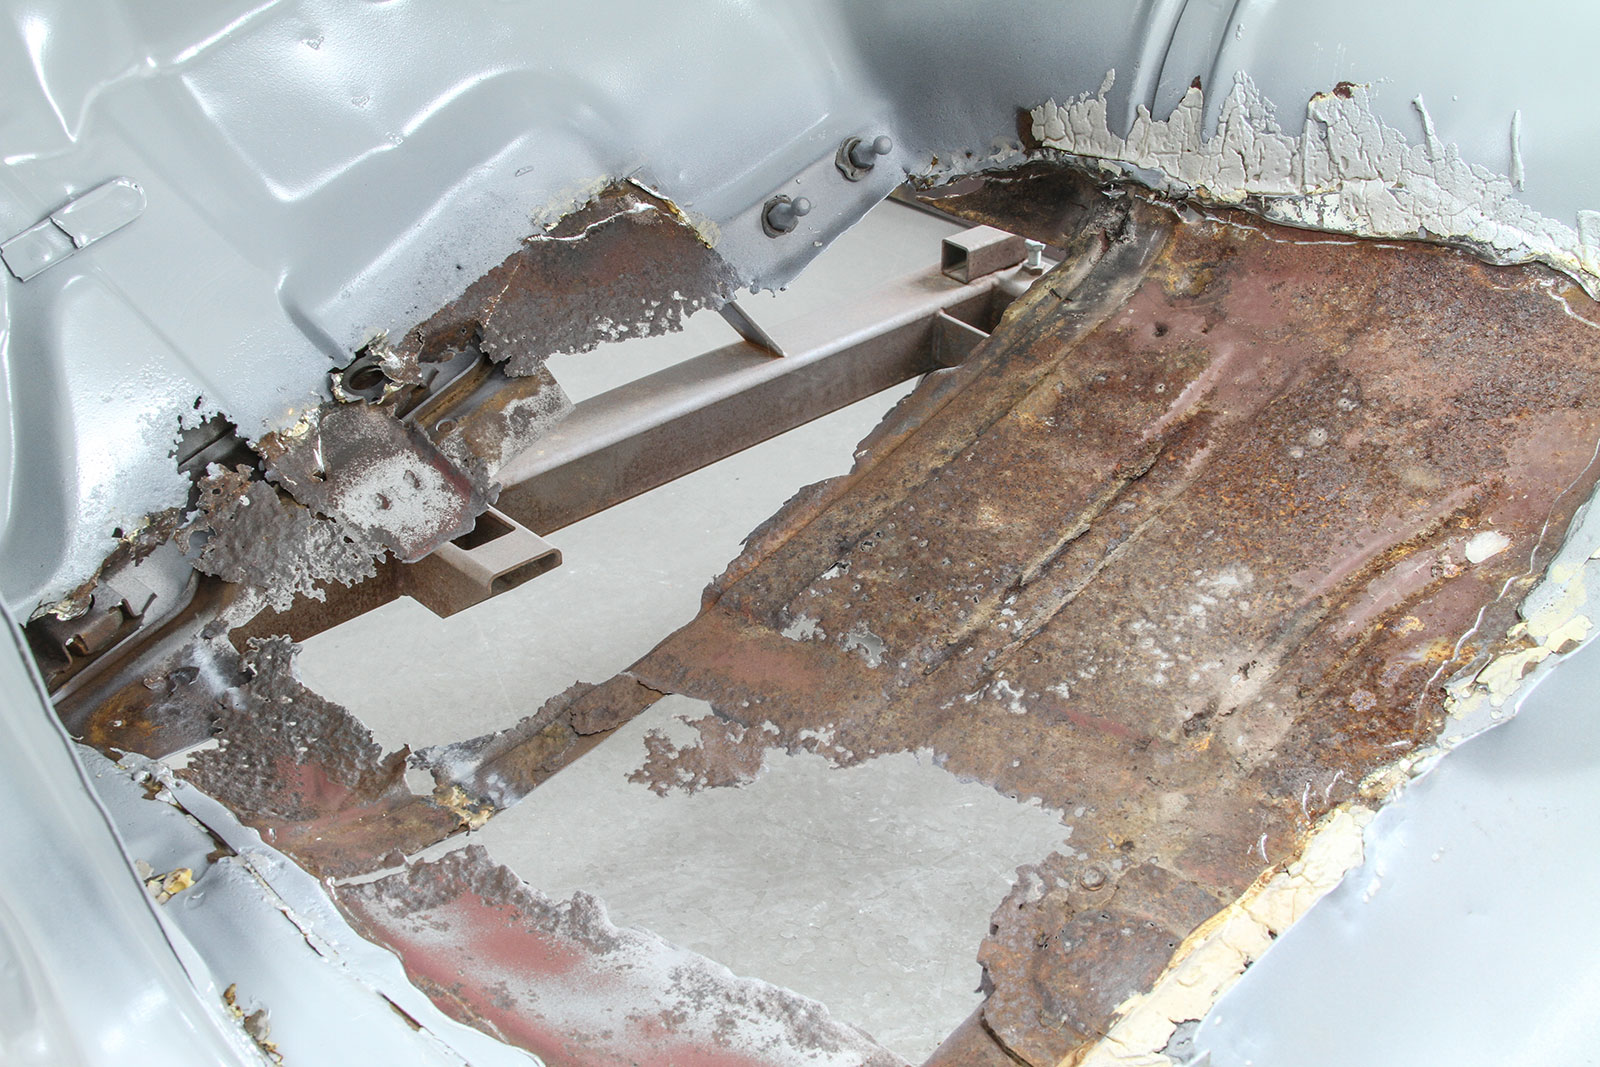
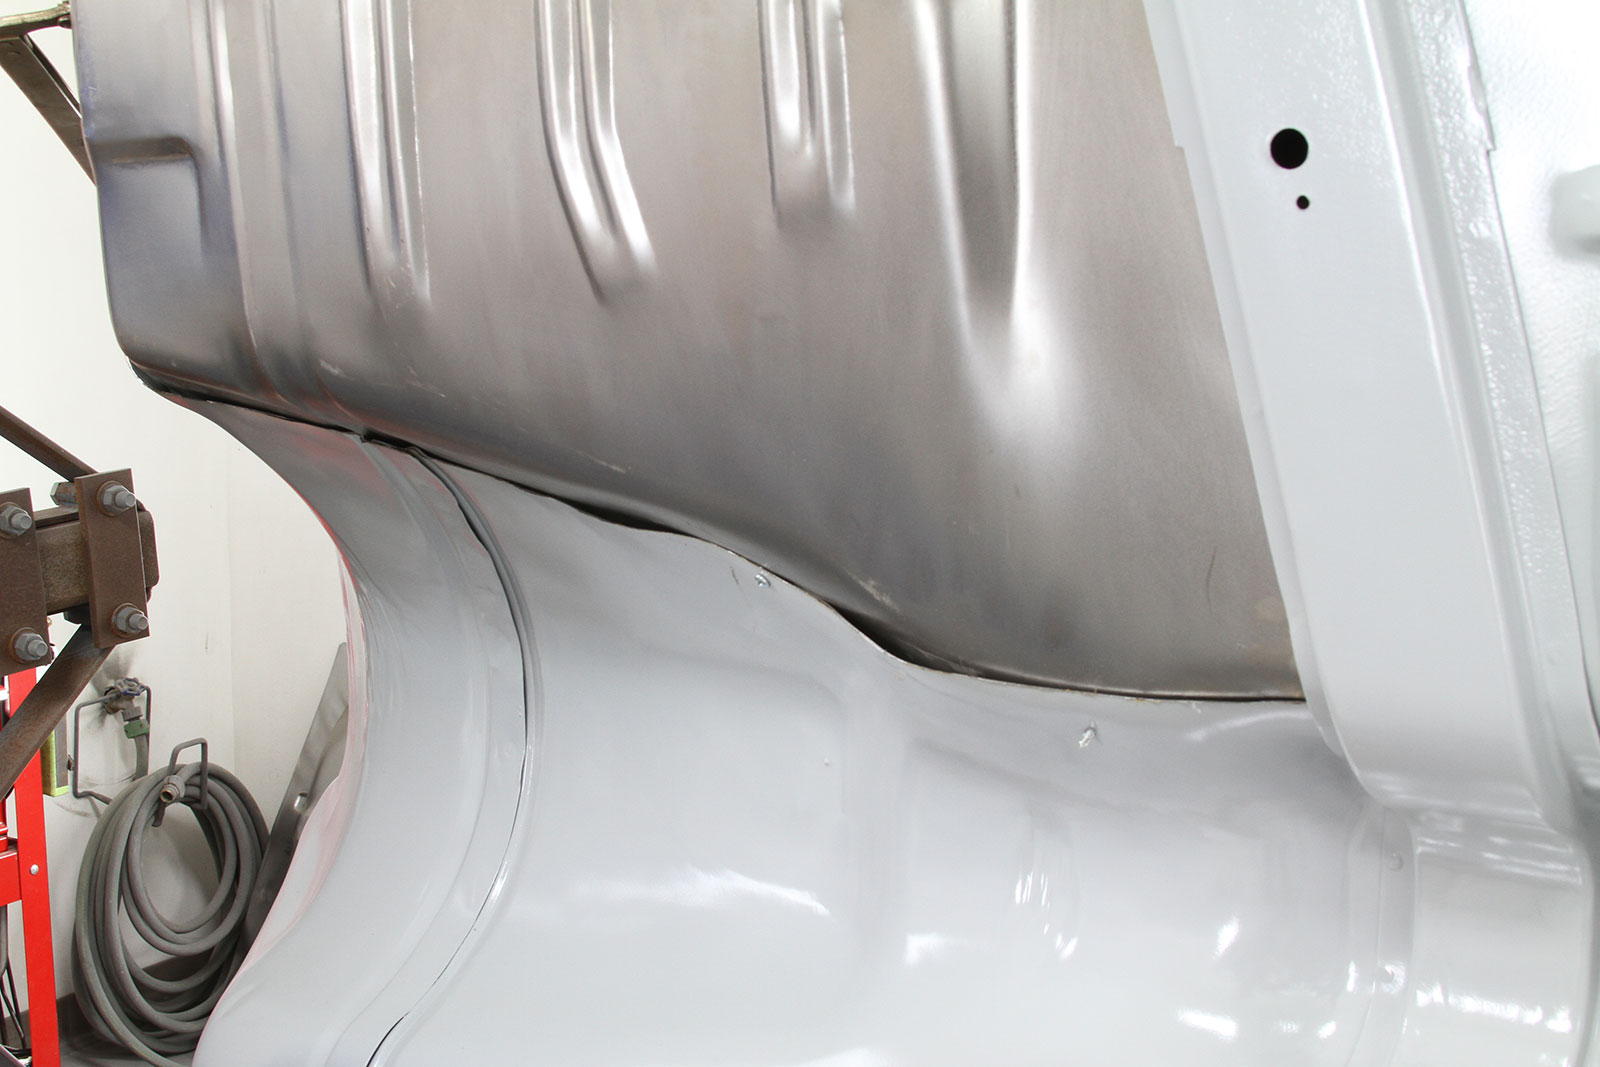
There was no question the 1964 Pontiac LeMans convertible (GTO same floor pan) project car in our story would need a date with a sheet metal surgeon. A Midwesterner all its life, the A-body suffered from typical corrosion from stem to stern. Previous patches kept the car on the road longer but couldn’t stave off the inevitable.

- Advertisement -
04 Passenger side front floor pan of a Pontiac LeMans showing extensive corrosion and need for replacement
It was the same story on the passenger side front floor pan. Worse even. Fortunately, the transmission tunnel was comparatively solid, so the metal work would involve replacing the individual floor pans rather than the entire floor of the car. The trunk, however, was another story and it would require a complete floor replacement.

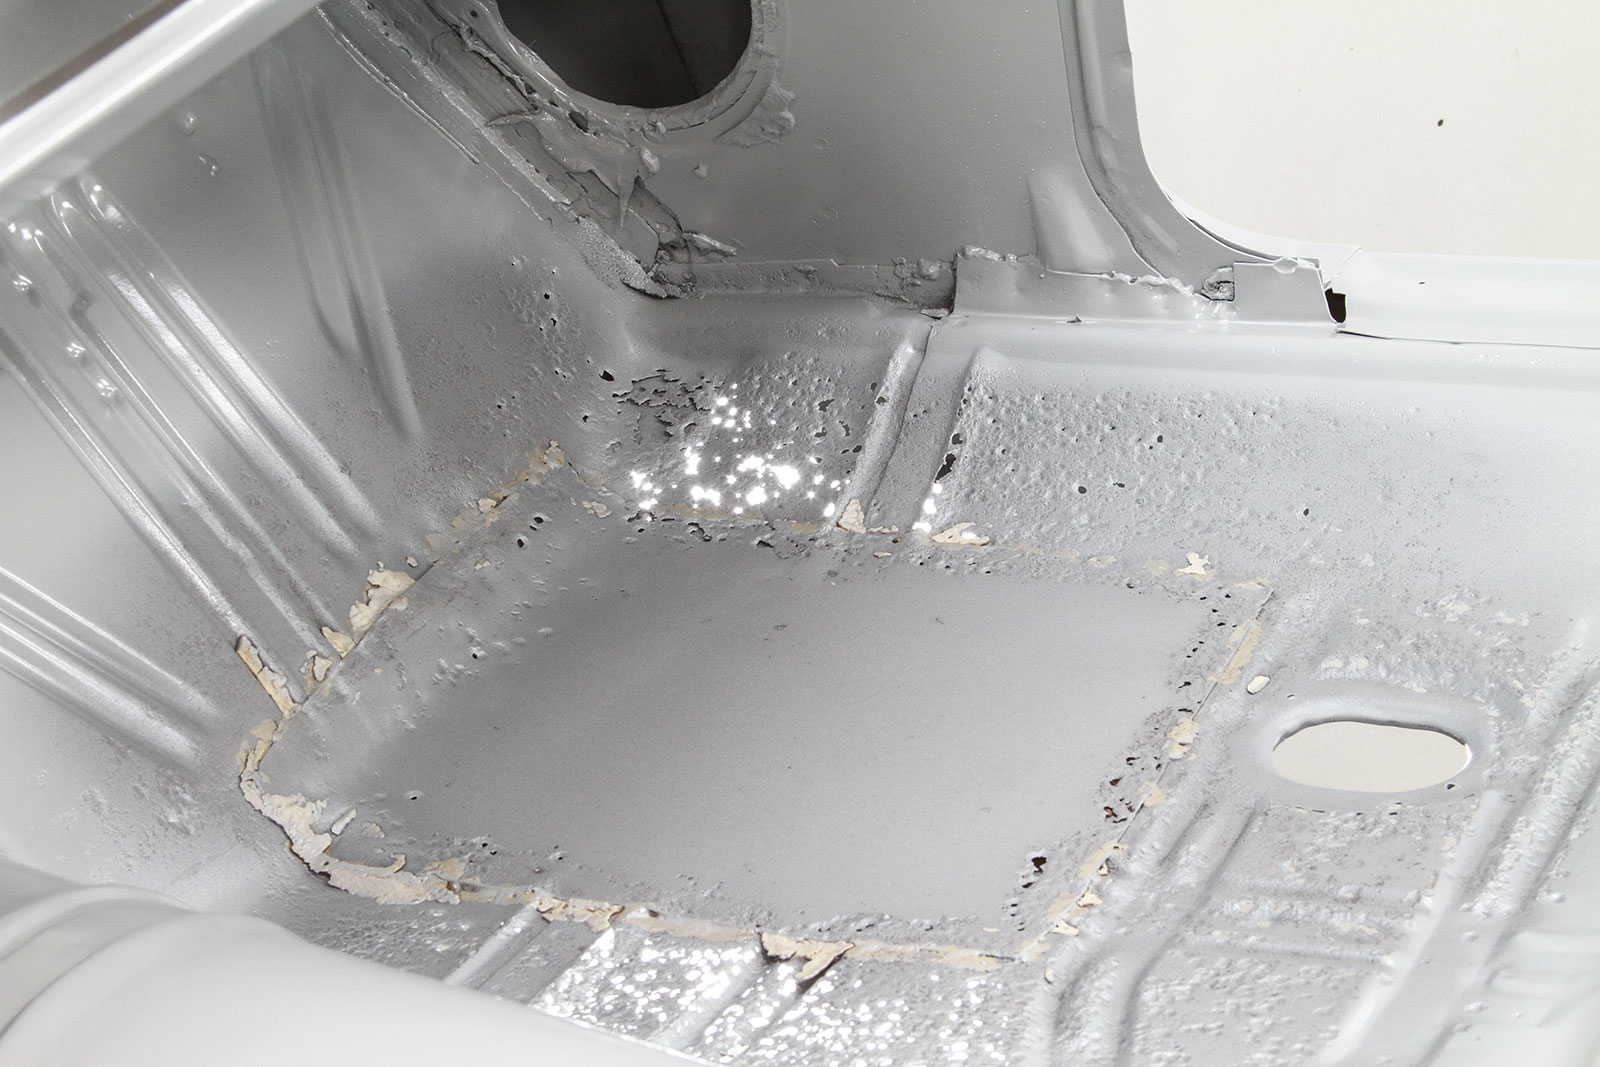
“You never know the full extent of the rust issue until you get the body stripped and media-blasted, but even before that we knew this one was going to need some serious attention,” says longtime and recently retired restorer Nyle Wing. “The car had been in the owner’s family for decades and he told us about some of the previous repairs, but even we were surprised to see rust holes literally from one end of the car to the other.”

05 Underneath view of the corroded floor pan and previous repair work on a 64 Pontiac LeMans convertible
Here’s a bottom-up look at the rot and previous repair. It ain’t pretty, but fortunately the damage is confined to the floor pan itself. Even better, the crossmembers and other structural components are intact and rust-free.

Read More: How To Retain Your Classic Car’s Original Frame

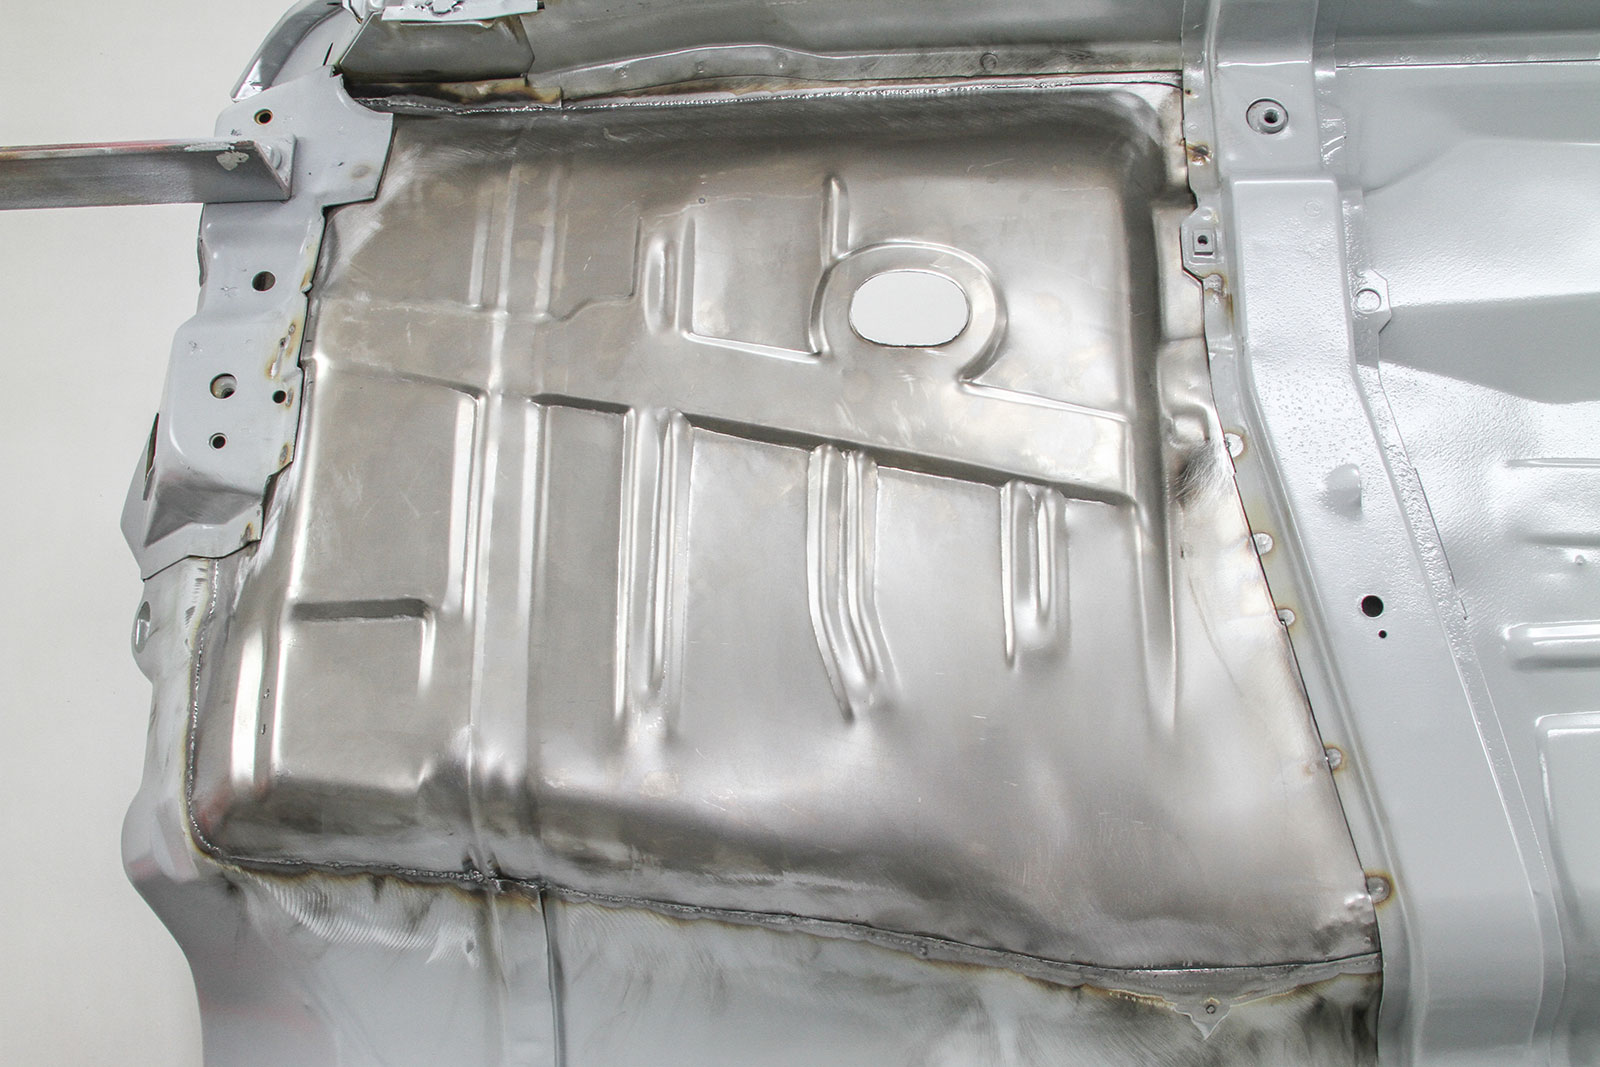
The extent of rot and patchwork throughout the Pontiac’s body was extensive and would ultimately take weeks of professional attention, but we caught up with the project to zero in on one of the more common repairs that DIY enthusiasts will attempt: floor pan replacement.

06 Removal of the previous patch panel from the floor pan of a 64 Pontiac LeMans using an air hammer
The first step in the repair is the removal of the previous patch panel. It doesn’t have to be pretty at this point, so an air hammer was used to simply cut around the inner perimeter of the panel.

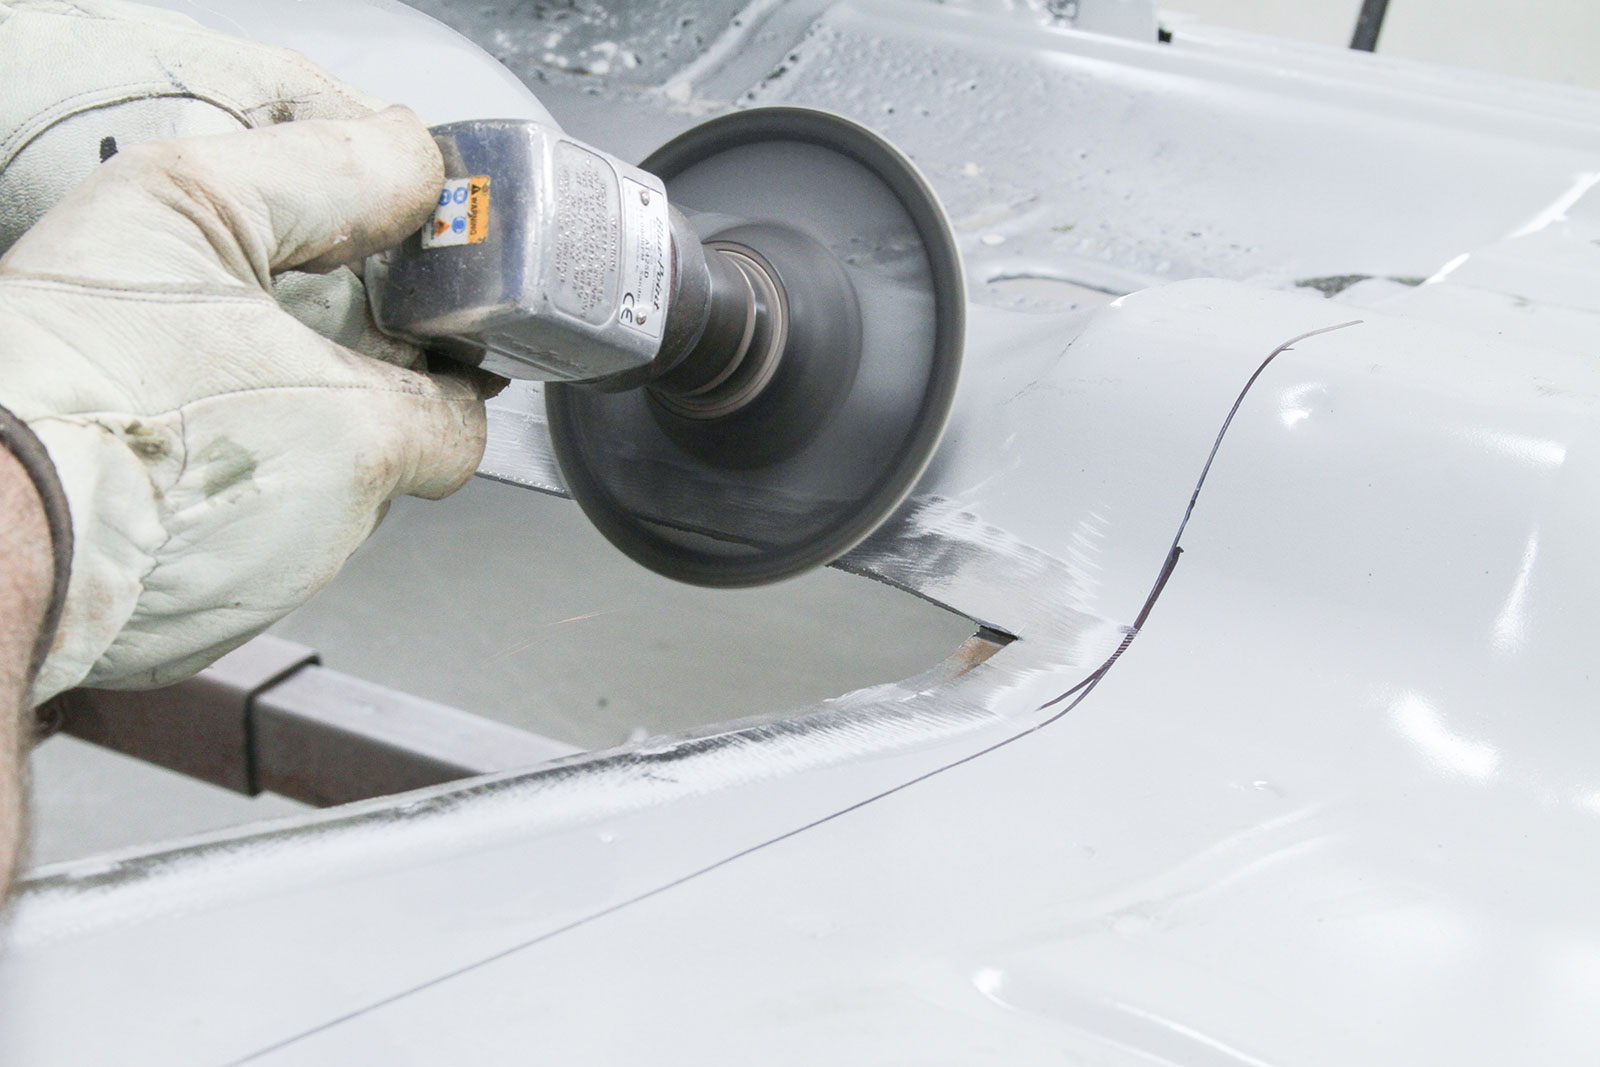
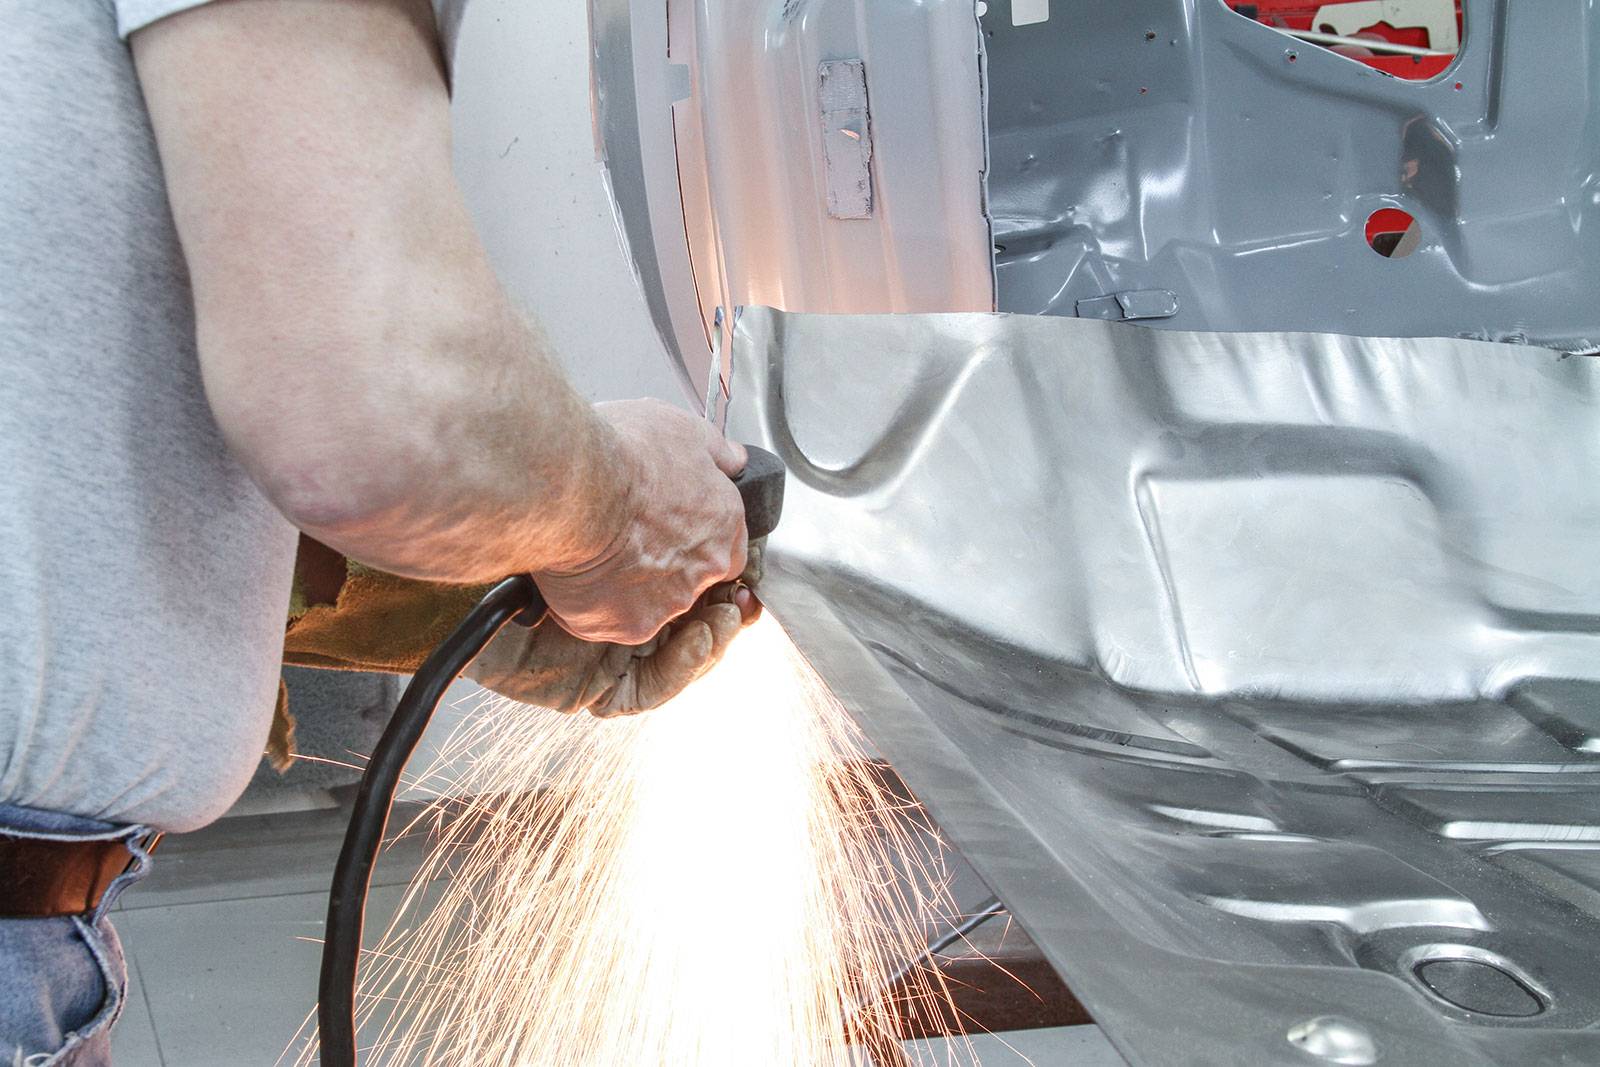
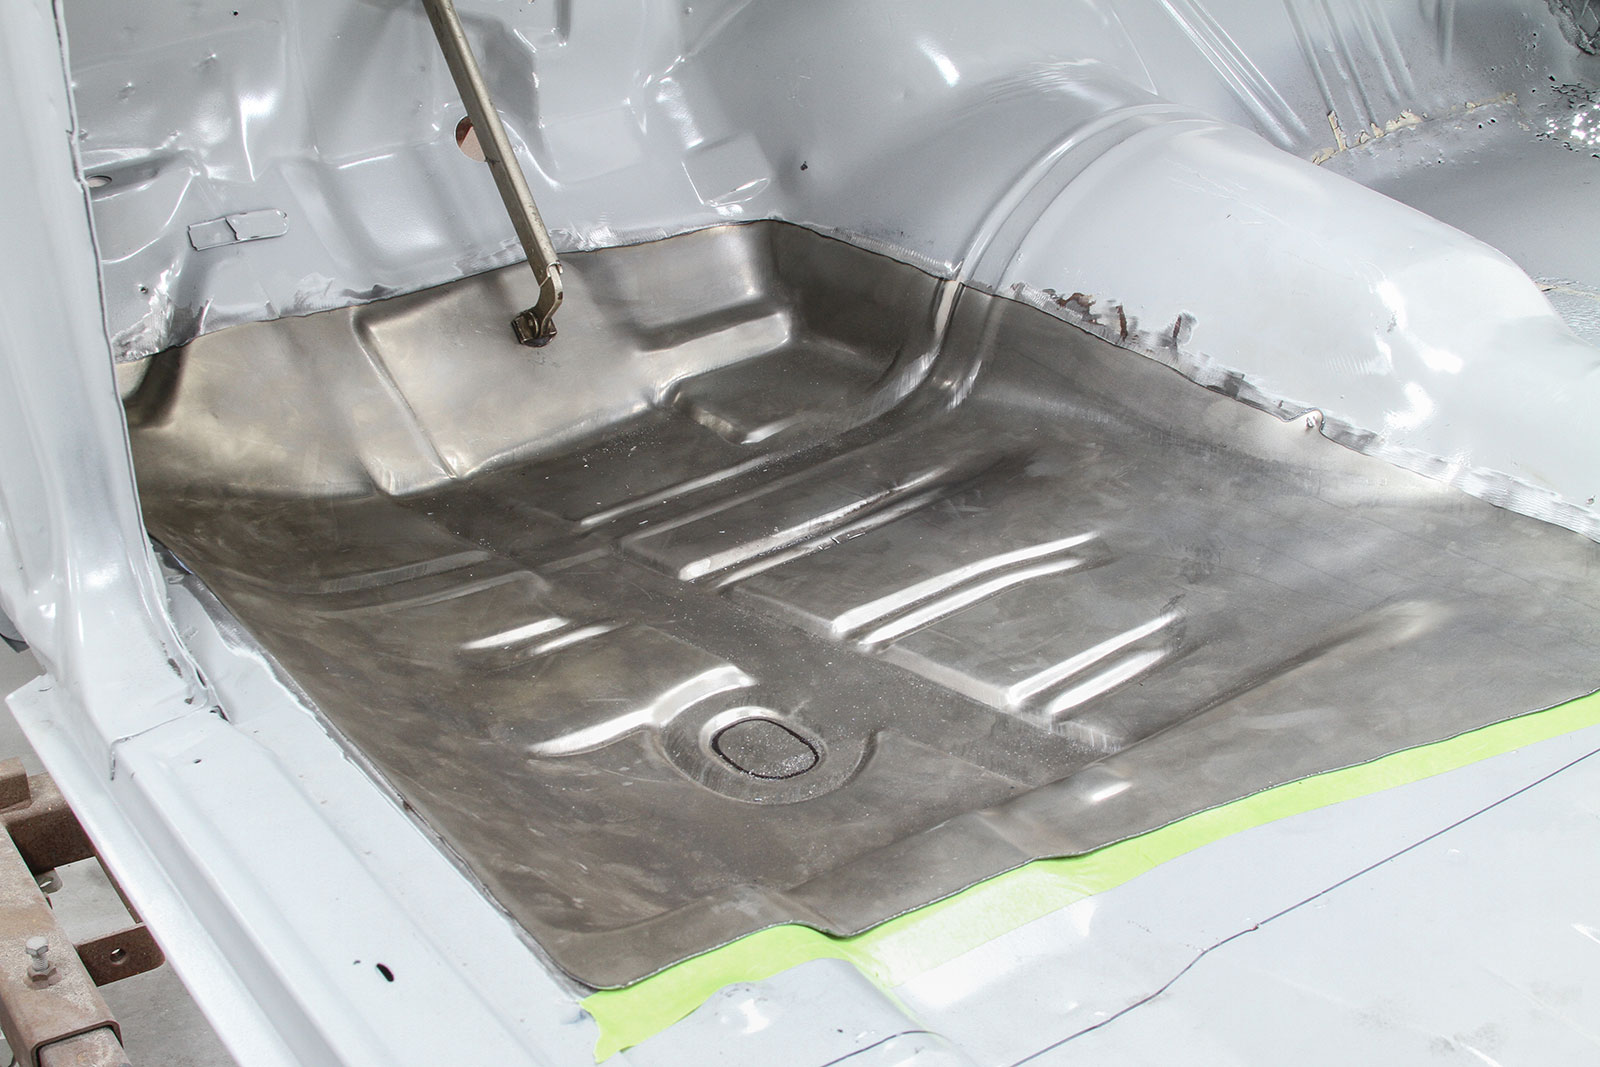
Floor Pan Replacement

- Advertisement -

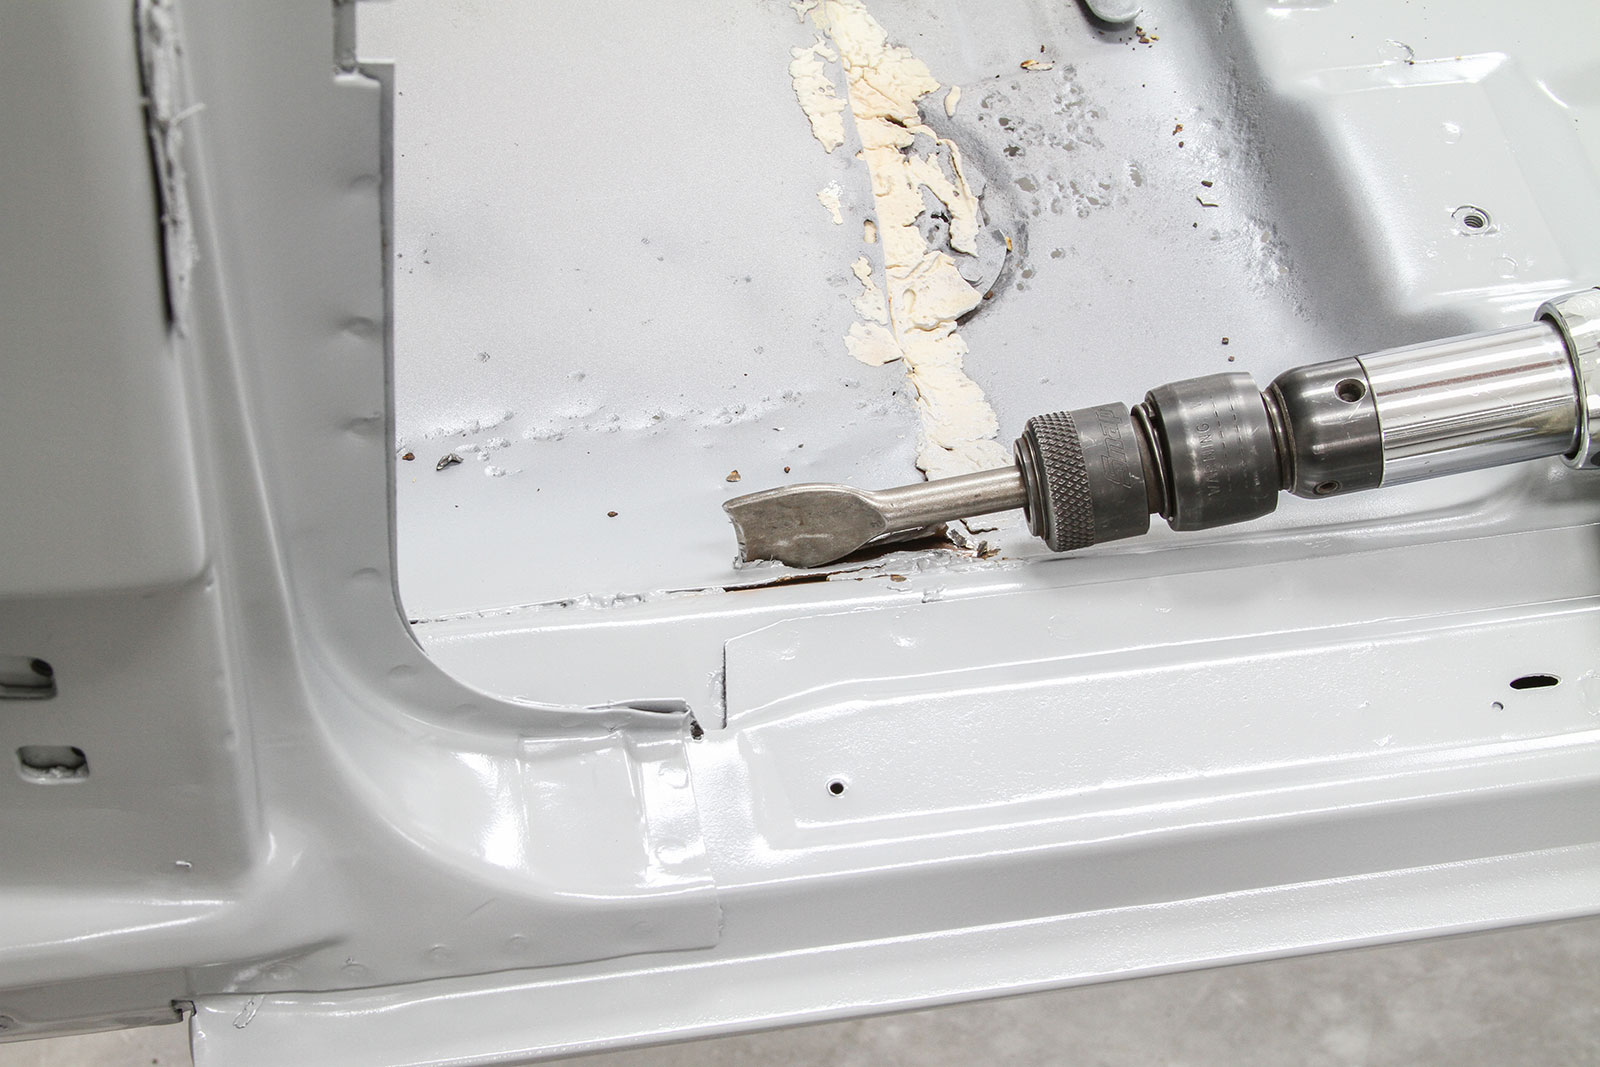
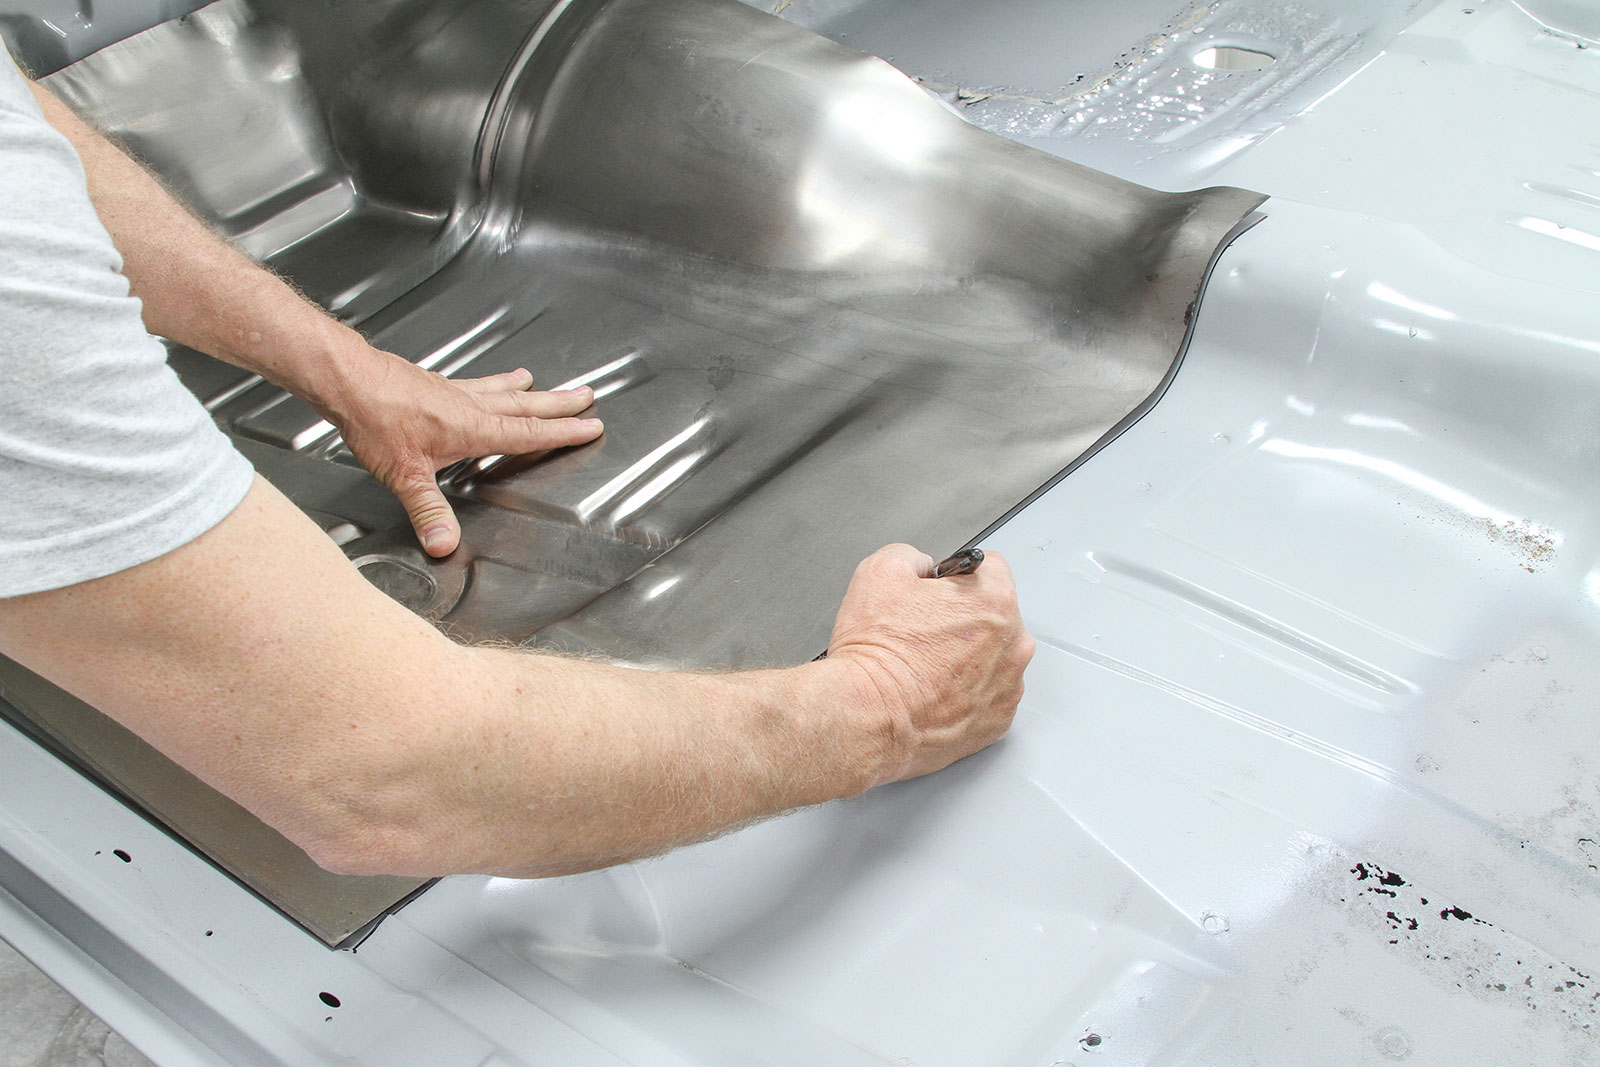
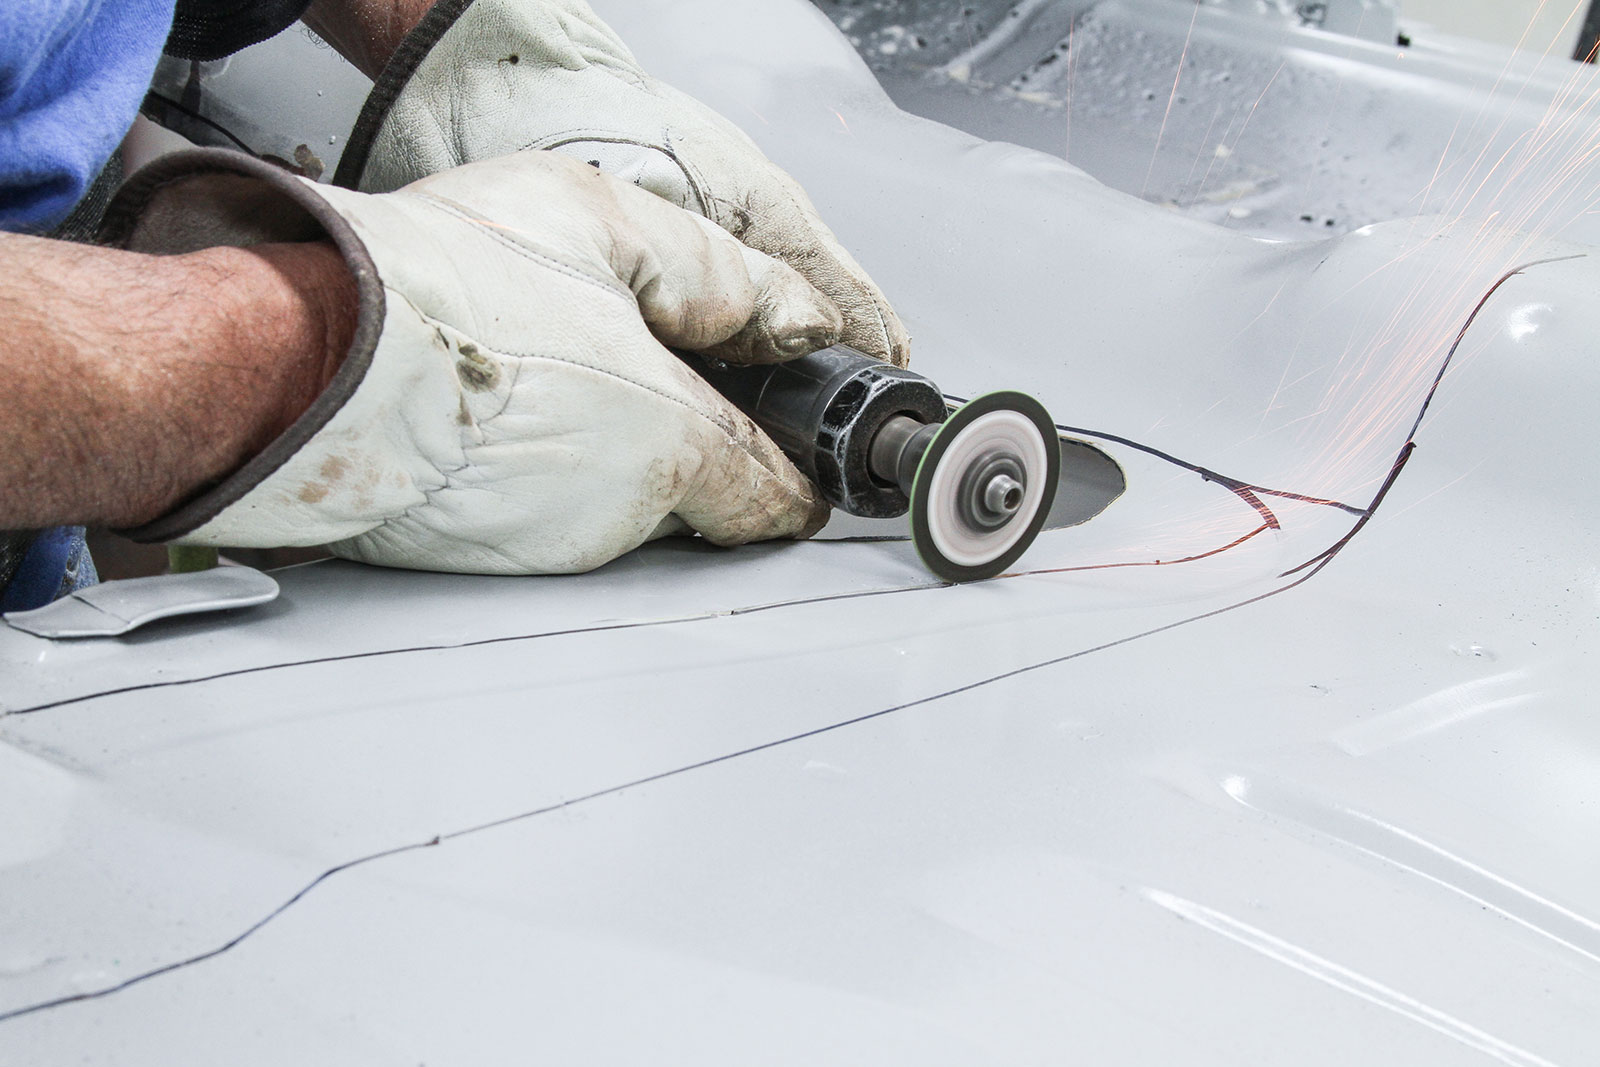
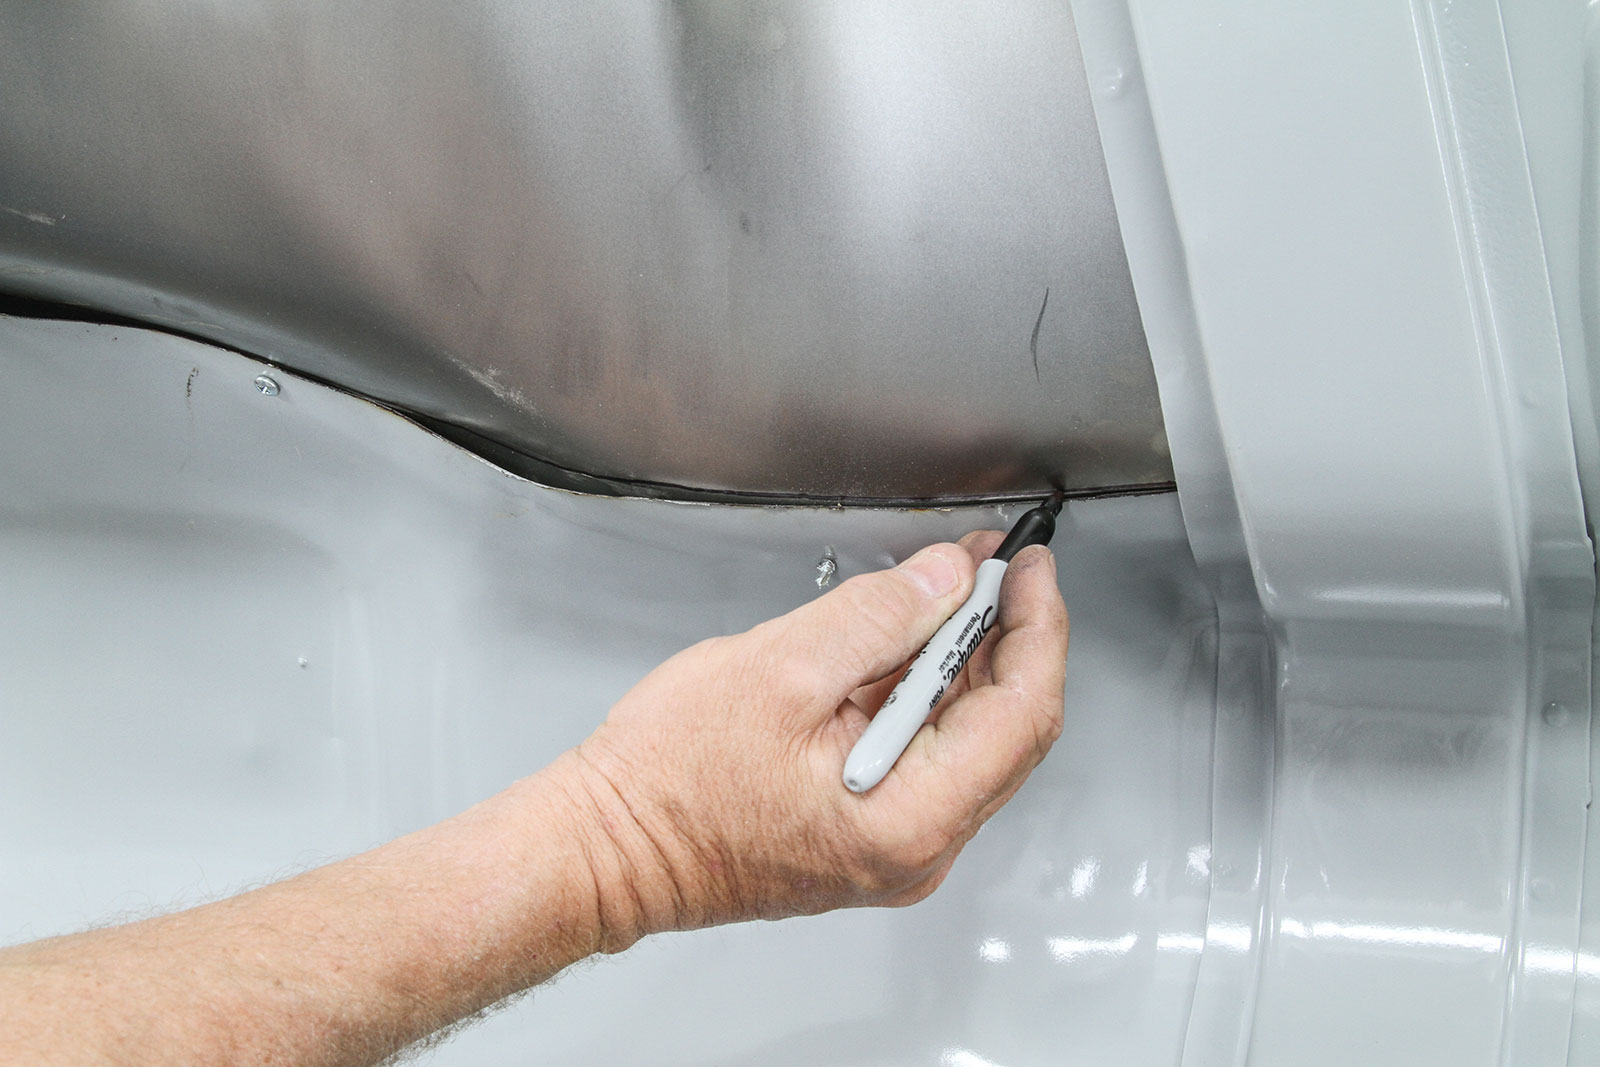
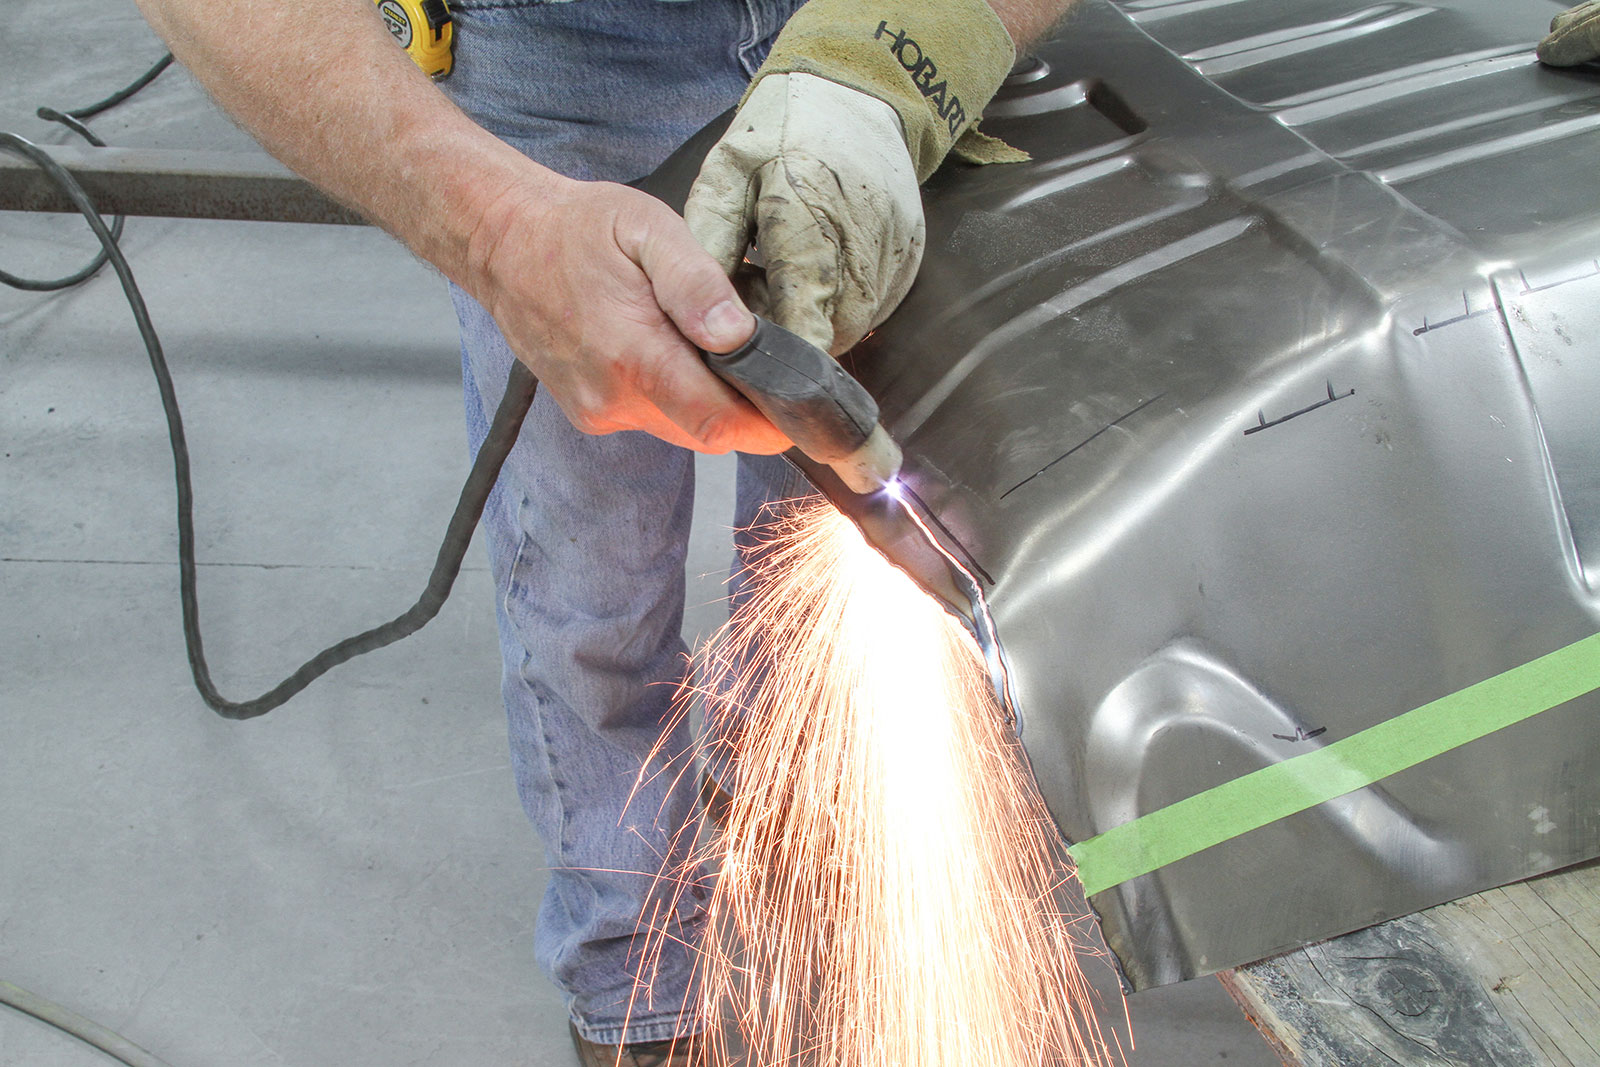
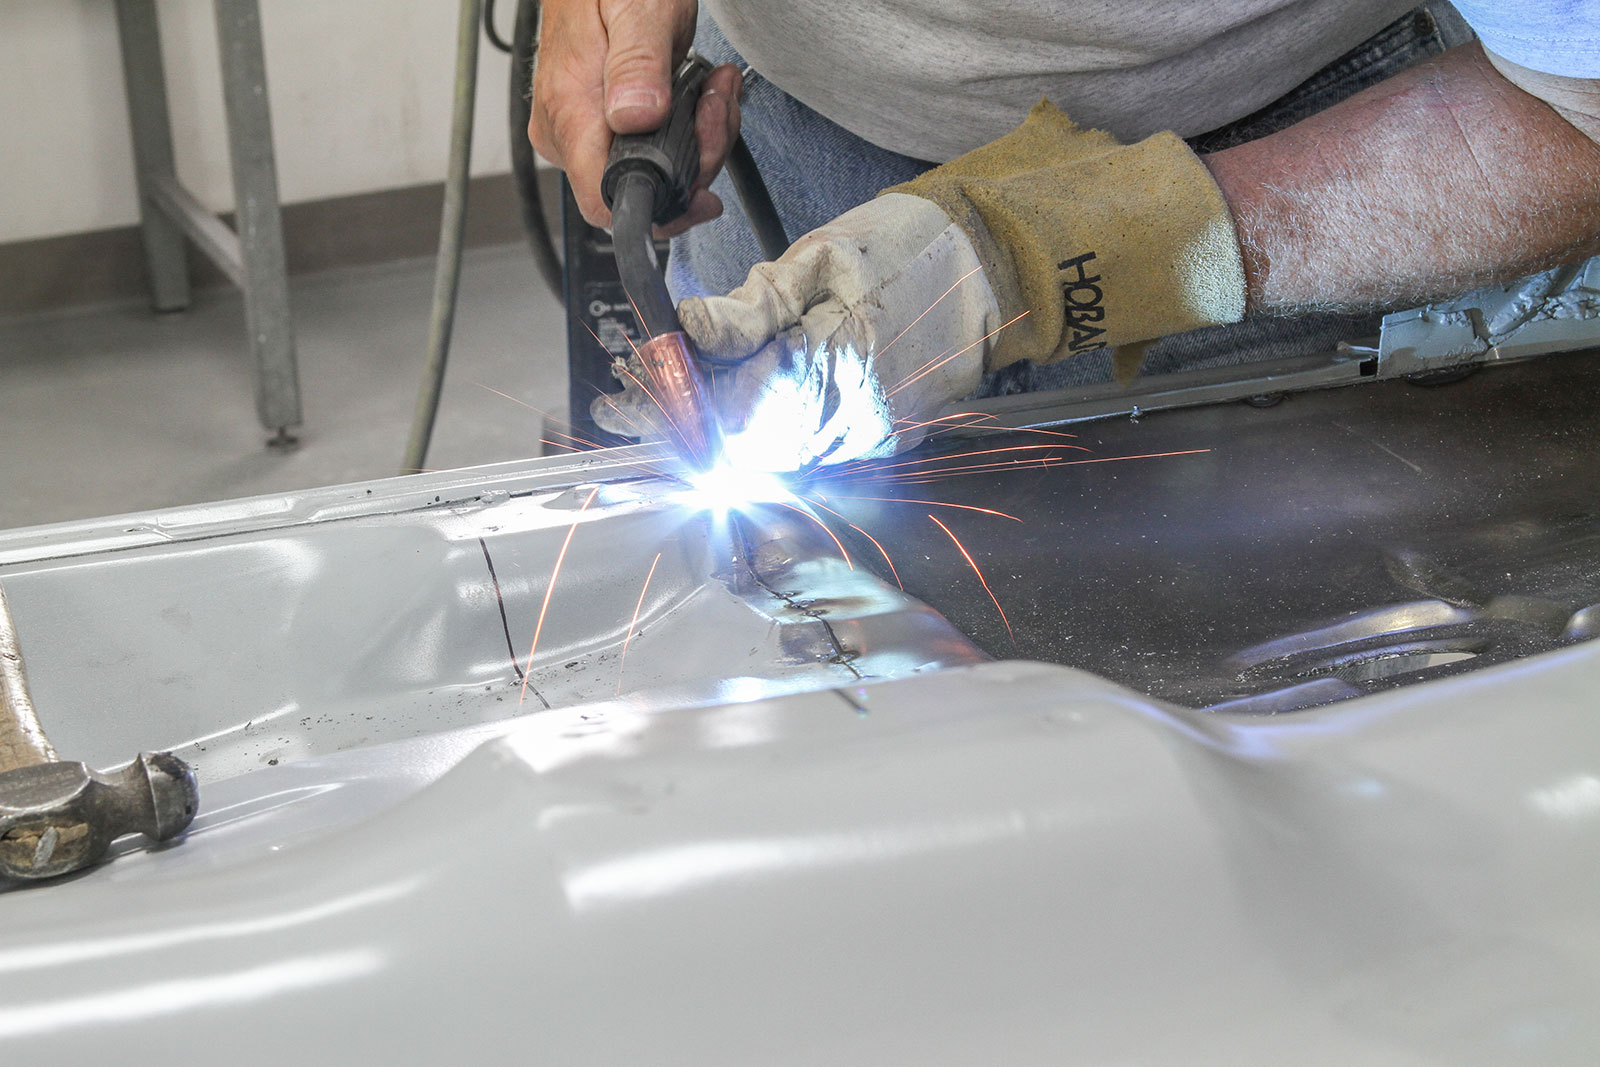
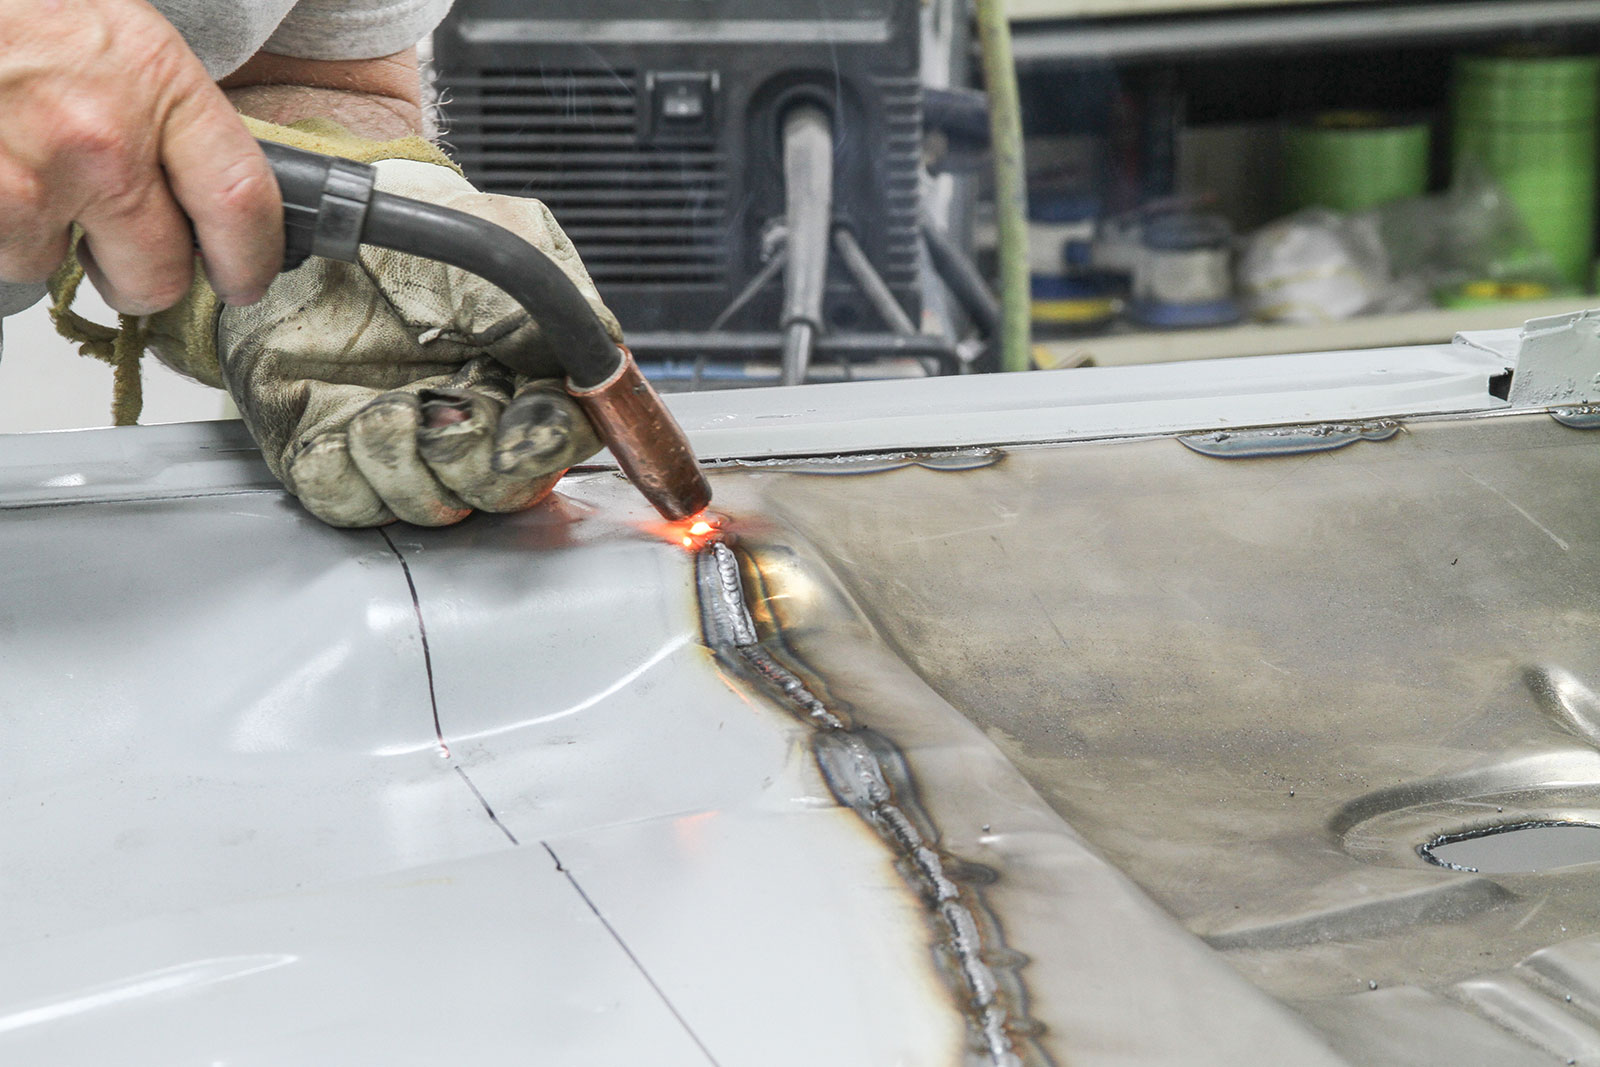
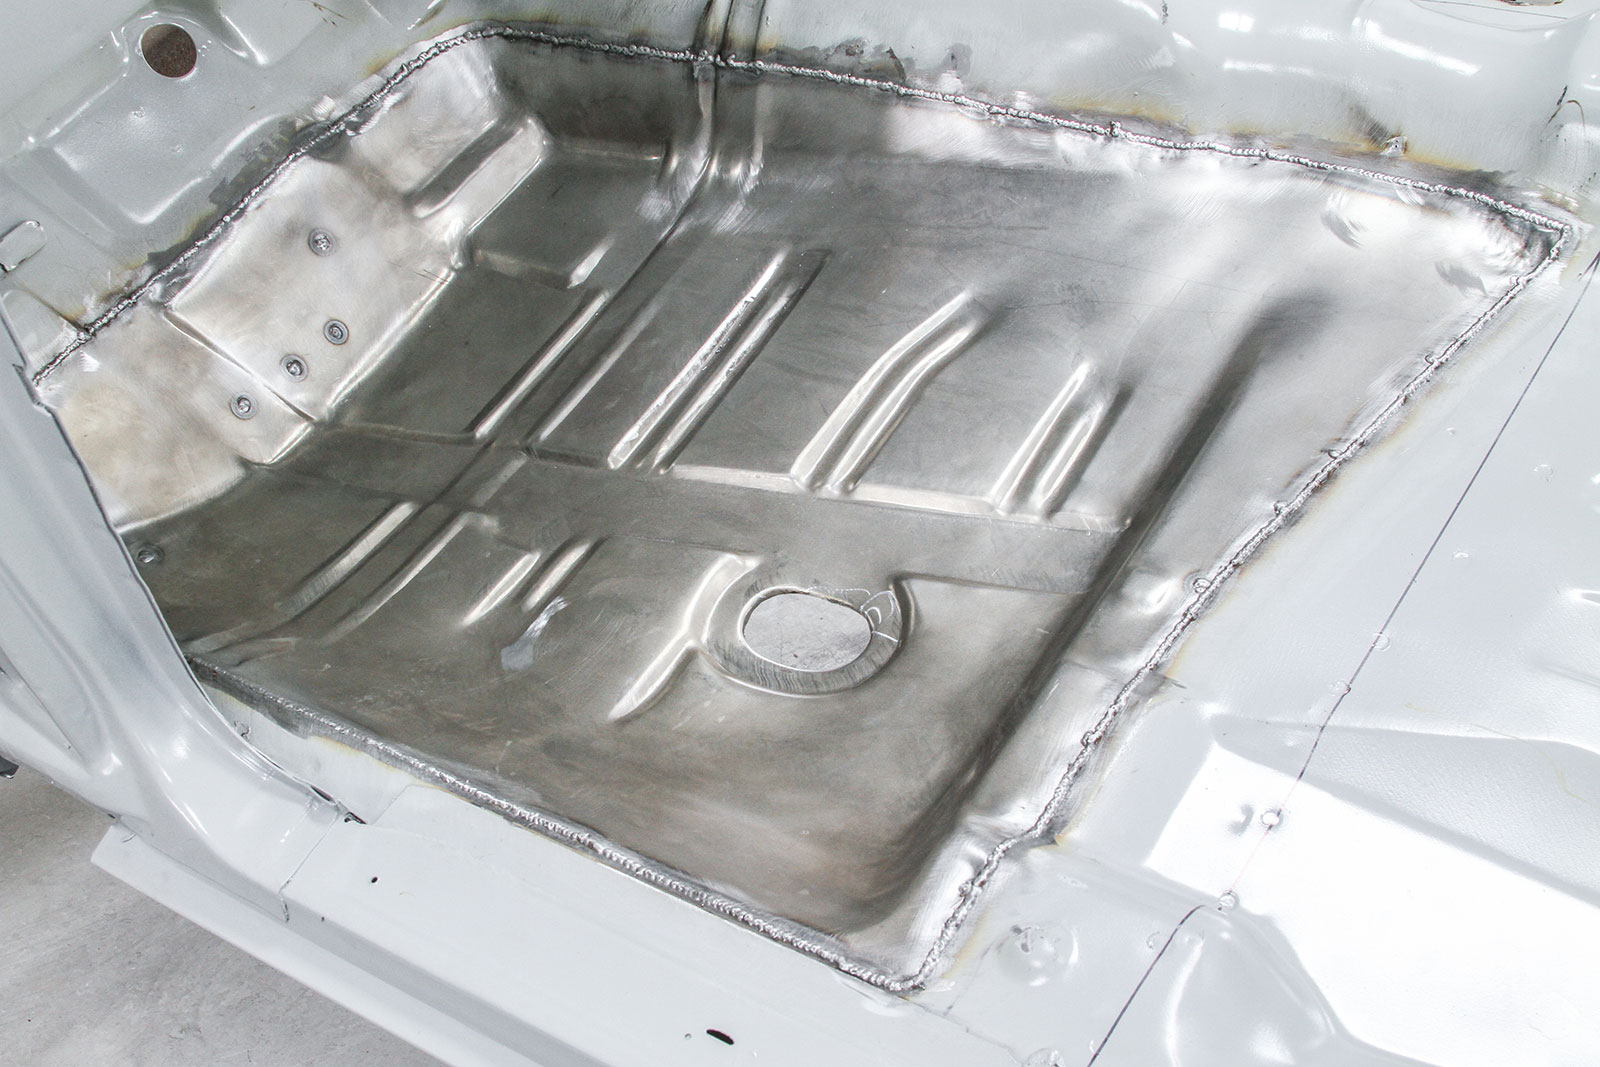
It’s a project that must be performed accurately to ensure a strong, long-lasting repair. We followed along as the Pontiac’s cancerous steel was sliced out and the replacement metal grafted in with surgical precision. The project also demonstrated the more time-consuming butt-weld method rather than lap-welding, a technique that makes all the difference in a high-quality repair, especially when it comes to a show-quality final finish.

“The butt weld is the way to go for a strong, factory-type repair,” Wing says. “It takes a little more time, patience, and experience, but the end result is worth it.”

07 Revealed corrosion in the layer beneath the patch panel on a 64 Pontiac LeMans convertible
With the old patch panel removed, even more corrosion is revealed in the layer beneath, the remnant of the actual floor pan. It all must go. Fortunately, the body-on-frame design of the A-body means there are fewer crossmembers and spot welds to contend with in the floor compared to a vehicle with unitized chassis.

DIY Auto Rust Repair

It also begs an important question: Is a floor pan replacement a DIY project? Well, the welding isn’t particularly complicated, even for those with only moderate experience, but the job requires additional tools that might not be in everyone’s toolbox, including a spot weld cutter for a drill, long body panel vise clamps, and a body hammer. An air hammer or plasma cutter speeds things along, too, as seen in our story.

08 Using a plasma cutter to remove the corroded floor pan from a 64 Pontiac LeMans convertible
Several methods could be used to slice out the corroded floor pan, from a torch to a cut-off wheel to even a pair of shears if you really wanted to make a day of it. A plasma cutter is used here, and it works by sending an electric arc through compressed air or another gas that’s passing through a constricted opening. That elevates the temperature of the gas dramatically, up to about 20,000 degrees F. An oxyacetylene torch reaches about 6,000 degrees F, meaning the plasma cutter flows through the sheet metal like a hot blade through ice cream.

Read More: Myers’ Fenderless 1936 Ford Roadster

So, yes, it’s a project that could be tackled at home, but the chance for warping the comparatively thin sheet metal used in floor pans is high, particularly with butt-welding. With a professional repair, the bulk of the cost will be in the labor hours, as the cost of the replacement metal is comparatively inexpensive.

09 Replacement floorpan from Golden Star Classic Auto Parts for a 64 Pontiac LeMans convertible restoration
The replacement floor pan for the repair is available from several restoration parts suppliers, including Golden Star Classic Auto Parts. It is contoured to match the car’s original stamping and is designed to be trimmed to fit.

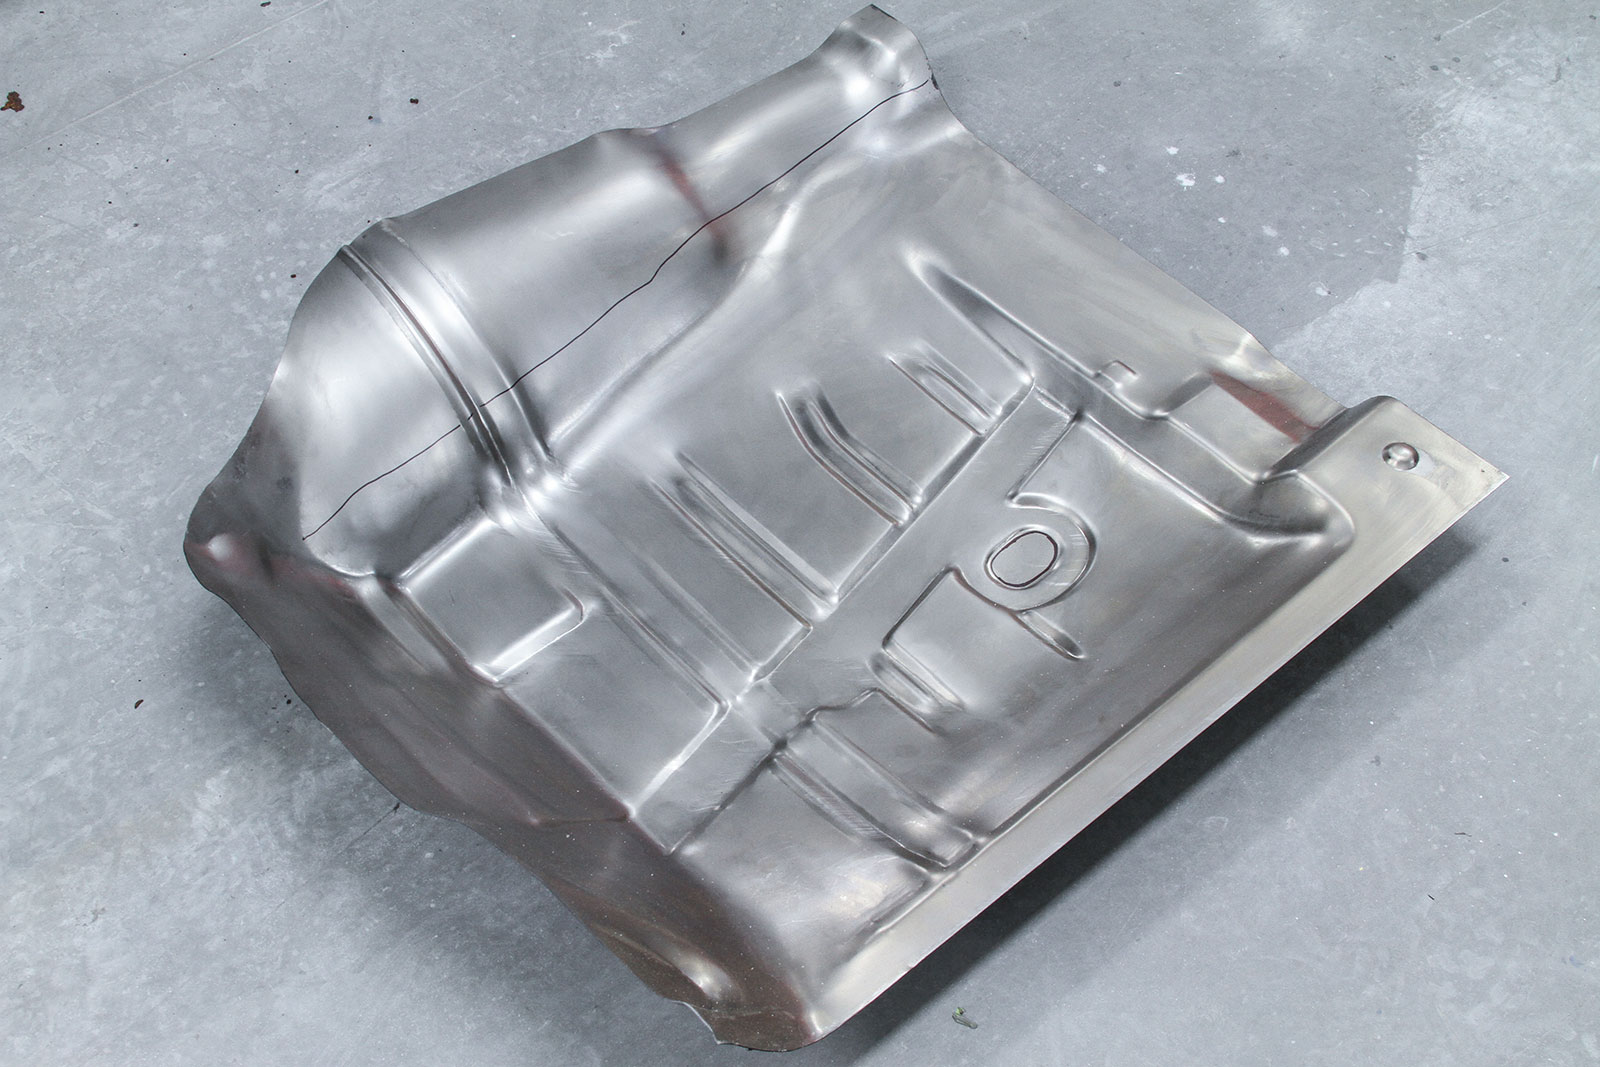
Patch Panel Procurement

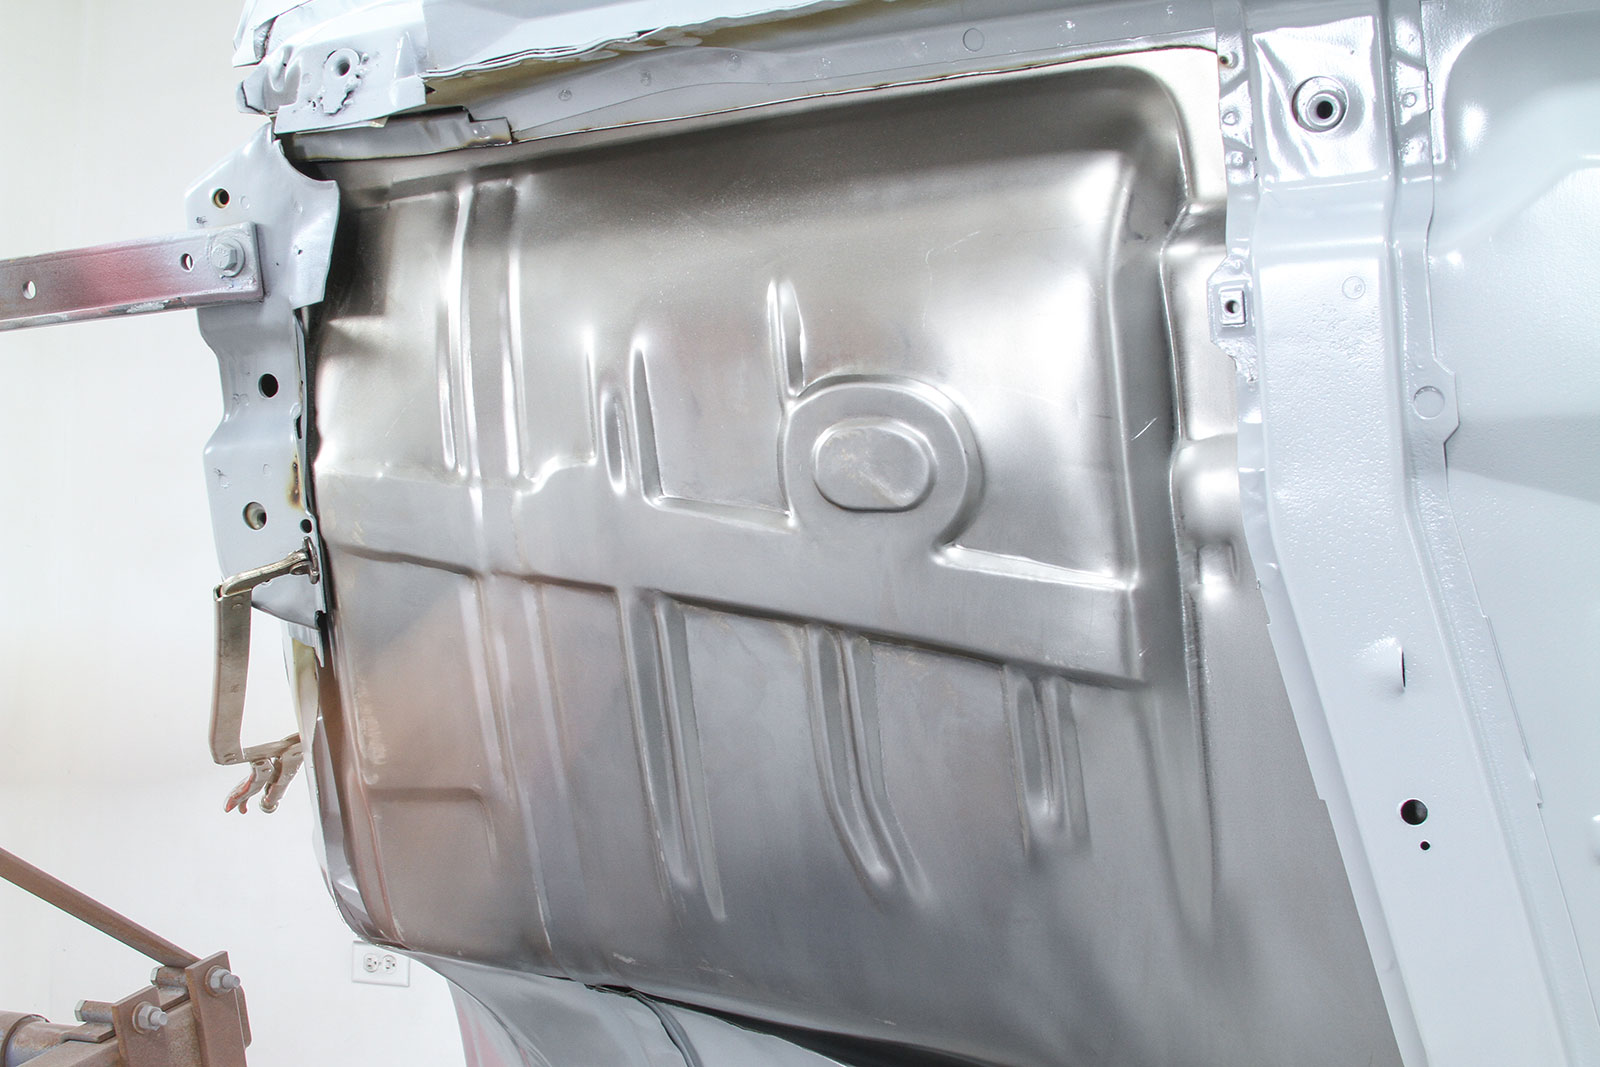
For the project illustrated in our story, only a front floor patch panel was used, which can typically be found for less than $100 for GM A-bodies. In fact, we found the panel for only $84.95 at Golden Star Classic Auto Parts. Of course, this Pontiac project would go on to include several additional sheet metal parts, but as we mentioned, we’re focused only on the floorboard in this story.

10 Tracing the edge of a new floorpan for a 64 Pontiac LeMans to ensure a precise fit
The new floor pan was laid over the opening of the original floor and the edge traced to indicate the trim line for the rear of the pan. The sides of the pan will be mostly cut off because the portion that extends over the transmission tunnel isn’t needed. It would be easy, and lazy, to simply leave the pan as-is, but taking the time for a custom fit will pay off with a more precise fit.

No matter which path you choose, DIY or a professional repair, the bottom line is you can’t ignore your project car’s corrosion indefinitely.

Rust, as they say, never sleeps. MR

11 Cutting out additional metal in the floor of a 64 Pontiac LeMans to make room for the new floorpan
A cut-off wheel is used to simply cut out the additional metal in the floor to make room for the new floor pan. A clean, sharp disc makes the job easier. A dull one will require more time to generate more heat, which could possibly warp the metal.
12 Preparing the sheet metal for welding with a grinding disc during a 64 Pontiac LeMans restoration
After that, a grinding disc is used to dress the sheetmetal and prepare it for welding.
13 First test fit of the replacement floor pan in a 64 Pontiac LeMans showing gaps and misalignments
The first test-fit of the floorpan looks “OK” at a glance, but upon closer inspection, it’s easy to see the mile-wide gap between the pan and the toeboard structure (upper-left corner) and the central reinforcing “beam” of the pan doesn’t align with the corresponding area at the front of the body structure.
14 Close up view of alignment issues with the replacement floor pan in a 64 Pontiac LeMans
Here’s a closer look at the alignment. More trimming of the new floorpan and probably a little hammer work is in order
15 Trimming the edges of the replacement floorpan for a more precise fit in a 64 Pontiac LeMans
The edges of the floorpan are trimmed further. The goal is to get the pan to fit into the opening, sort of like a puzzle piece. It doesn’t have to be exactly that precise, but the idea is for it to butt up against the edges of the opening with no overlap.
16 Using sheet metal screws to secure the new floor pan in a 64 Pontiac LeMans for a more precise fit
Getting closer. A couple of sheet metal screws snug the new pan into the opening, drawing it down further for a more precise fit.
17 Tracing the bottom edge of the tighter trimmed pan for further trimming in a 64 Pontiac LeMans restoration
The tighter-trimmed pan’s bottom edge is traced for further trimming. Again, the idea is to create a new panel that fits into the opening without overlap.
18 Using a plasma cutter to trim the panel s edges during a 64 Pontiac LeMans restoration
A quick zip with the plasma cutter trims the panel’s edges down to size.
19 A nearly perfect fit of the replacement floorpan in a 64 Pontiac LeMans restoration project
The pan is back in for another trial fit and shows it’s about as close as it’s going to get. The alignment of the center reinforcement is good, although it’s clear to see the widths of the factory stamping and the replacement stamping differ. That can be further massaged for a totally seamless appearance.
20 Custom fit floorpan clamped and ready for welding in a 64 Pontiac LeMans restoration project
Here’s a look at the custom-fit floor pan, clamped in place and ready for welding. The attention to detail that came from Wing’s continued trimming is terrific. Note how the horizontal ribs in the trans tunnel align perfectly with the ribs in the new pan. Nice work. Also notice the floor drain hole is traced for cutout.
21 Applying the first welds to the replacement floorpan in a 64 Pontiac LeMans restoration project
The first welds are applied as small, individual stitches all around the perimeter. Leaving a couple of the sheet metal screws in at first helps ensure the panel stays put and that the car’s panel and the replacement pane remain aligned for perfect butt-welding.
22 Alternating weld stitches around the panel to prevent warping during a 64 Pontiac LeMans restoration
Wing alternates the weld stitches around the panel until the entire perimeter is filled. Alternating the welds prevents warping from too much heat building up in one area. He’s using a MIG welder, which is preferred for sheet metal like this.
23 Fully welded replacement floorpan installed in a 64 Pontiac LeMans including the drain hole cutout
Here’s the fully welded replacement floor pan installed, including the drain hole cutout and massaged to provide the radius appearance that mimics the original stamping process. Typically, the drain plugs are sold separately.
24 View from the bottom of the newly installed floorpan in a 64 Pontiac LeMans restoration project
From the bottom, the new pan looks great, and it is as strong as new. Structurally, the car doesn’t need further welding or metalwork, but depending on the level of restoration, further finishing work could be done around the edges.
25 After installing the driver side floorpan the passenger side pan is next in this 64 Pontiac LeMans restoration
With the driver side floor pan installed, the passenger side pan needs to be replaced and then it’s onto the rest of the car. It’s a seriously perforated Pontiac that’s being restored one replacement panel at a time.

26 A MIG welder will handle just about all the automotive hobby projects you’ll encounterWelding 101

Welding is as much an artform as it is a skill; no matter how you approach, practice and experience are the only ways to become proficient at it. Not surprisingly, many enthusiasts are reluctant to make the investment in a welder for fear that their trepidation in learning the skill will relegate the unused machine to the corner of the garage, like a 220-amp treadmill.

There isn’t a single welding process to cover every task, but certain types are more likely to be encountered in the types of projects associated with working on cars. Here’s a quick rundown

Stick Welding

It’s the most basic of welding types and is typically what many people use as their first foray into welding. Also known as arc welding, it simply used an electric current flowing from a gap between the metal and the welding stick. It’s good for basic work, like welding a hitch receiver to the bumper frame of your truck but tends to throw off a lot of spatter and can’t be used with anything thinner than 18-gauge sheetmetal.

MIG Welding

MIG stands for metal inert gas and the process involves a wire-welding electrode on a spool. An arc created by the electrical current between the metal and the wire melts the wire to join the metals. It’s a relatively easy process to learn, although it takes experience to learn optimal temperatures and stitching procedures. It’s also a clean process, with little or no spatter, and it can be used on thin or thick metals.

TIG Welding

TIG stands for tungsten inert gas and is an arc welding process that uses a tungsten electrode to produce the weld. The tungsten does not create the filler, like the wire in MIG welding and with some processes, one isn’t needed. TIG welding is generally the best for joining thin sections of metal and non-ferrous materials, such as aluminum and magnesium. It is more complex than MIG welding and more difficult to master.

Bottom line

A MIG welder will handle just about all the automotive hobby projects you’ll encounter. It’s the just-right tool between a basic stick welder and the more-complex TIG welder.

27 New Striker Door Shims for Mopars

New Striker Door Shims for Mopars
When it comes to reversing the rust on a muscle car–era Mopar, most enthusiasts are stuck with the often-corroded original striker door shims or take-offs from a parts car—and that’s only if better ones can be found.

28 1969 Dodge Charger Door Examples


It’s a compromise that can be avoided with JF Restoration Parts’ new laser-cut shims. Like the factory shims, they install behind the striker on the door post to optimize the door latch catch and door alignment. The shims come in a kit with four sizes that match the thickness of the originals: 0.032, 0.048, 0.060, and 0.077 inch and each kit includes two of each, which is enough for a two-door car.

The shim kit is available on eBay, under item number 222204828682, or by searching “jfshims;” or call (204) 822-0745 for more information.

Source:

Golden Star Classic Auto Parts
(972) 315-3758
goldenstarauto.com

Click on this issue’s cover to see the enhanced digital version of Sheetmetal Surgery.mr february 2024

- Advertisement -

Related Articles

Search Our Site

More Modern Rodding

Rodding Around – Automotive Racing Products& South City Rod & Custom Receive Accolades

Automotive Racing Products Named HRIA Business of the Year...

Purple Reign: Custom Pinstriped Merc Coupe

Brian Omatsu's 1951 Mercury Coupe: Blending Styles from Classic...

Parting Shot: Isky’s Tribute Ford Roadster

Dennis Taylor’s Modern-Day Representation Of Isky’s Ford Roadster At...

2024 Detroit Autorama Ridler Winning ’53 Corvette

Owned by Dave & Tracey Maxwell & Built By...

First Look 2024 Detroit Autorama Great 8

The 71st Annual Detroit Autorama & The Competition For...

A New Suspension on Jason Scudellari’s Brookville Model A

By Ron Ceridono   -   Photography By Jason Scudellari Over the...
More Modern Rodding

2024 Barrett-Jackson Cup Top Five Finalist Revealed – 1968 Ford Mustang

From the Shop of East Bay Muscle Cars Comes...

David’s Dream 1938 Ford Coupe Build

David Burgard’s Good-Looking Hot Rod Ford Coupe By Dale Moreau ...

2024 Barrett-Jackson Cup First Look At Competitors

Country’s Best-Looking Hot Rods, Trucks, and More Compete For...

How To Fix Quarter Panel Rust

Patch Panel Install For Rust Repair on Your Vintage...

Hemi Swapped 1932 Ford Roadster

Dave Gray’s Deuce Roadster Built In only 5 Months By...

Under The 1965 Buick Riviera Detroit Speed Chassis

Unmatched Street Performance & Sixties Style By Gerry Burger   -  ...