When it comes to a classic Chevy that gets driven on a regular basis, it doesn’t make sense to go all-out on engine bay detailing. You can, however, make a huge difference with a few parts and some serious cleaning. Our 1964 Chevelle has a tired 283ci small-block underhood, and it isn’t exactly “oil tight.” It leaks a drop or two on the garage floor, but the main annoyance is the oil film that you have to wipe off every few thousand miles. Regardless of the fact that this engine is a little loose in the gasket department, we wanted to freshen up its appearance, so that we wouldn’t be too embarrassed to open the hood at our local cruise night.
Our starting point is a relatively low-mileage, 283ci, small-block Chevy engine, which had recently been tuned up with some generic parts store components. It had received a rattle-can restoration many years ago, but the flaking paint and lackluster components inspired us to give this engine bay a major face-lift.
The general idea is to do this type of engine bay detailing while you’re working on other projects. For us, we had part of the engine disassembled for cooling upgrades and an EFI install, so it was the perfect time to make it clean. We used basic tools and materials—simple stuff that you can get at the local parts store. We used semigloss black spray paint for accessory brackets, Chevrolet Orange engine paint for the block and heads, satin black for the inner fenders and firewall, and we rubbed some Calyx manifold dressing to bring the rusty exhaust manifolds back to life. Eastwood and Speedway Motors also sell manifold coatings and other types of high-temp paint that work well for this application.
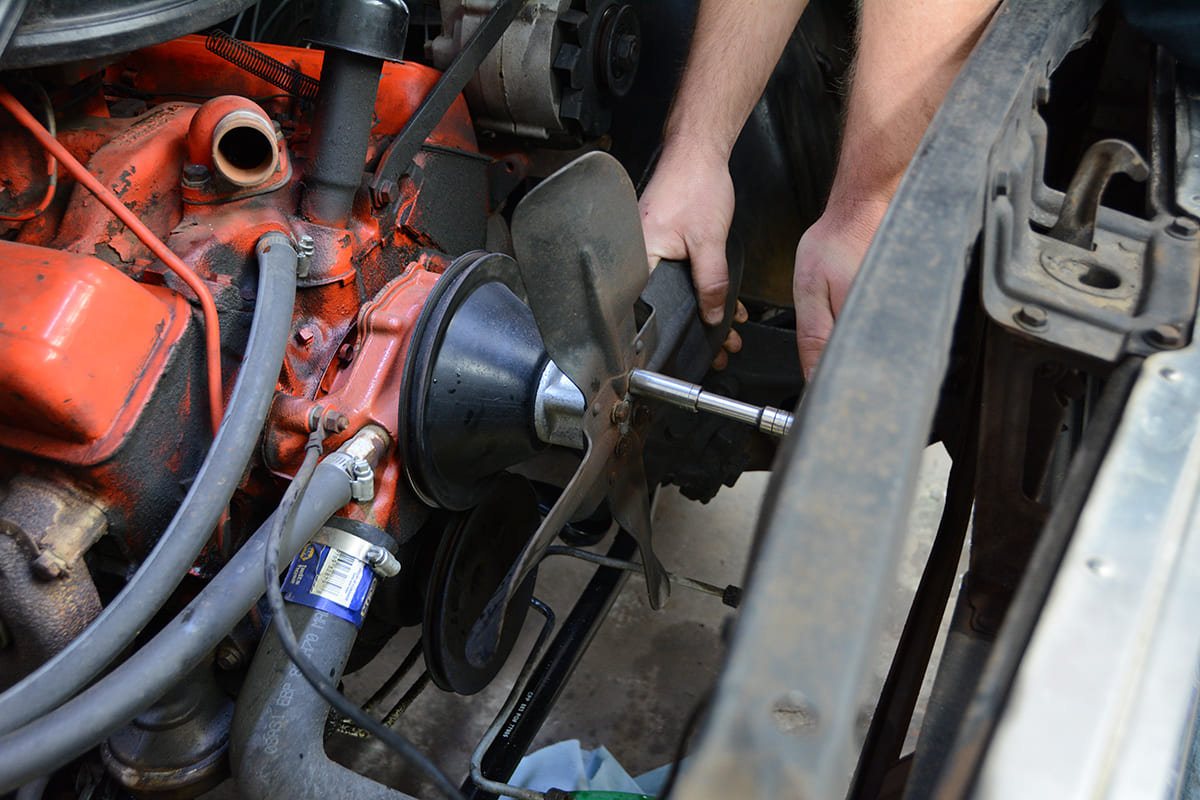
We started by disassembling the front of the engine and the cooling system. We planned to upgrade the cooling system either way, so this was the perfect time to improve its appearance. After draining the coolant, we removed the original radiator, four-blade fan, and water pump.
Let’s be clear: This isn’t a show car, so we didn’t do a show-car-quality engine bay. However, our rattle-can restoration and the addition of some nice, new components from Holley, Vintage Air, and U.S. Radiator really helped this engine bay look great. Even though the old engine isn’t perfect, we’re happy with the end result of our engine bay makeover
Follow along with us as we take a crusty, bone-stock small-block and turn it into a presentable engine with just a few evenings in the shop.
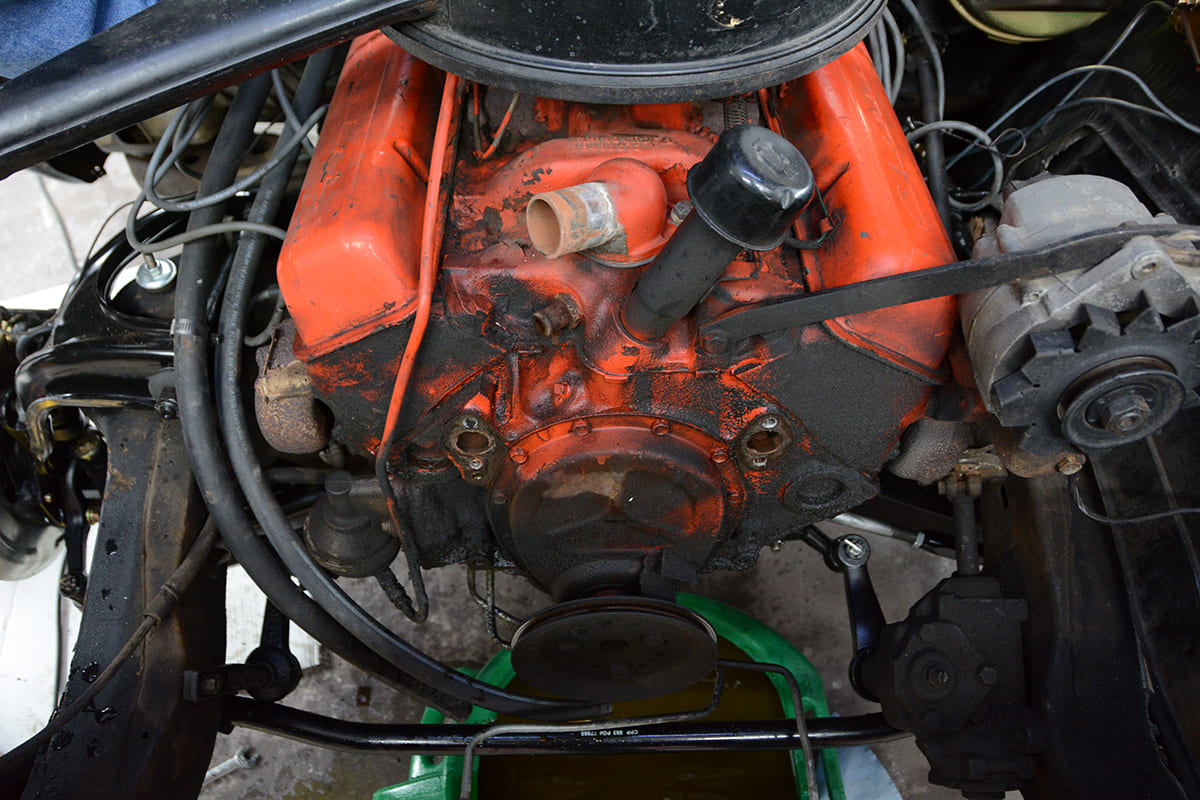
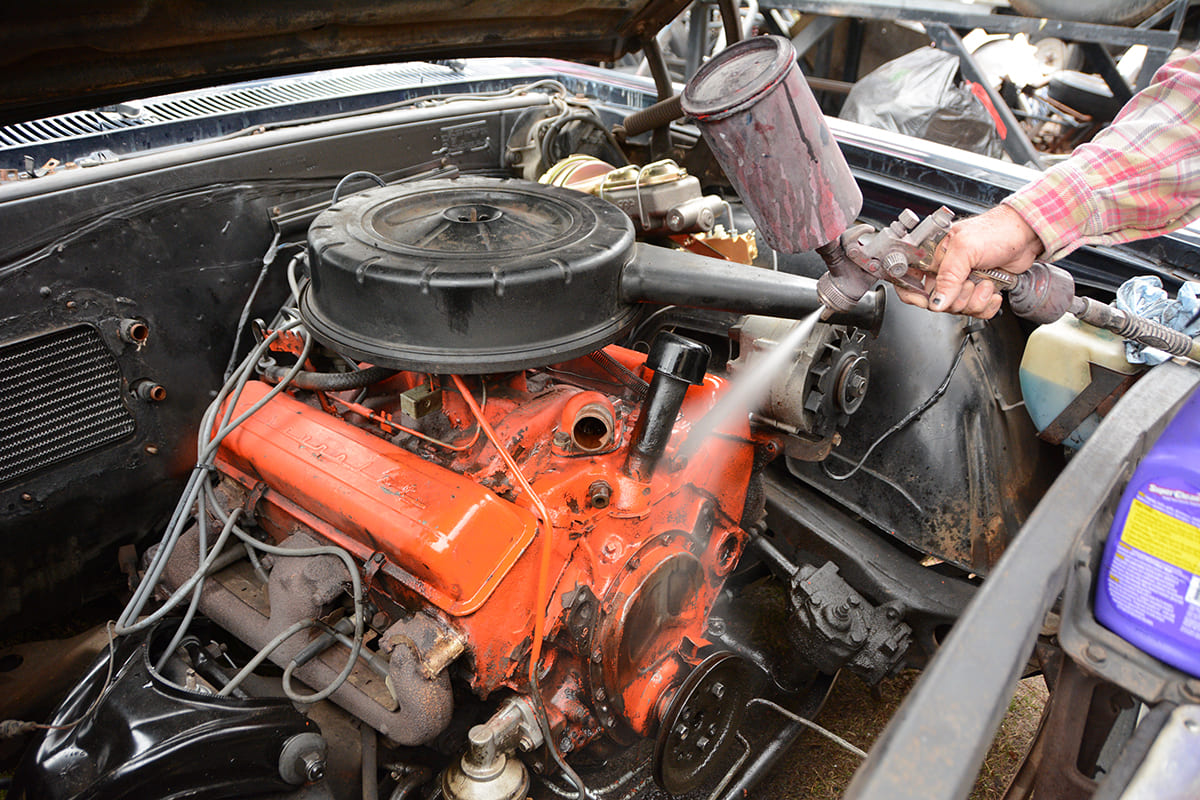
With the front drive accessories removed, we can get a good look at our greasy small-block. It doesn’t take long for these older engines to develop an oil coating due to the lack of crankcase ventilation, and, of course, the age of the gaskets and seals. This is the perfect time to do some major cleaning.Engine degreaser is usually the easiest solution to engine gunk, but we went next level. We poured lacquer thinner into an old spray gun and hosed down the front of the engine. It made quick work of the grease and removed any of the loose paint. This may not be the right approach for every car, but it certainly worked for our old-school driver.A fresh coat of Chevrolet Orange paint definitely gave the old small-block a fresh look. We painted the FlowKooler water pump separately and then bolted it into place with new hardware from Speedway Motors.
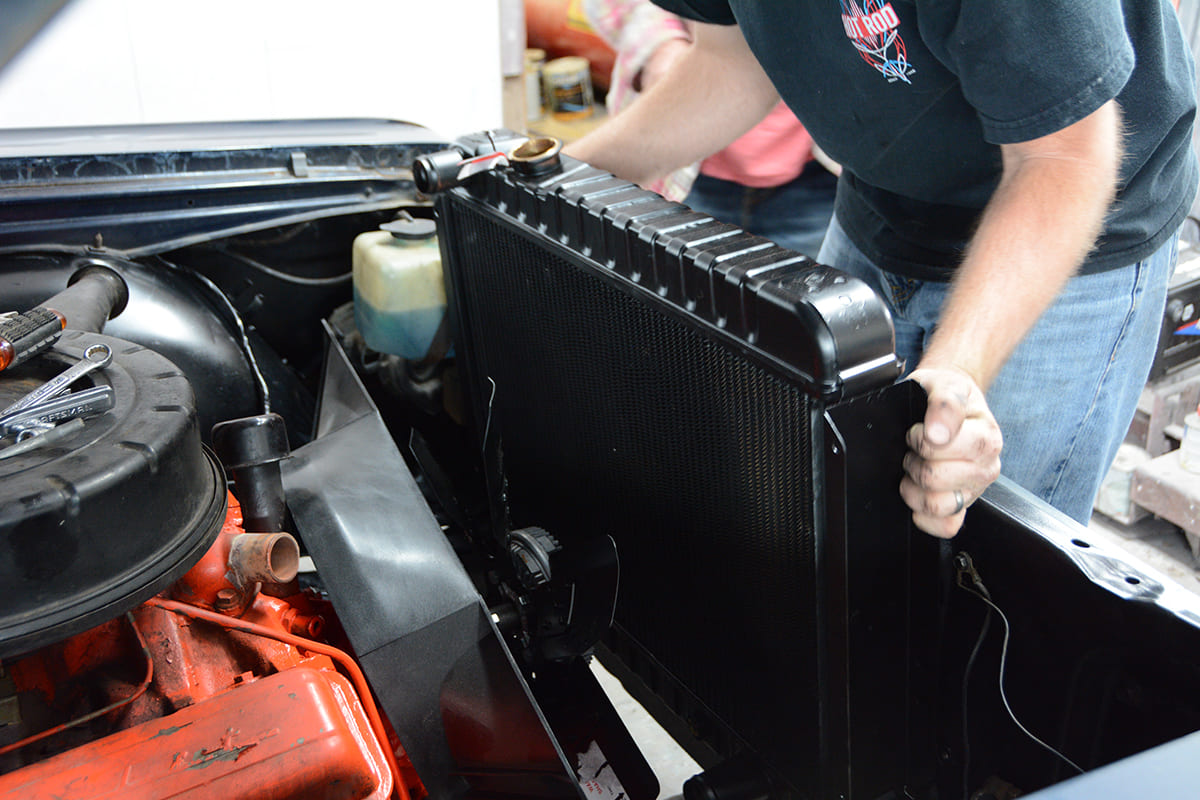
We could’ve easily given our original radiator a fresh coat of semigloss black paint, but we already had plans to upgrade the cooling system. We went with a new unit from U.S. Radiator, which has internal improvements with the classic, original look.For the next steps of our engine bay revamp, we had to remove the distributor and prepare to take off the intake manifold. We disconnected the throttle linkage, fuel line, and coolant hoses from the original cast-iron intake manifold.After removing the intake manifold bolts, we had to do some delicate prying to free the intake from its home of more than 55 years. Even though the two-barrel carburetor works nicely, we want to upgrade the appearance and performance with an aluminum intake manifold and Holley Sniper EFI system.The cylinder heads are a little crusty on the intake manifold mounting surface, but a quick inspection confirms that our 283 has been well-maintained. Now is a good time to inspect the pushrods and lifters while they’re accessible.We stuffed the intake runners and coolant ports with paper towels and began scraping the leftover gasket material off of the cylinder heads. We also used paper towels to catch the debris that falls into the lifter valley. A putty knife works well for scraping the surface.Now it’s time for a bead of silicone on the front and rear surfaces of the block and new intake manifold gaskets. It’s important to let the silicone tack up a little, so that it doesn’t squish out when you lower the intake manifold into place; the oozing silicone looks bad, and you could create an oil leak.The Weiand Street Warrior intake manifold is a great option for our very mild-mannered small-block. It’s dramatically lighter than the original cast-iron intake, and, of course, provides a four-barrel carburetor flange.Our old distributor (an off-brand electronic unit) goes back in, but we’ll give it an update with a new cap and new 8mm plug wires to freshen up its appearance.Now the Holley Sniper EFI system can be installed. It slides over the studs and looks right at home on our old-school small-block. We love the classic gold finish, but Holley also makes Sniper systems in glossy black and polished finishes.We opted for Holley finned accessories, as the bright polished finish and vintage look is perfect for our mid-’60s sedan. Since the new Weiand intake didn’t have an oil fill tube, we are ventilating the small-block with a valve cover breather and PCV system.The fresh look is topped off with a matching Holley round air cleaner. With nicely routed hoses and wires, fresh paint, and a few key components, this tired small-block has a new identity.
1 of 17
Our starting point is a relatively low-mileage, 283ci, small-block Chevy engine, which had recently been tuned up with some generic parts store components. It had received a rattle-can restoration many years ago, but the flaking paint and lackluster components inspired us to give this engine bay a major face-lift.
We started by disassembling the front of the engine and the cooling system. We planned to upgrade the cooling system either way, so this was the perfect time to improve its appearance. After draining the coolant, we removed the original radiator, four-blade fan, and water pump.
With the front drive accessories removed, we can get a good look at our greasy small-block. It doesn’t take long for these older engines to develop an oil coating due to the lack of crankcase ventilation, and, of course, the age of the gaskets and seals. This is the perfect time to do some major cleaning.
Engine degreaser is usually the easiest solution to engine gunk, but we went next level. We poured lacquer thinner into an old spray gun and hosed down the front of the engine. It made quick work of the grease and removed any of the loose paint. This may not be the right approach for every car, but it certainly worked for our old-school driver.
A fresh coat of Chevrolet Orange paint definitely gave the old small-block a fresh look. We painted the FlowKooler water pump separately and then bolted it into place with new hardware from Speedway Motors.
We could’ve easily given our original radiator a fresh coat of semigloss black paint, but we already had plans to upgrade the cooling system. We went with a new unit from U.S. Radiator, which has internal improvements with the classic, original look.
For the next steps of our engine bay revamp, we had to remove the distributor and prepare to take off the intake manifold. We disconnected the throttle linkage, fuel line, and coolant hoses from the original cast-iron intake manifold.
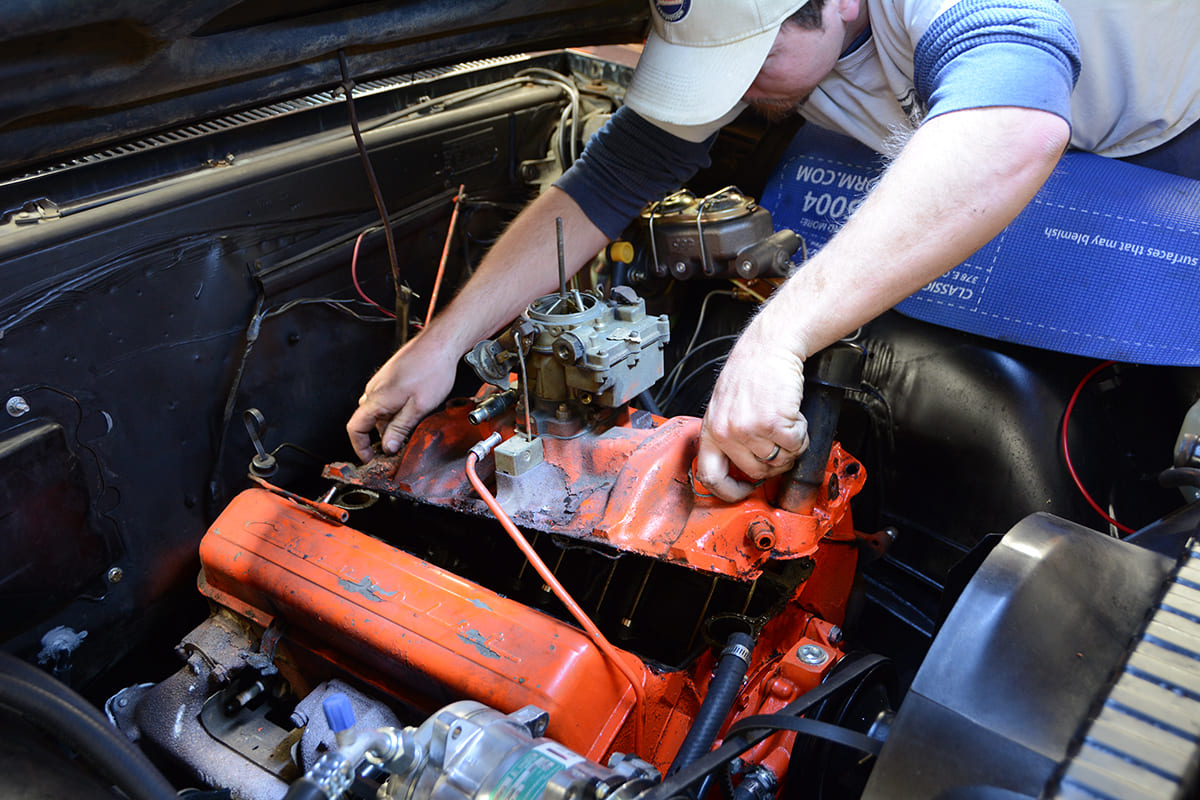
After removing the intake manifold bolts, we had to do some delicate prying to free the intake from its home of more than 55 years. Even though the two-barrel carburetor works nicely, we want to upgrade the appearance and performance with an aluminum intake manifold and Holley Sniper EFI system.
The cylinder heads are a little crusty on the intake manifold mounting surface, but a quick inspection confirms that our 283 has been well-maintained. Now is a good time to inspect the pushrods and lifters while they’re accessible.
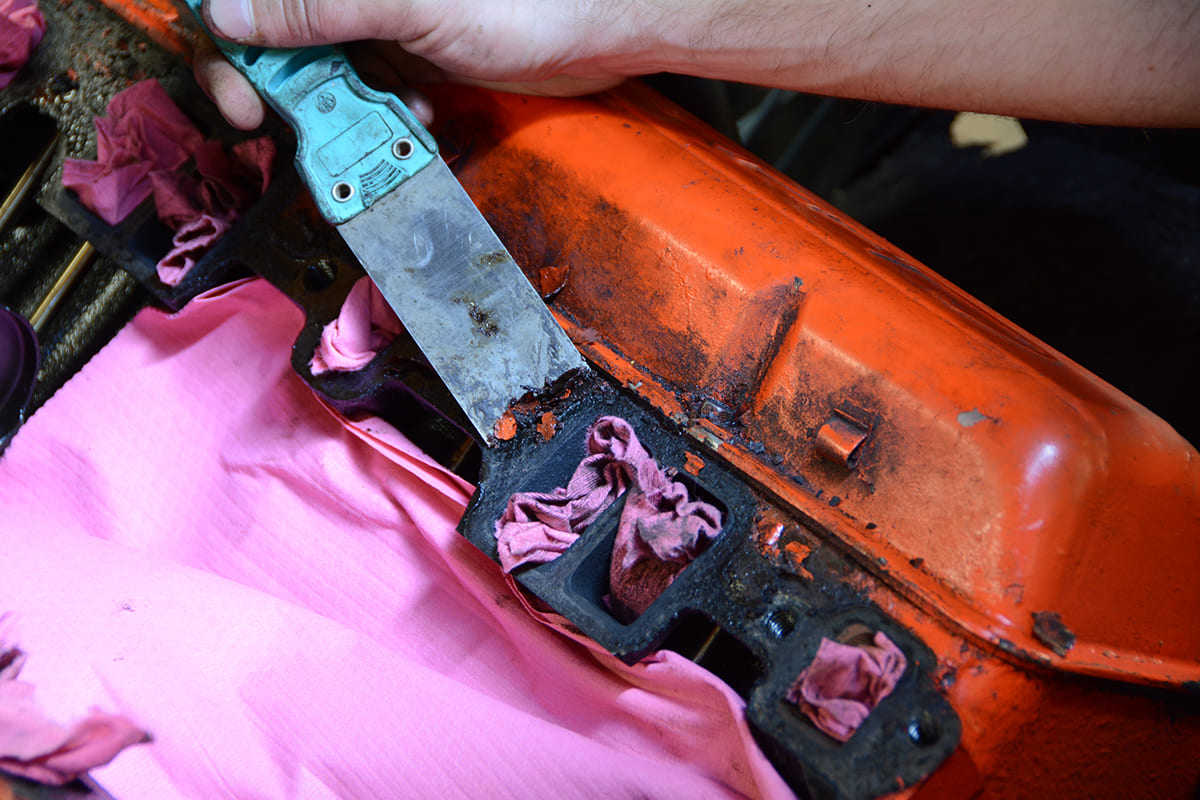
We stuffed the intake runners and coolant ports with paper towels and began scraping the leftover gasket material off of the cylinder heads. We also used paper towels to catch the debris that falls into the lifter valley. A putty knife works well for scraping the surface.
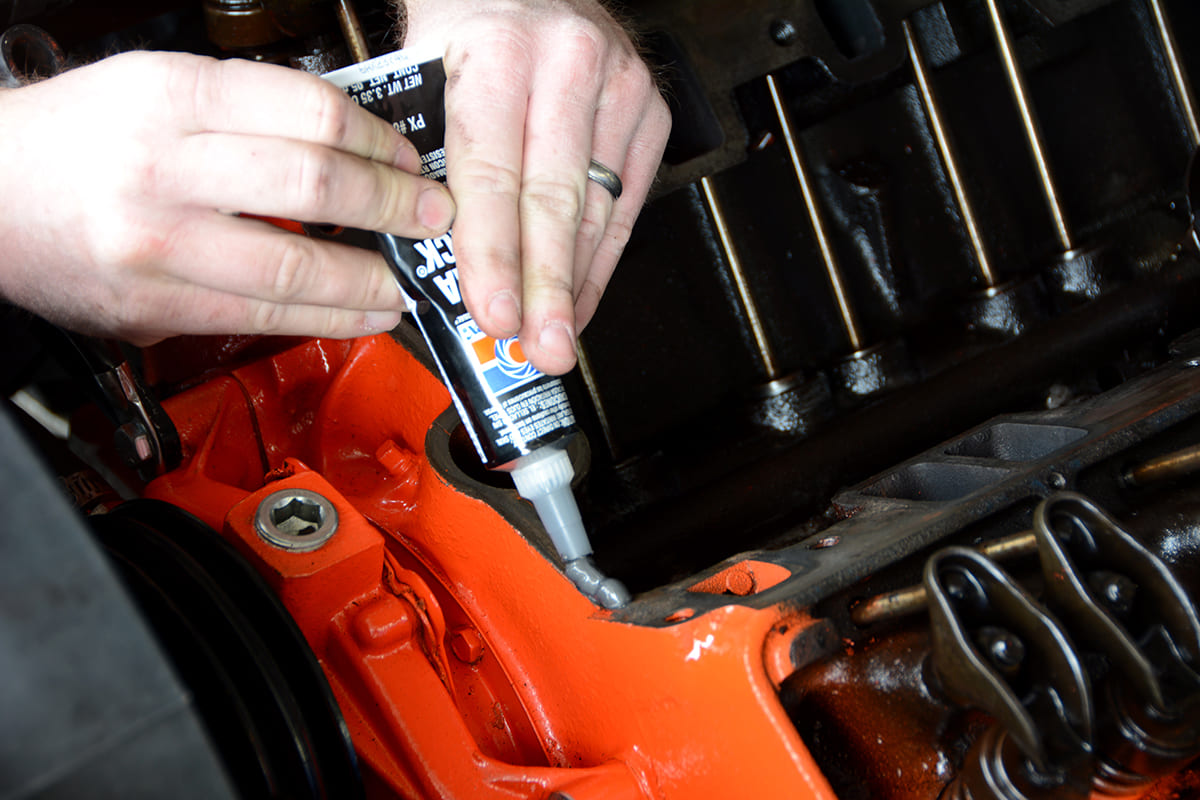
Now it’s time for a bead of silicone on the front and rear surfaces of the block and new intake manifold gaskets. It’s important to let the silicone tack up a little, so that it doesn’t squish out when you lower the intake manifold into place; the oozing silicone looks bad, and you could create an oil leak.
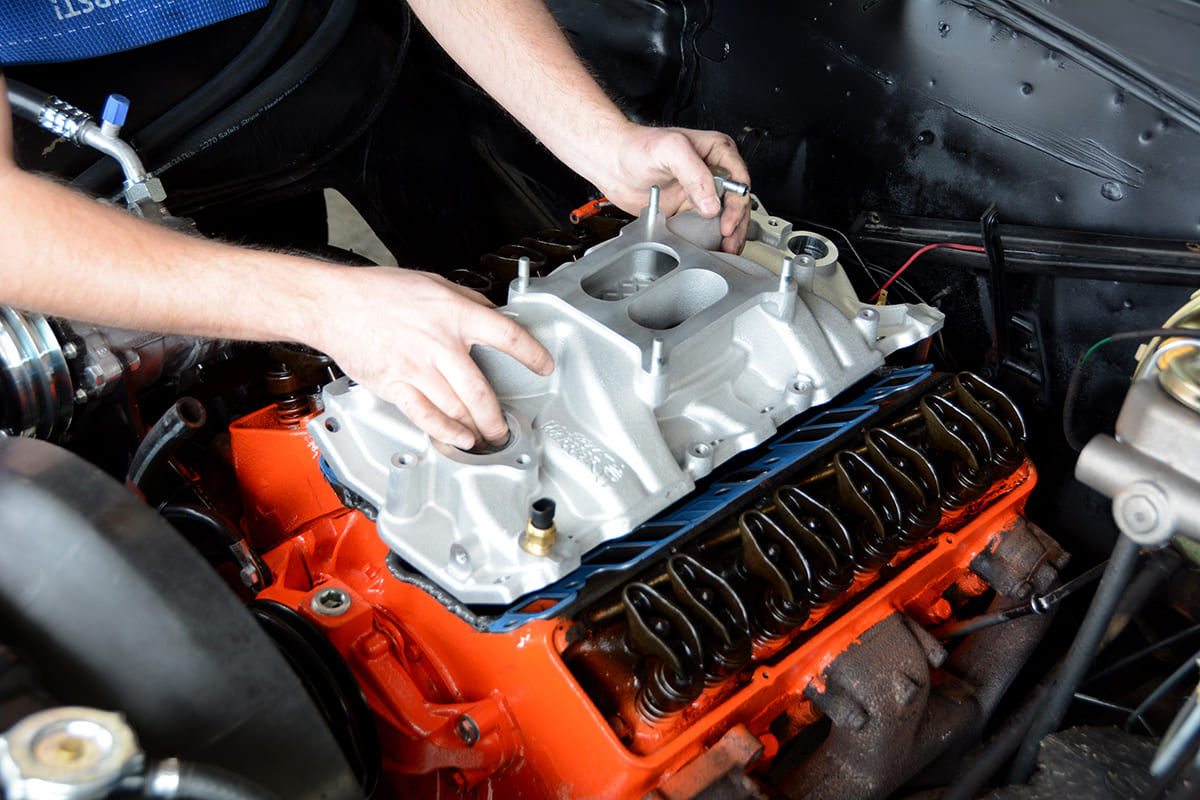
The Weiand Street Warrior intake manifold is a great option for our very mild-mannered small-block. It’s dramatically lighter than the original cast-iron intake, and, of course, provides a four-barrel carburetor flange.
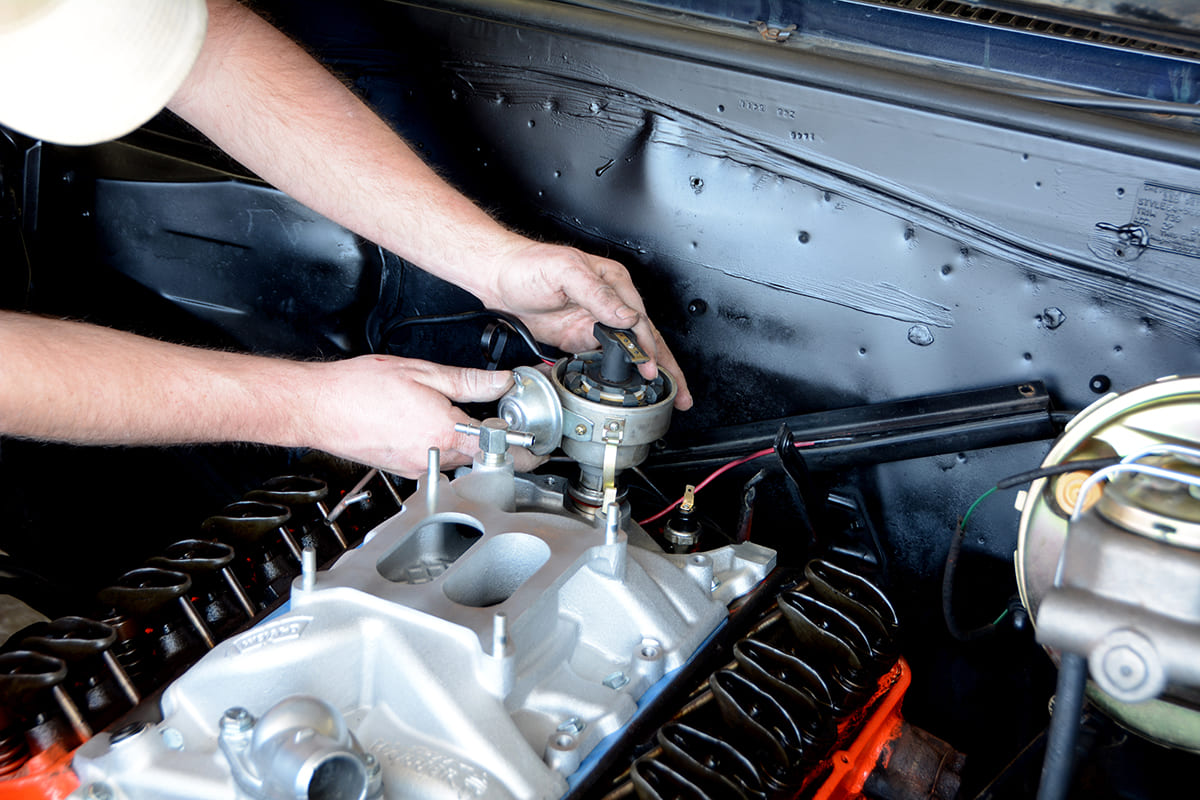
Our old distributor (an off-brand electronic unit) goes back in, but we’ll give it an update with a new cap and new 8mm plug wires to freshen up its appearance.
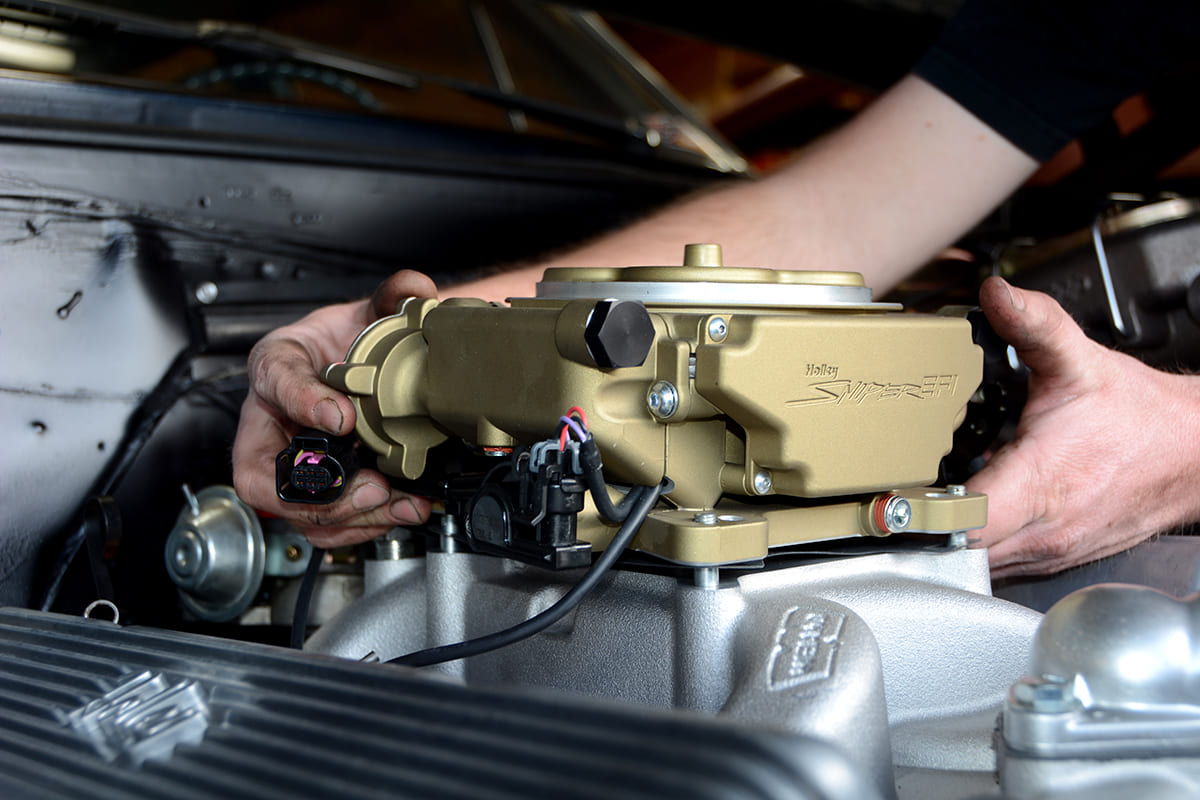
Now the Holley Sniper EFI system can be installed. It slides over the studs and looks right at home on our old-school small-block. We love the classic gold finish, but Holley also makes Sniper systems in glossy black and polished finishes.
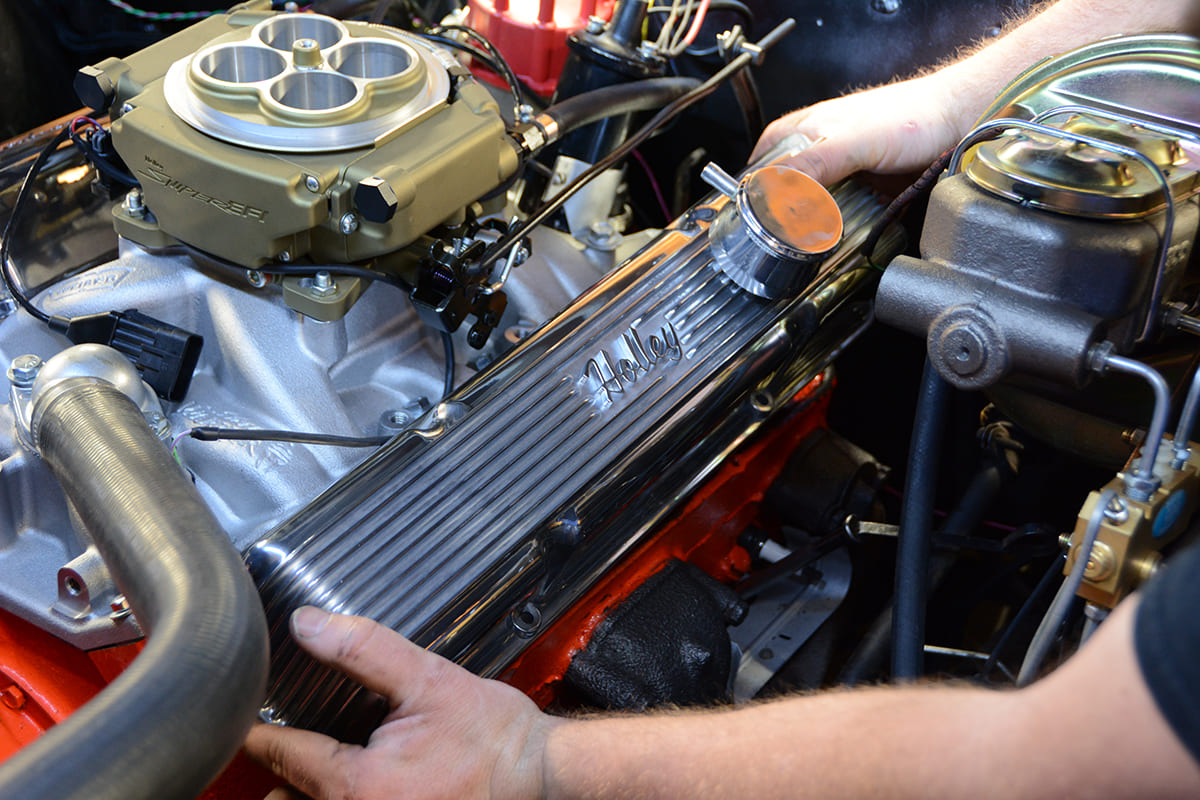
We opted for Holley finned accessories, as the bright polished finish and vintage look is perfect for our mid-’60s sedan. Since the new Weiand intake didn’t have an oil fill tube, we are ventilating the small-block with a valve cover breather and PCV system.
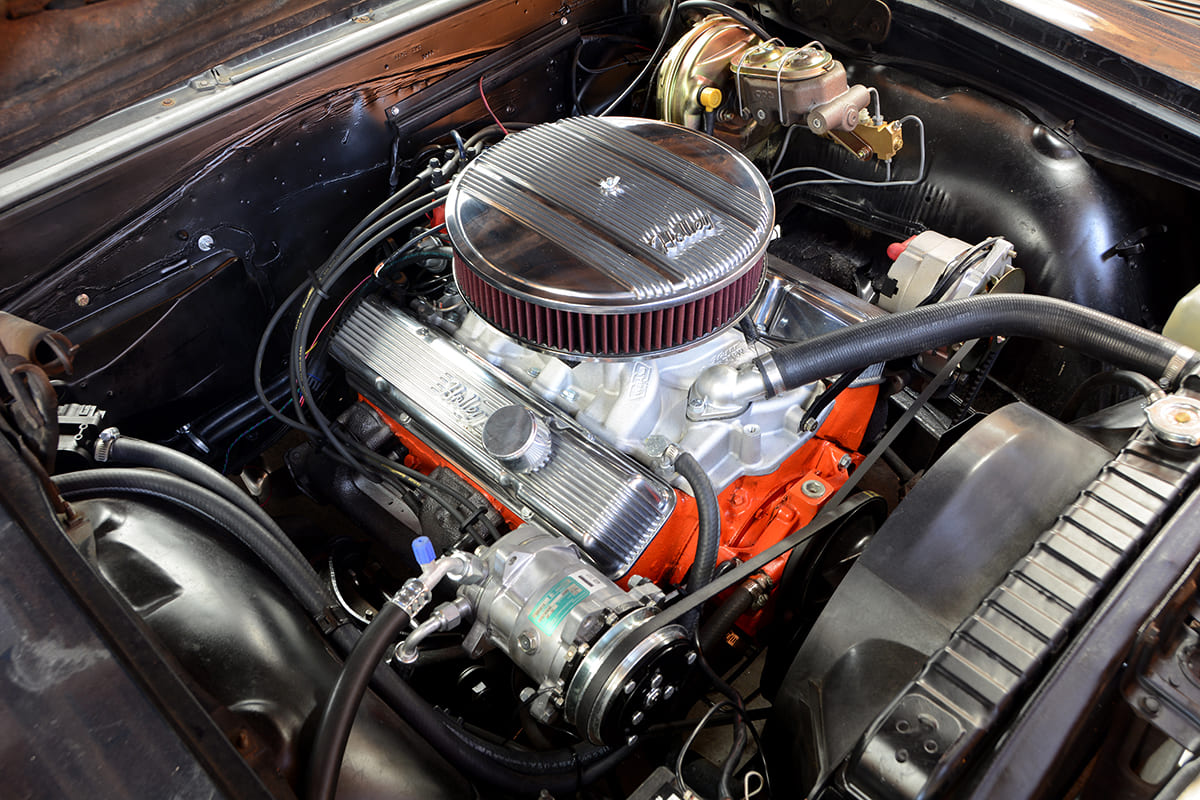
The fresh look is topped off with a matching Holley round air cleaner. With nicely routed hoses and wires, fresh paint, and a few key components, this tired small-block has a new identity.
We use cookies to ensure that we give you the best experience on our website. If you continue to use this site we will assume that you are happy with it.