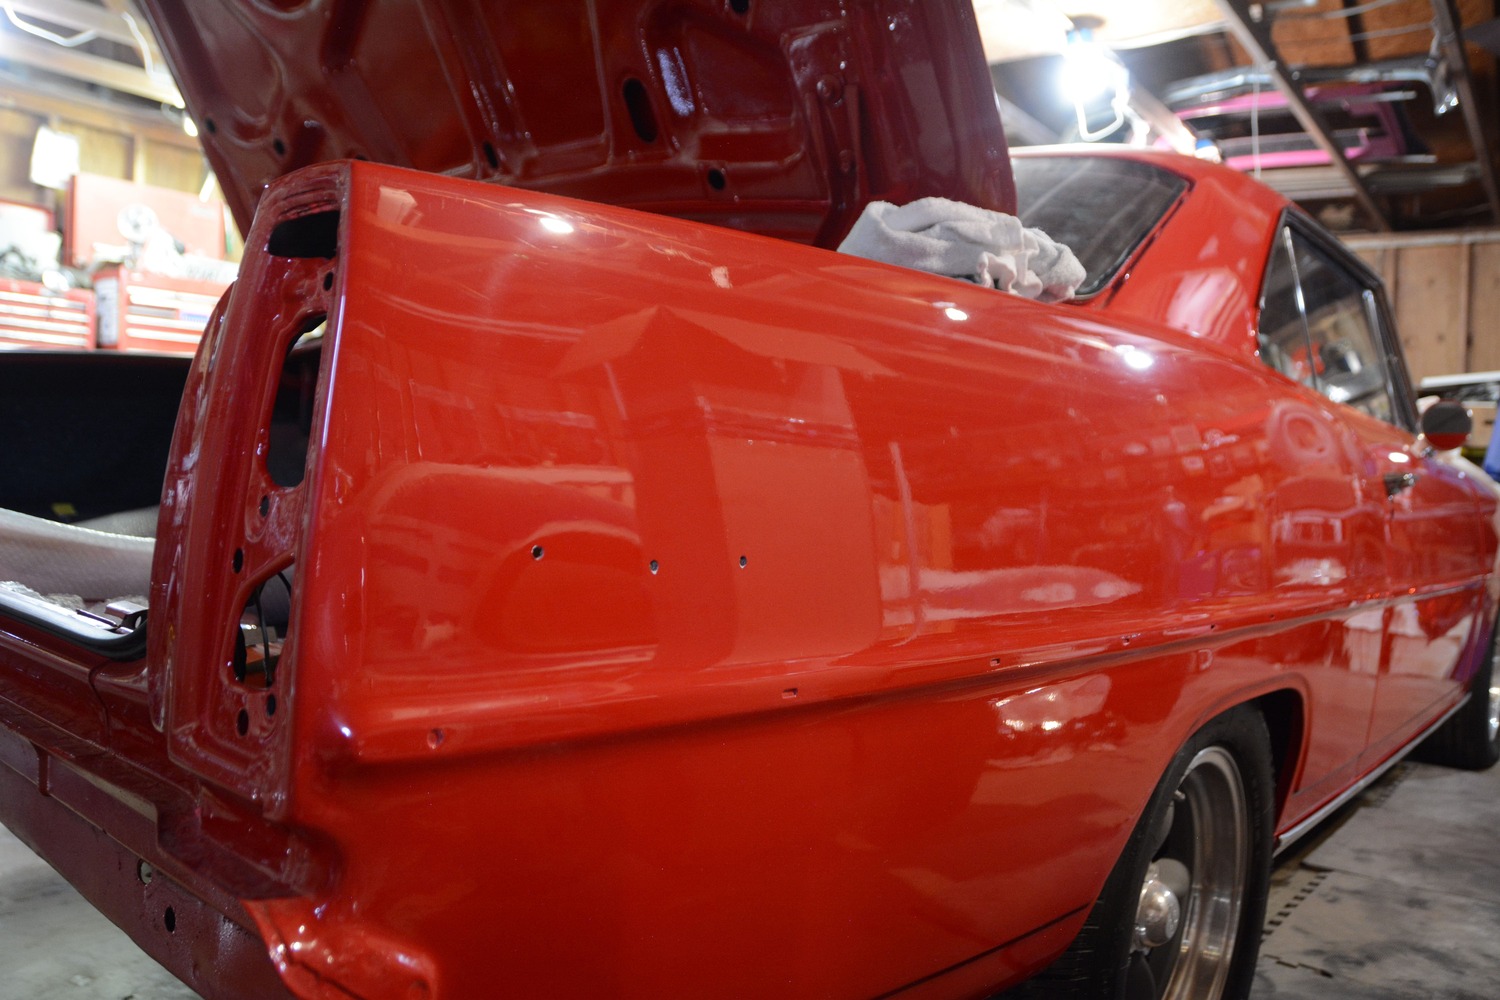
There is no such thing as a quick paintjob on a classic car—it always escalates into a big project. Our original intention with this ’66 Nova was a driver-quality paintjob, but as things progressed, we couldn’t just settle for a subpar job. Although not exactly show quality, the bodywork and paint turned out nicely, but we can see how projects stall out at this stage. Some folks give up all together, so it’s common to find cars on the market that are painted but not reassembled. If you’ve ever bought a project that’s disassembled, you know the struggles of finding the right clips, hardware, and brackets to put it all together. Thankfully, Classic Industries has an extensive catalog of parts and pieces for our ’66 Nova, so we made a huge list and started chipping away at the reassembly process.
Our starting point is a ’66 Nova that has been painted and is ready for final assembly. It’s quite common to buy a project in this state of completion, and we’re showing the steps necessary to make this car ready for the local cruise night.
The bumpers, grille, headlights, and taillights were still functional on our project, but there’s no way we could bolt those components onto a fresh paintjob. Along with the big items, we ordered all the necessary clips to hold the trim pieces in place. Then, it was onto final details, like door handles, mirrors, and windshield wipers. There are a few unobtainable pieces on a ’66 Nova, including the body side moldings and trunk trim, so we restored our original parts and installed them with new hardware. Restoring original parts definitely adds to the hours invested, and we spent about a week putting this car back together with our pile of new parts. Many of the items require an extra set of hands for proper alignment and easy installation.
In the last issue, you saw us straighten and polish the aluminum body side moldings for the Nova. Those were the first pieces we installed because we were anxious to see the result of our efforts. We used an assortment of mounting clips from Classic Industries.
Take a look at our assembly process and how we took a stripped-down ’66 Nova and turned it into a head-turner with beautiful brightwork and final details. Whether you’re taking on someone’s abandoned project or reassembling your own, Classic Industries can help button up your old-school Chevy.
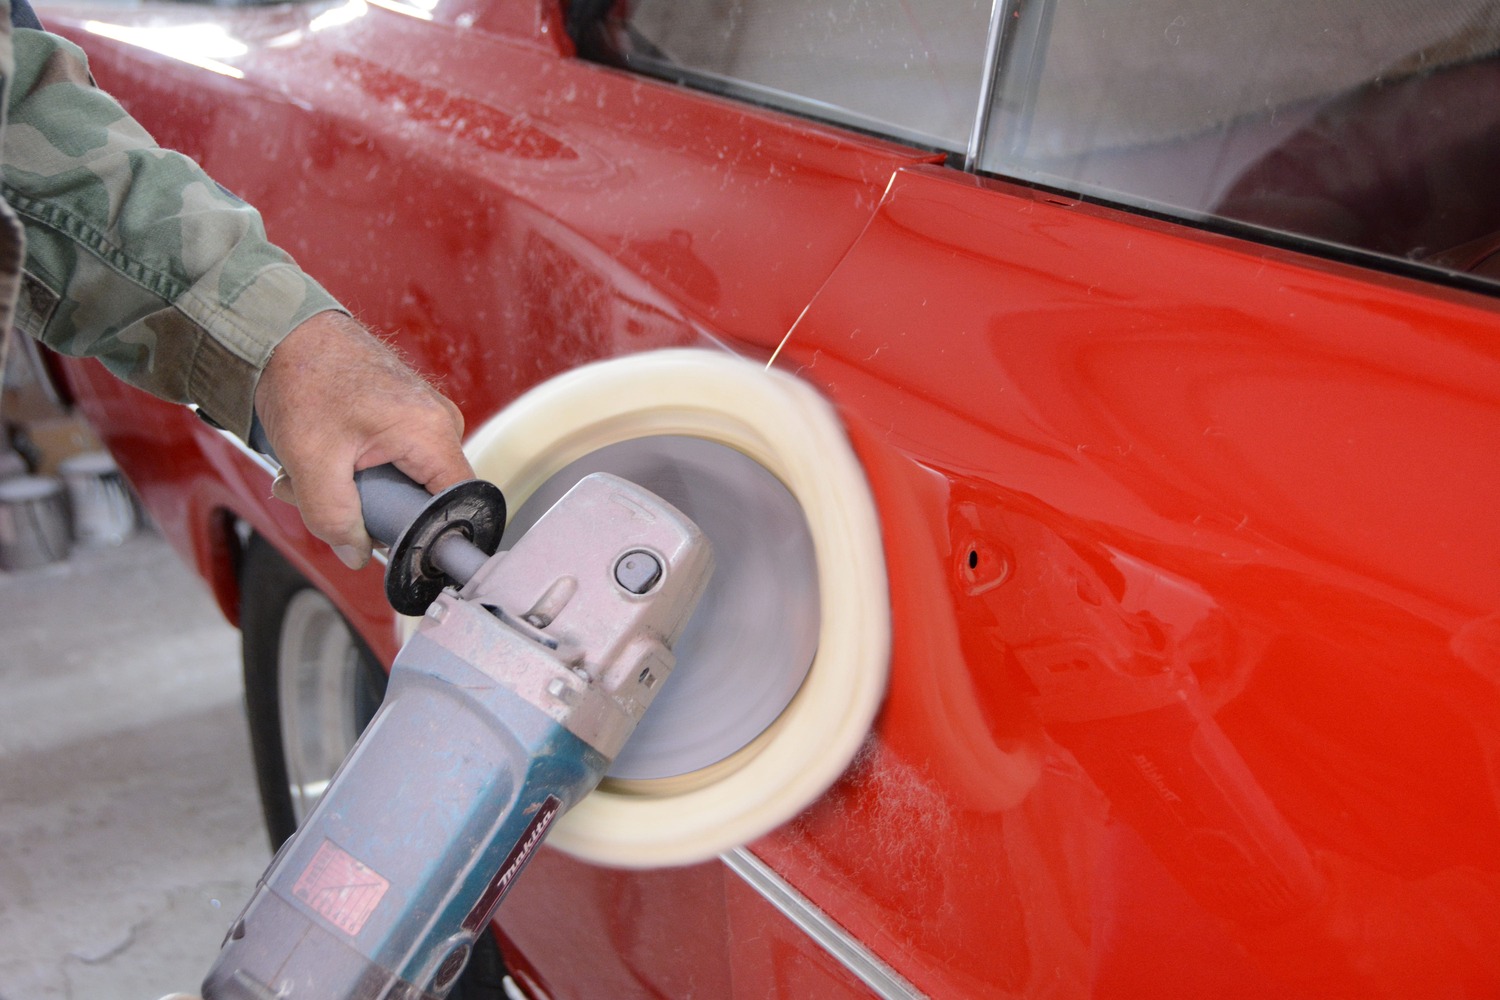
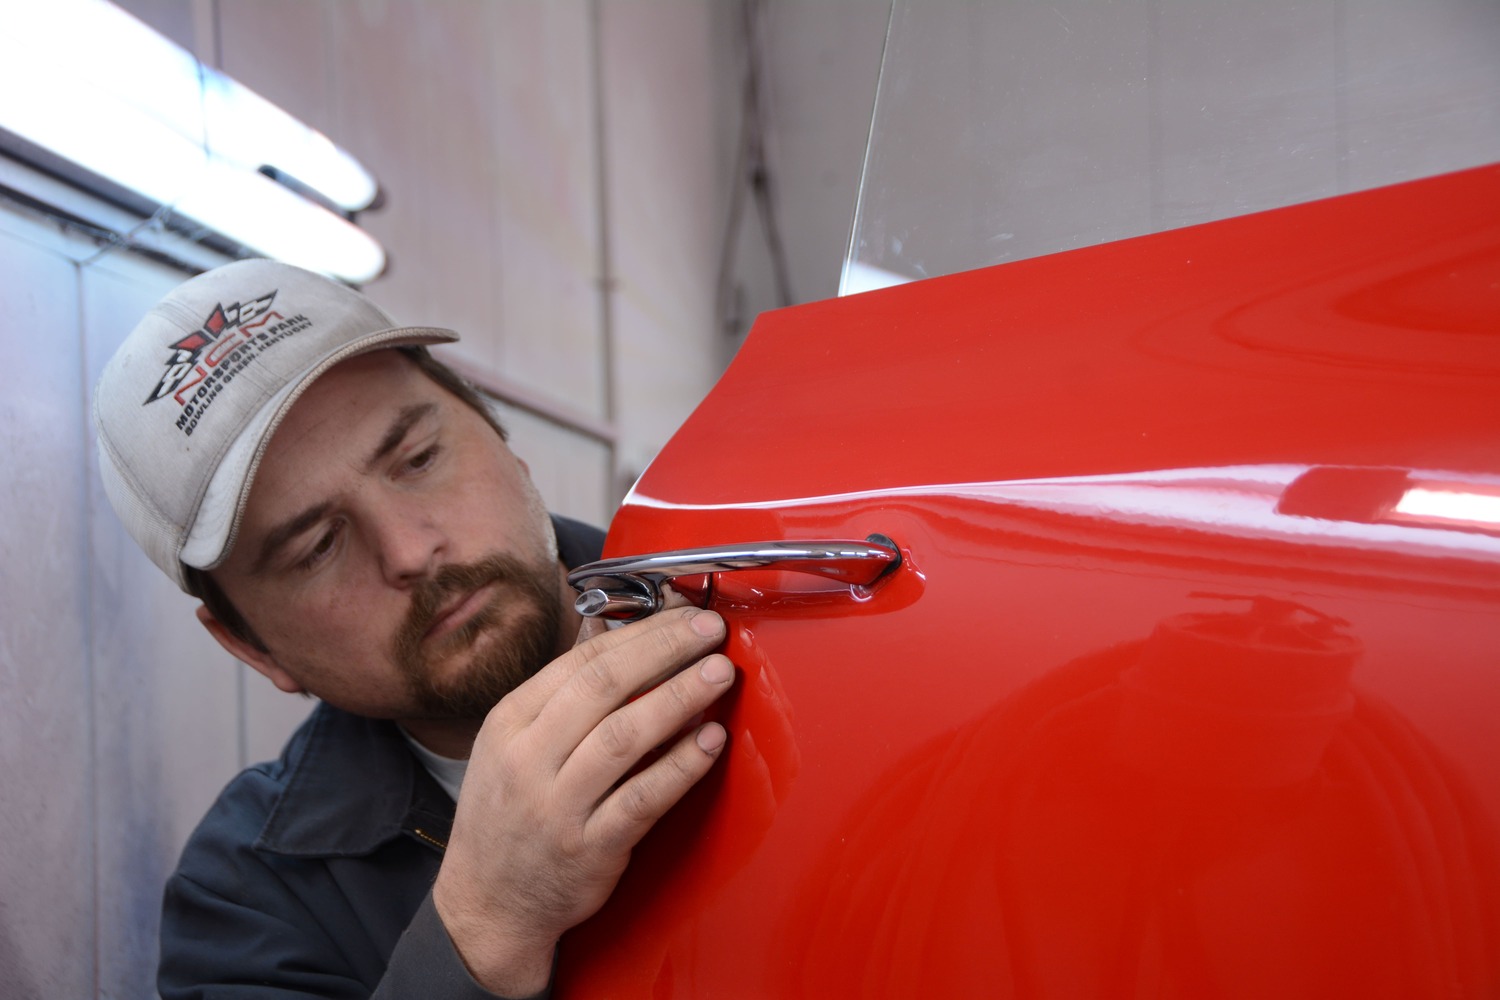
Before we start adding emblems, door handles, and mirrors, we buffed the paint that might be hard to access once those items are installed. Light compound and a wool pad are used for larger imperfections, then finished with a foam pad and machine glaze.The new door handles from Classic Industries are an affordable way to freshen up any classic Chevrolet. Installation is simple as the two rubber gaskets and two bolts are provided with the kit.
We were able to reuse the Nova’s original door locks. The lock slides into the notched hole and fits onto the latch mechanism easily. Finally, we slide the locking clip into place to complete the install.Many cars, like our Nova, came from the factory with only a driver-side mirror. We added a passenger-side mirror for safety. A small bracket bolts to the door and then the mirror hooks onto that bracket and is held in place with a provided screw.The rear window features stainless steel trim that’s held in place with clips. We ordered new clips and trim from Classic Industries and used the “hand hammer” to bump the trim into place, starting with the upper pieces and working our way down.Moving to the bottom side of the body, we screw new rocker panel trim clips into place. These clips provide a ledge for the rocker panel moldings to hang on. Once again, Classic Industries came to the rescue because our original clips were long gone.The new rocker panel moldings slide over the clips on the top side and then attach to the bottom of the rocker panel and front fender with screws.Classic Industries also provided the Nova quarter-panel emblems. The emblems slide into three holes and are held in place with three speed nuts on the back side of the quarter-panels, which are accessible in the trunk.Speed nuts refer to a type of nut that does not have threads. They are designed to cut threads into a smooth stud, like the ones used on our quarter-panel emblems. Speed nuts can also be used on threaded studs, like the ones used on the body side moldings.The original taillight assemblies were functional but didn’t match the finish quality of the new paintjob. We ordered new assemblies from Classic Industries, complete with bezels, lenses, and mounting hardware.The rubber gaskets for trim components can sometimes have some flashing or excess material around the edges. For this, we use a piece of sandpaper to clean up the edges before installing.The taillights are pre-assembled right out of the box and slide into place easily. We install them with the three provided nuts, and then plug in the sockets for the tail/brake lights and reverse lights.Classic Industries currently reproduces a Super Sport trunk molding, but since our car is a regular Nova, we polished and reused the original piece. The molding is made from diecast metal (aka pot metal) and features chrome plating. It is held in place with six nuts.The front of the Nova has several trim pieces in addition to the bumper and grille. The hood has two trim pieces: one that is diecast and one that is aluminum that fits on the bottom edge. It has studs pre-installed and attaches with nuts.Another piece of trim attaches to the steel filler panel, also known as a splash pan, that rests between the grille and bumper. This trim piece is also aluminum and attaches to the painted panel with nuts and bolts from the hardware store.The filler panel is then bolted to the front fenders with standard fender bolts and washers.Next is the bumper. We reused the original bumper brackets but replaced the bumper with a new one from Classic Industries. There is very little room for adjustment, so if your brackets are tweaked they will need to be replaced.The aluminum headlight bezels are often damaged because they are the most likely place to be bumped when these cars were everyday drivers and the material is very thin. These new bezels from Classic Industries gave this Nova a huge face-lift.Next, the hood latch assembly and vertical brace are bolted to the radiator support and then loosely bolted to each other. The upper latch bolts also hold the original clamps for the headlight wiring harness.Before we can install the new grille, we must install the side brackets from the Classic Industries mounting kit. These brackets bolt to the inner portion of the front fenders. Holding the nut on the backside can be a challenge with the headlight bucket installed, but it can be done.The top side of the grille slides in between the latch assembly and vertical support. A bolt goes through the grille and latch and threads into the support. We suggest leaving the bolts loose until the grille is bolted to the side brackets.The Chevy II emblem bolts onto the grille. The backside of the emblem has a channel design, which uses spring clips with studs. After the studs pass through the grille, we carefully tighten the nuts to prevent bending the aluminum material.Finally, the grille attaches to the side brackets. We used #10 Phillips head bolts and nuts from the hardware store. It takes two bolts and nuts per side. Additional brackets are used to attach the bottom of the grille to the filler panel.A finishing touch for the front end is a pair of new parking light lenses from Classic Industries. We also grabbed a pair of new gaskets to go behind the lenses. We reused the original screws.Classic Industries also offers new windshield wiper arms and blades. The car had decent blades, but they had an ’80s look, so we went back to the original style. They slid directly on the splines and finish off the car nicely.The window reveal molding is made from stainless steel that hold the window felts with small tabs. The quarter-panel moldings attach with very short sheetmetal screws, and the door moldings attached with special clips, which are available from Classic Industries.Next are the rubber components, starting with the roof rail seals. The old ones were crumbly, so we ripped them out of the channel and squeezed the new ones into the rail.Door weatherstrips are next and attach with built-in plastic pins. After pressing in the pins, we attach the ends with the provided black push-in pins. Finally, we screw in the original keepers.This rubber seal slides into the stainless trim on the leading edge of the quarter window to provide a watertight seal between the door glass and quarter window.After a week of reassembly, the final product is a very presentable ’66 Nova that anyone would be proud to display at the local cruise night. It isn’t a show car, but the Classic Industries trim components gave this Nova an awesome look.
We use cookies to ensure that we give you the best experience on our website. If you continue to use this site we will assume that you are happy with it.