When it comes to assembling an engine, it’s not uncommon to find yourself mixing and matching components of unknown origin. Perhaps it starts with a junkyard engine that’s been torn down to the bare block, or maybe it’s a half-finished engine build inherited from a friend. The specifics are supposed to be XYZ, but what are they in reality?
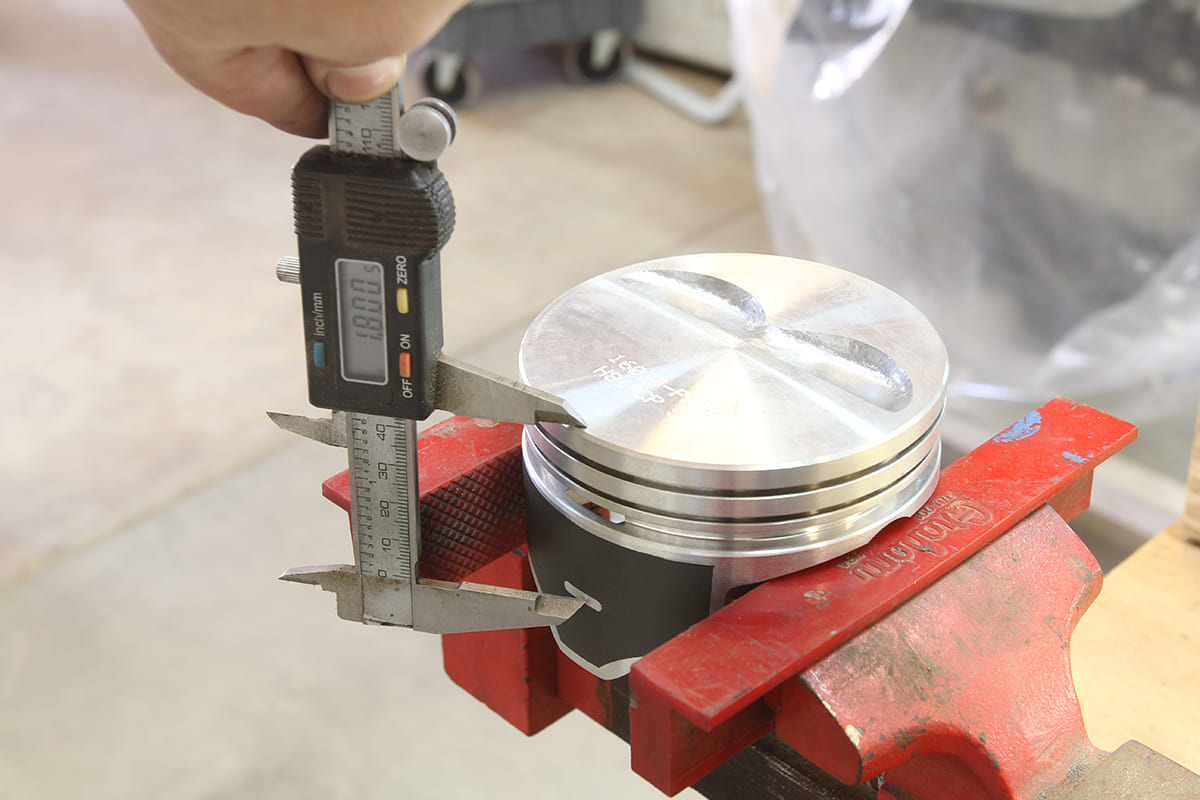
The first step in checking the piston size and its compatibility with our block is to determine the proper location on the piston in which to measure its diameter. Many people don’t realize that pistons are actually oval shaped, so it’s important to measure the widest spot of the piston itself. Most piston manufacturers will provide these specifications with their product. Some, like our Mahle piston shown here, have a clearly marked area along with a spec (1.800- inch from the top of the piston crown down onto the skirt). If in doubt, measure the piston 90- degrees opposite the piston pin, towards the bottom of the skirt.
Without properly measuring everything, it’s nearly impossible to guarantee that the components will work together or are even what they’re supposed to be. The block could have been bored or honed, the pistons ordered oversized or otherwise incompatible. It’s not uncommon to pick up a set of decent pistons from a swap meet that seem like the perfect forgings for that low-buck 350 build, but if they won’t fit your block you could be looking at spending more money to get those “sweet deal” parts to actually work together. In all of these cases, your best bet is to measure twice and purchase once.
But there’s more to accurately measuring engine components than a tape measure, dial calipers, or a couple strips of Plastigage. No, if we’re going to measure things to the proper degree (or thou in this case) we need to step up our measuring game with a couple tools specifically designed to do exactly what we’re attempting. Thankfully, these tools aren’t outright expensive and are easily found by simply perusing Summit Racing’s website or catalog.
Next, the piston is measured using an outside micrometer. Our pistons are supposed to be just shy of 4 -inches, so we used a 3- to 4-inch outside mic. So far, so good. The piston measures two thousandths under 4 -inches, coming in at 3.998- inches, which is what we expected.
The first thing we’re going to need is a set of outside micrometers that are large enough to measure the piston diameter. This is where that tape measure or dial indicator can come in handy to find the rough diameter of the piston to ensure the micrometer set you order will work.
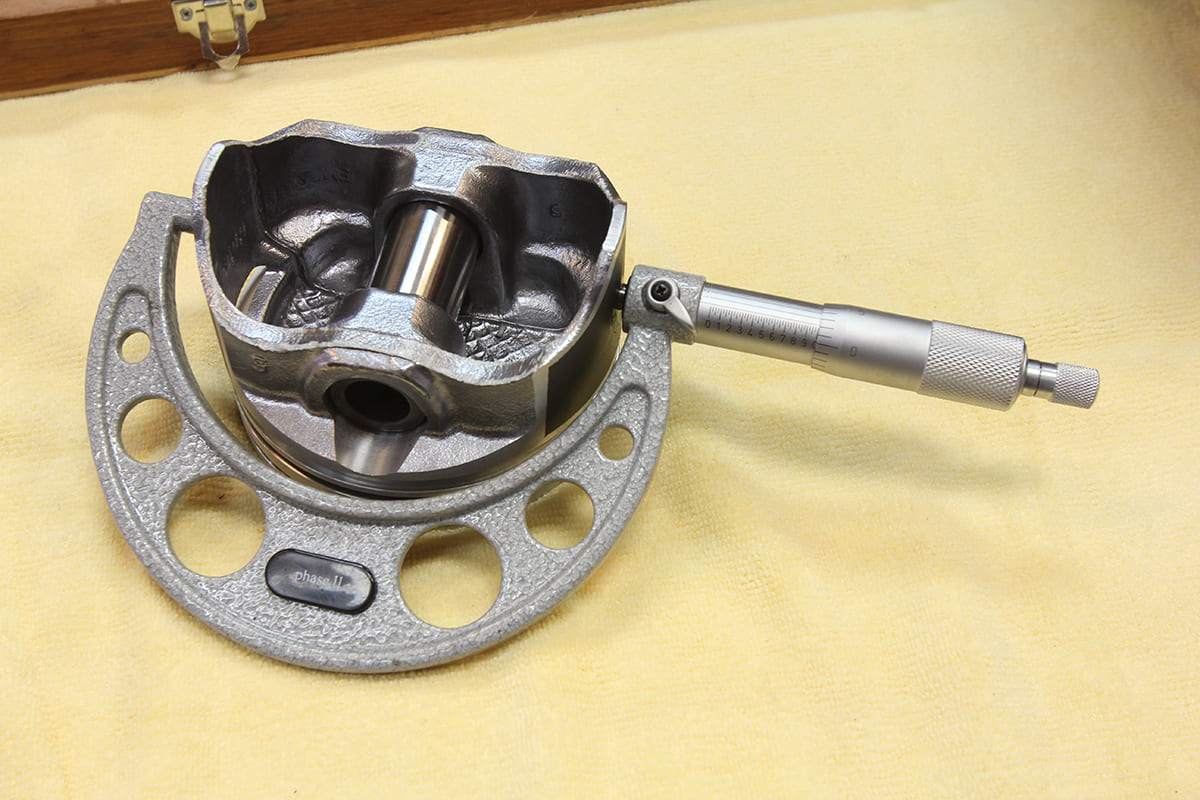
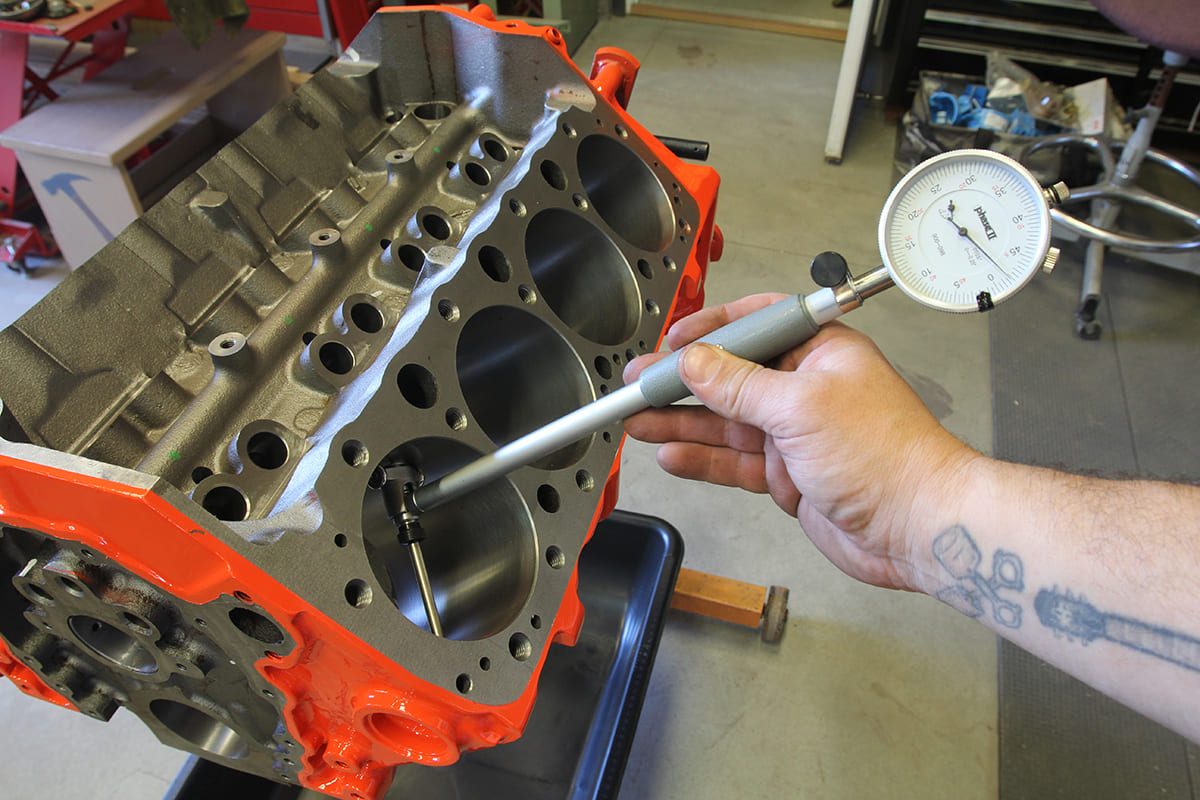
Something like Summit Racing PN POW152006 should work for most applications. An outside micrometer will allow us to measure the diameter of the piston, but to accurately measure the bore of our engine we’re going to need what’s called a dial bore gauge. PN SUM-900041 is a good, inexpensive solution for this.
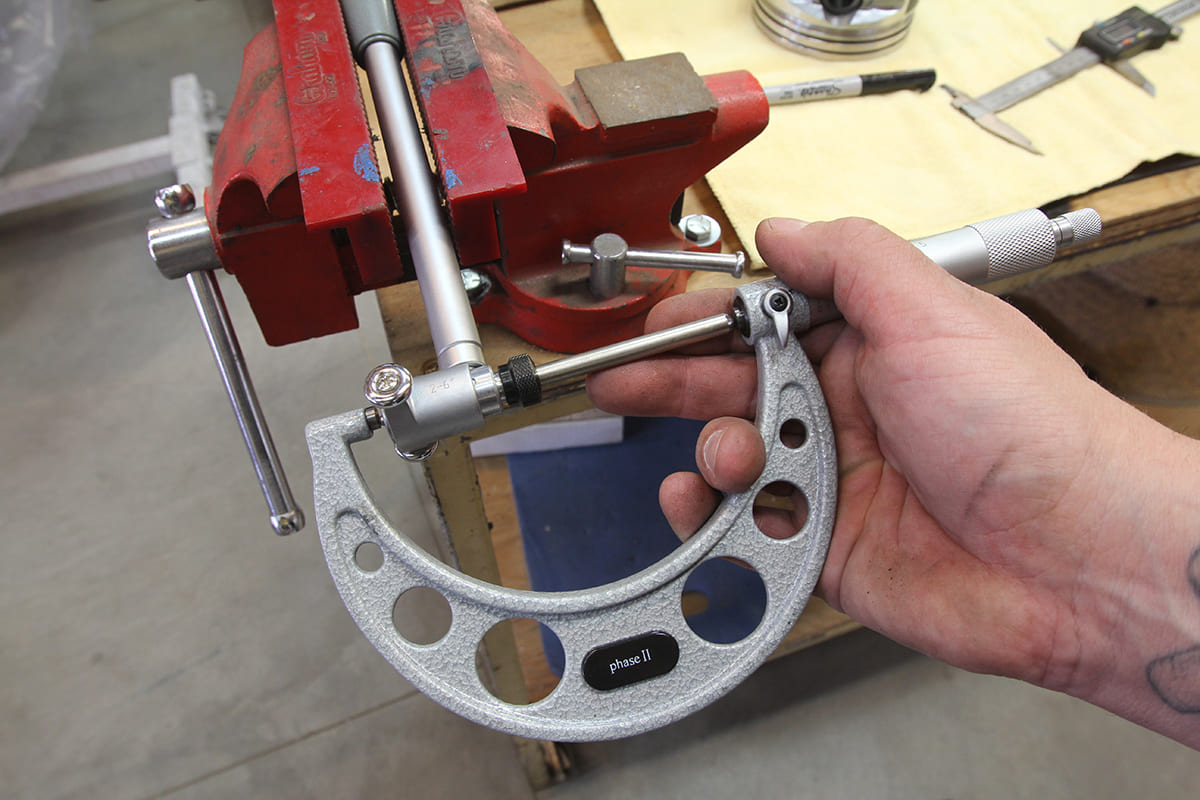
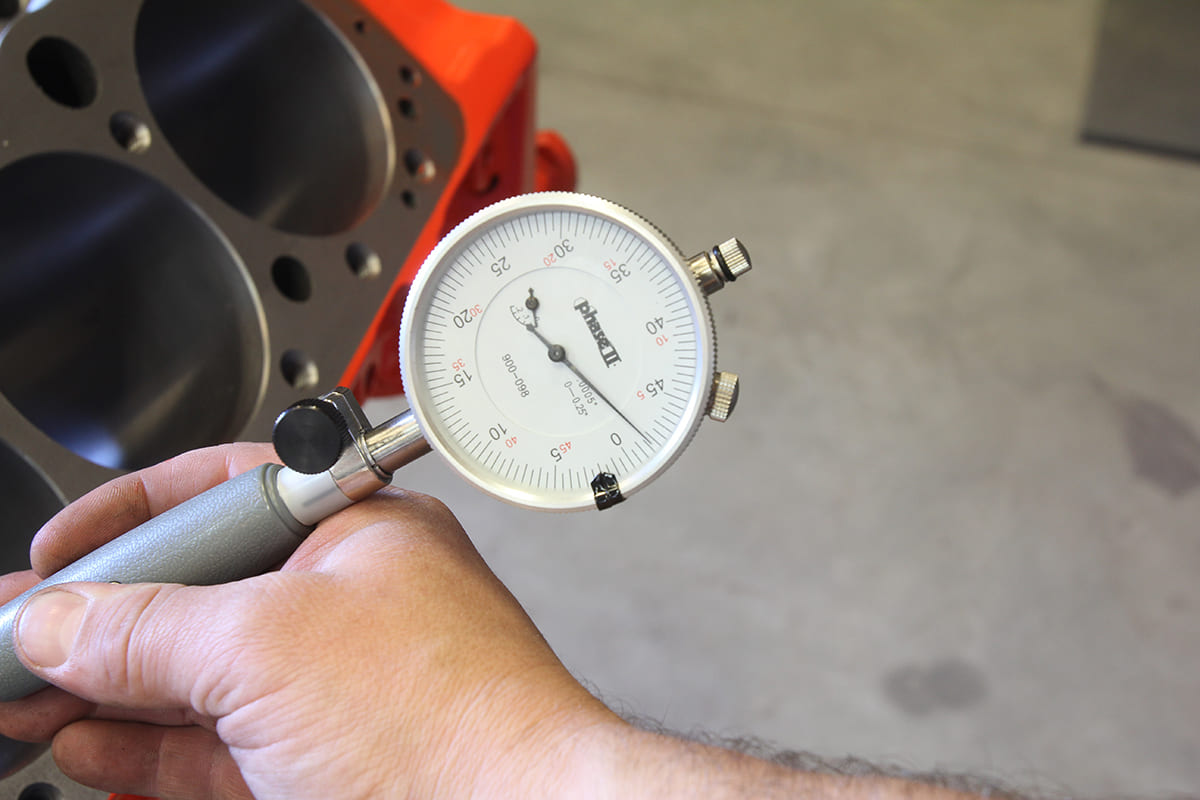
The next step is to “zero” our dial bore gauge using the proper arrangement of anvils for our particular tool to reach a width that’s slightly larger than the piston’s diameter of 3.998- inches.
With those two tools on hand, we can accurately measure both the piston’s diameter and the bore of the engine and also determine if the two dimensions jive as per the piston manufacturer specs, commonly referred to as piston-to-wall clearance. This is the difference between the engine block’s actual bore and the diameter of the piston at a specific dimension (usually perpendicular to the piston pin on the piston skirt). This distance is essential for proper piston ring function and safe clearance between the cylinder wall and the piston when things heat up and start to expand (remember steel and aluminum expand at different rates).
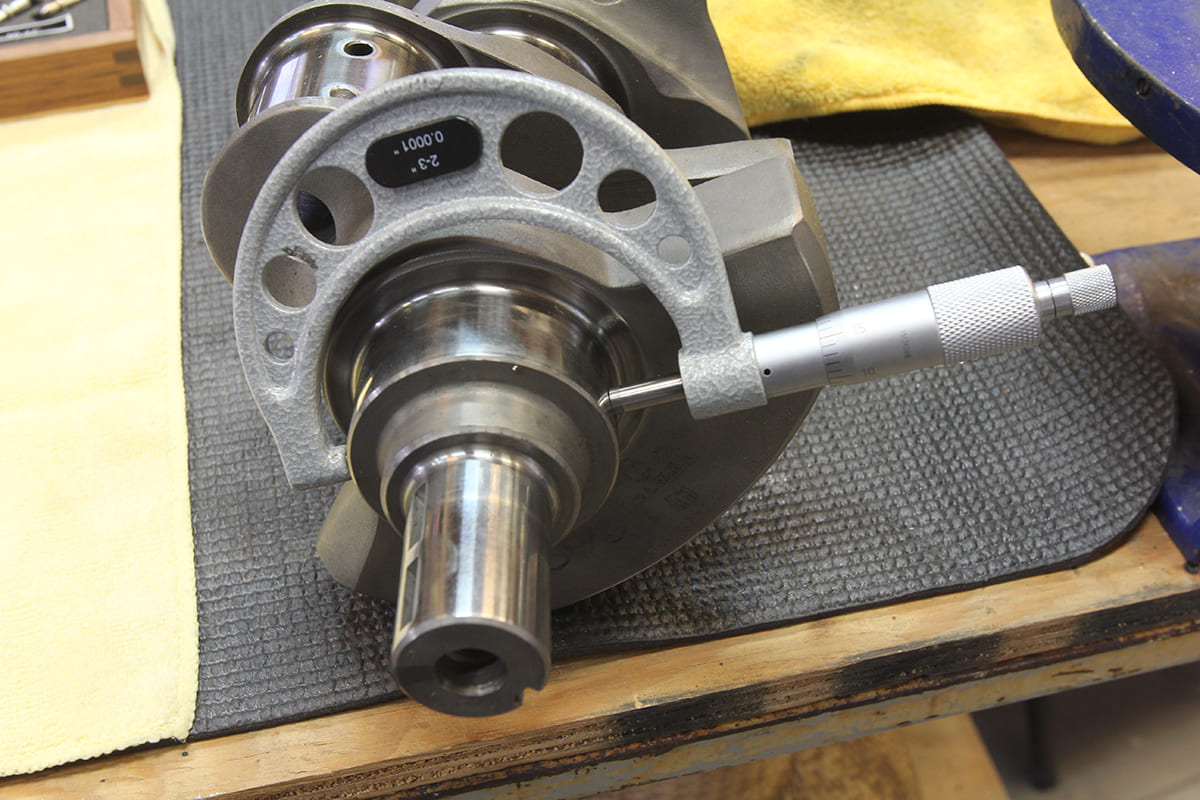
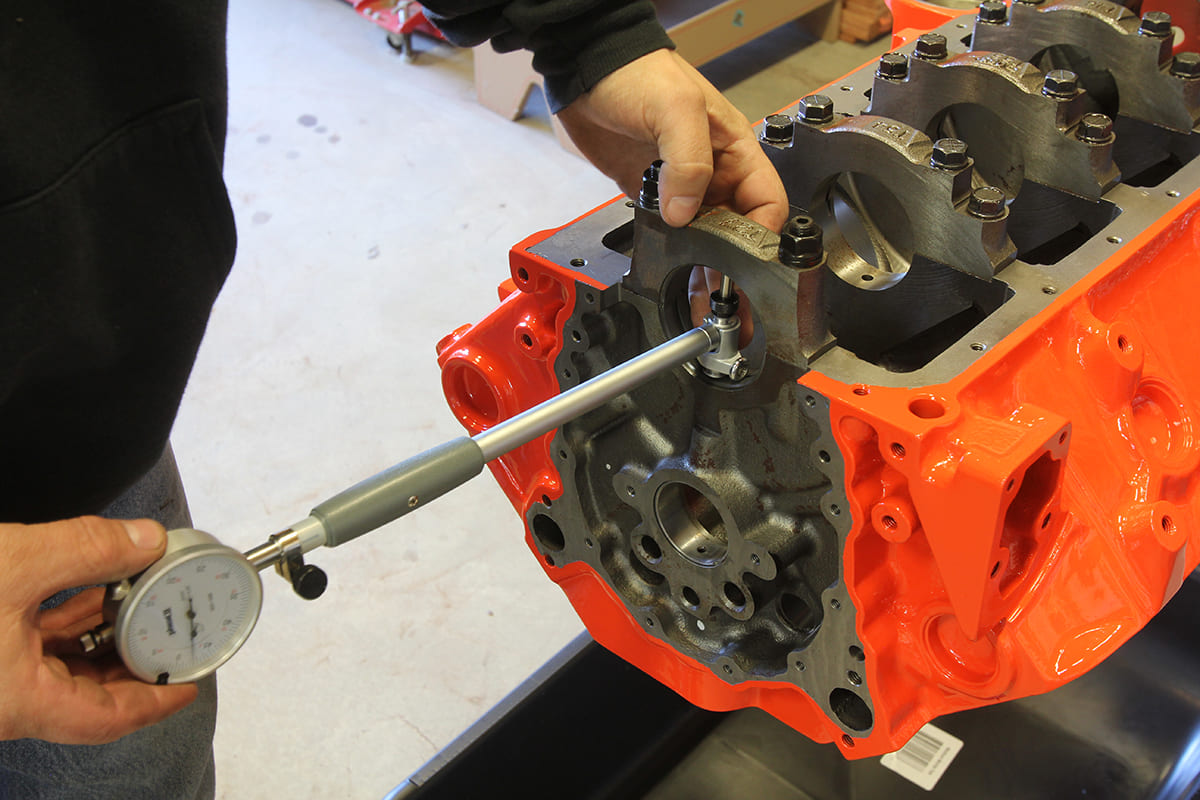
In addition to being able to properly measure the bore and piston diameter, equipped with these two tools, we can now check all of our installed diameters. The main bearings and caps can be installed and torqued to spec, measured, and then double-checked against the crankshaft to ensure those dimensions are accurate and whatever machining has been done in the past is acceptable. The same can be said about the rods and their respective components, and even the camshaft and bearings. This process is oftentimes referred to as “blueprinting” but any respectable engine builder will simply refer to it as just another step in a proper engine build.
This allows us to “zero” the dial indicator on the dial bore gauage to the piston’s measured diameter.
Call it what you want, if you have the tools and the ability to properly check all those engine components, you’ll have peace of mind that once it’s assembled, it should stay that way and provide years of reliable miles!
ACP
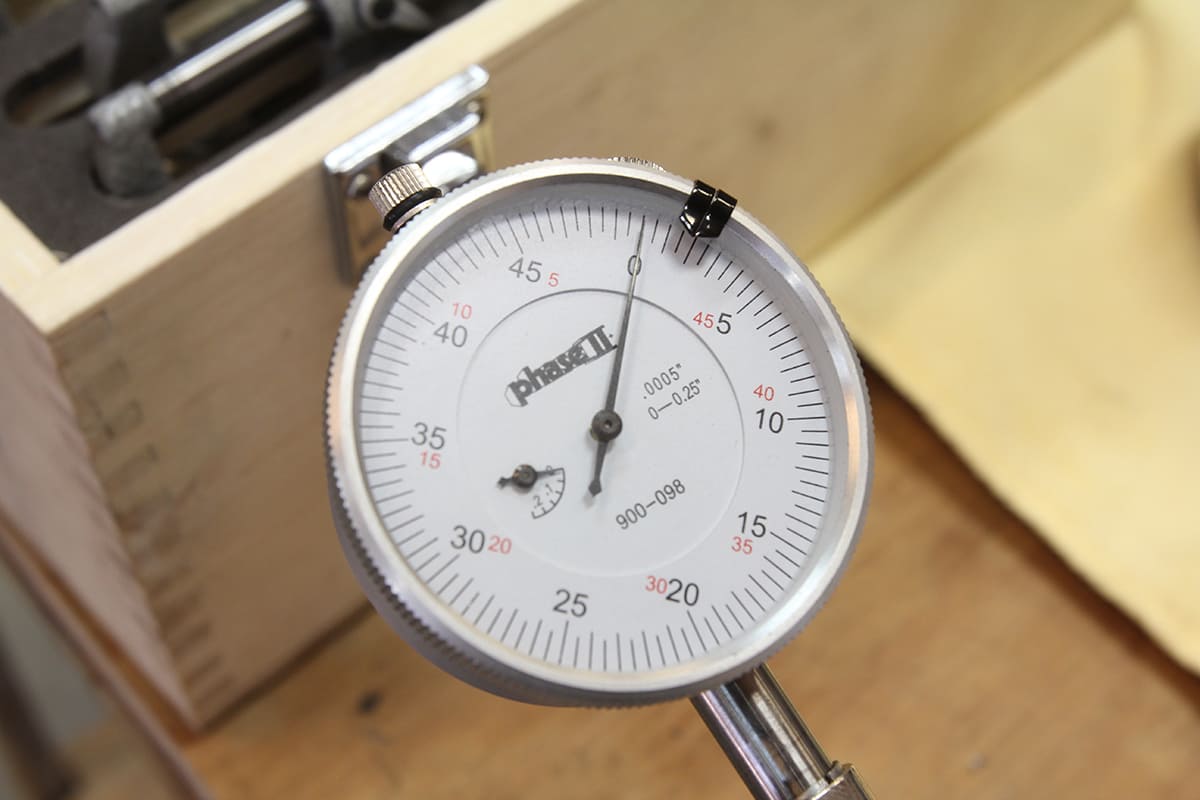
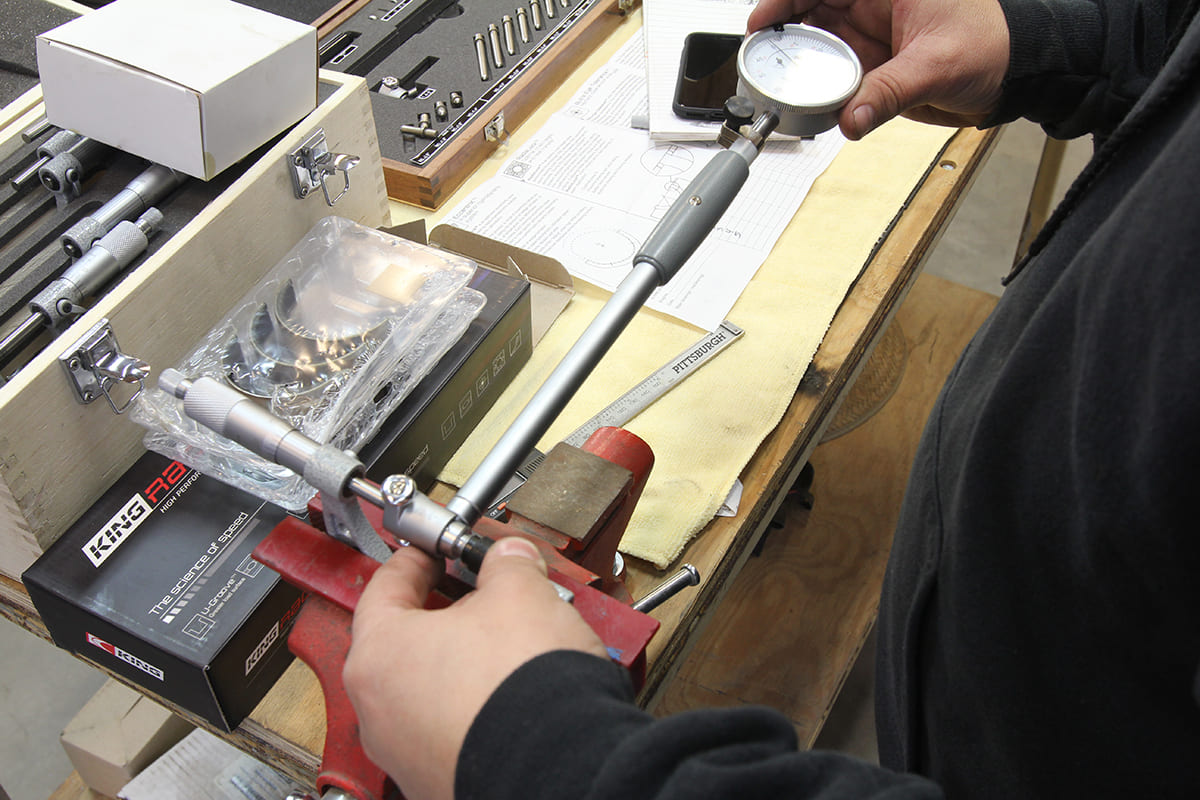
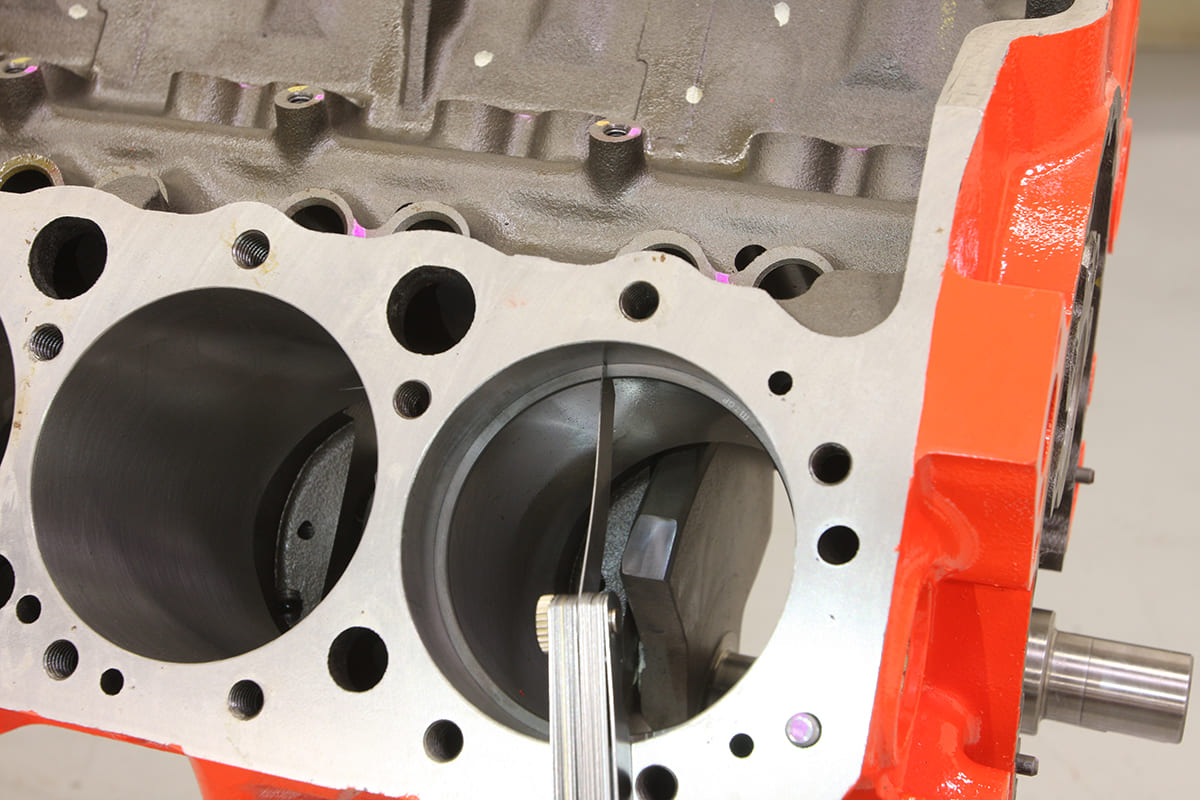
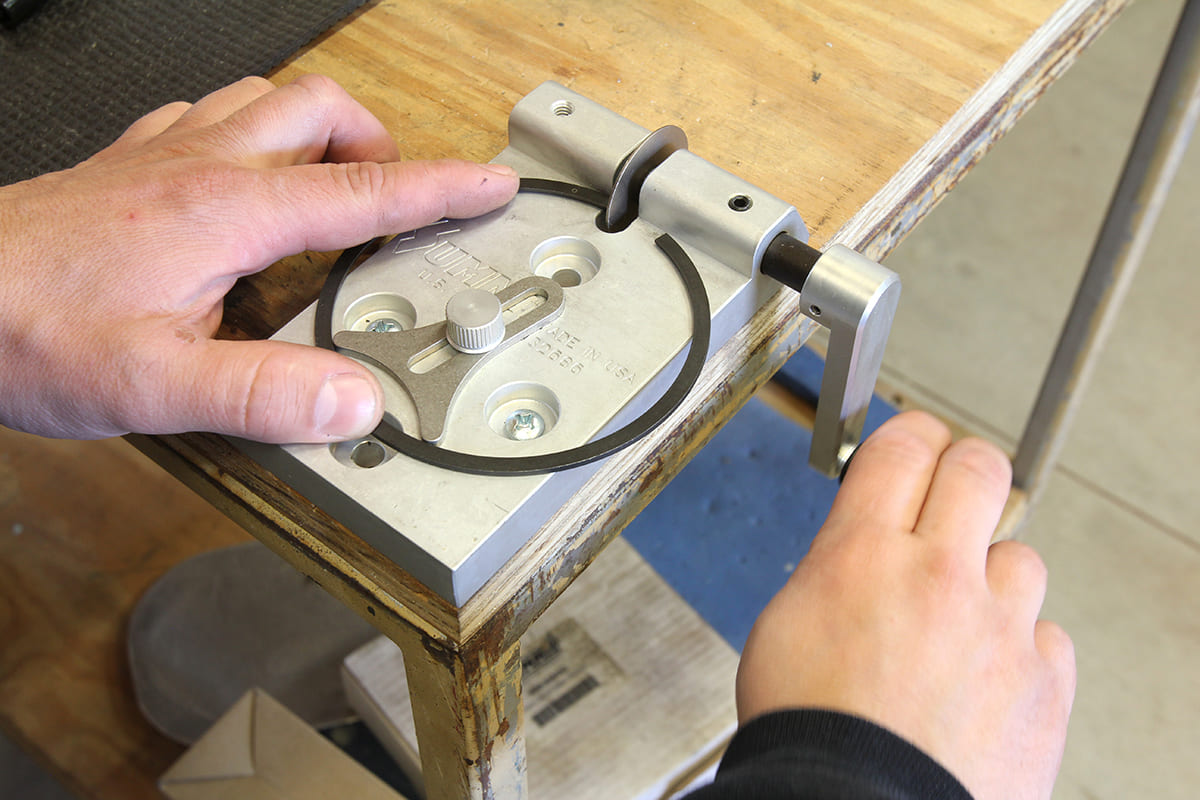
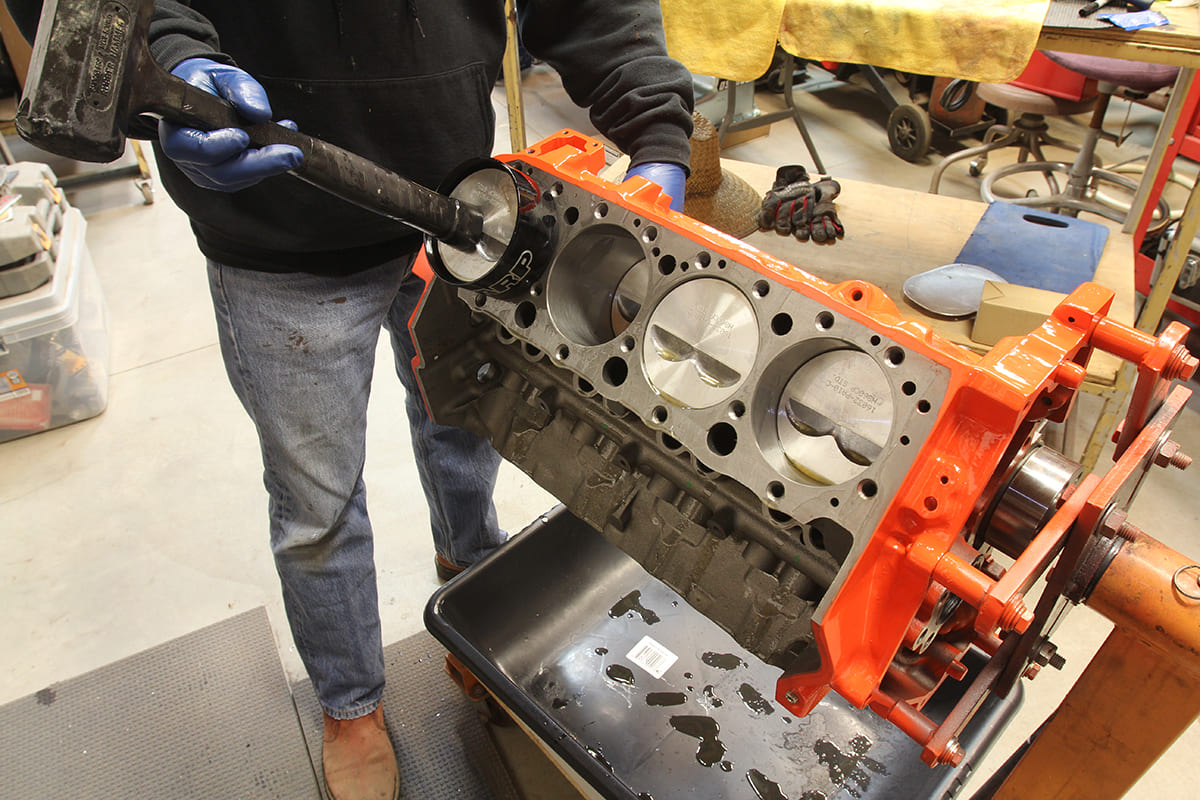
When it’s inserted in the bore of our engine, the difference in diameter between the engine block and the piston is easily read on the dial indicator.In this case, the bore diameter is 0.0035 -inches larger than the piston’s diameter, as evidenced by the dial bore gauge’s dial indicator reading. For a 383ci small-block Chevy, that’s right where it should be, so it looks like our block and pistons are a good match!As we mentioned earlier, we can apply the same technique to ensure other tolerances on our engine build are within spec as well. Here, we’re measuring the main bearing surface of our crankshaft …… “zeroing” the dial bore gauge to that measurement ……… and then measuring the IDid diameter of the engine block’s mains with the bearings installed and the main fasteners torqued to spec. Once again, this info can be compared to the bearing manufacturer’s recommended clearances to know whether the block’s mains or the crankshaft is within spec. Note that the main cap we’re measuring has been upgraded with ARP main studs, while the other caps are still under stock hardware. We’ll be replacing all the main bolts with ARP studs, so we’ll be sure to check the other mains to ensure they’re within spec as well. It’s not uncommon for main bolts and main studs to yield different results, so it’s a good idea to measure everything just in case if you’re making the change.When it comes to fitting unknown pistons to an unknown block, another item to check is the piston ring end gap. These specs are also provided by either the piston manufacturer (if they provided the rings) or the ring manufacturer themselves (if known). A good rule of thumb for a high- performance street engine is engine bore byx 0.0045 -inch for the top ring, bore byx 0.0050- inch for the second ring, and a minimum of 0.015- inch for the oil ring rails. To measure piston ring end gap, each ring is inserted a predetermined depth, achieved here using a Summit Racing Piston Ring Squaring Tool (PN SME-906002), and then the gap between the ring ends is measured using a feeler gauge.When it comes to fitting unknown pistons to an unknown block, another item to check is the piston ring end gap. These specs are also provided by either the piston manufacturer (if they provided the rings) or the ring manufacturer themselves (if known). A good rule of thumb for a high- performance street engine is engine bore byx 0.0045 -inch for the top ring, bore byx 0.0050- inch for the second ring, and a minimum of 0.015- inch for the oil ring rails. To measure piston ring end gap, each ring is inserted a predetermined depth, achieved here using a Summit Racing Piston Ring Squaring Tool (PN SME-906002), and then the gap between the ring ends is measured using a feeler gauge.If the rings seem obviously tight in the cylinder bore, chances are they are of the file-to-fit variety and have yet to be modified. Good news for you, as they can now be filed according to manufacturer’s specs to suit your block. Summit Racing has a great, affordable manual ring filing tool (PN SUM-906000) to handle this requirement.With our block and pistons checking out, one last tip for the home builder is to purchase the appropriately sized piston installation tool, like the ARP unit we’re using here. These are machined with a taper and are diameter-specific to each particular piston size, with a shoulder at the bottom that engages the bore of the engine block to ensure the piston slides smoothly into the cylinder bore without snagging the rings or cocking the piston.
We use cookies to ensure that we give you the best experience on our website. If you continue to use this site we will assume that you are happy with it.