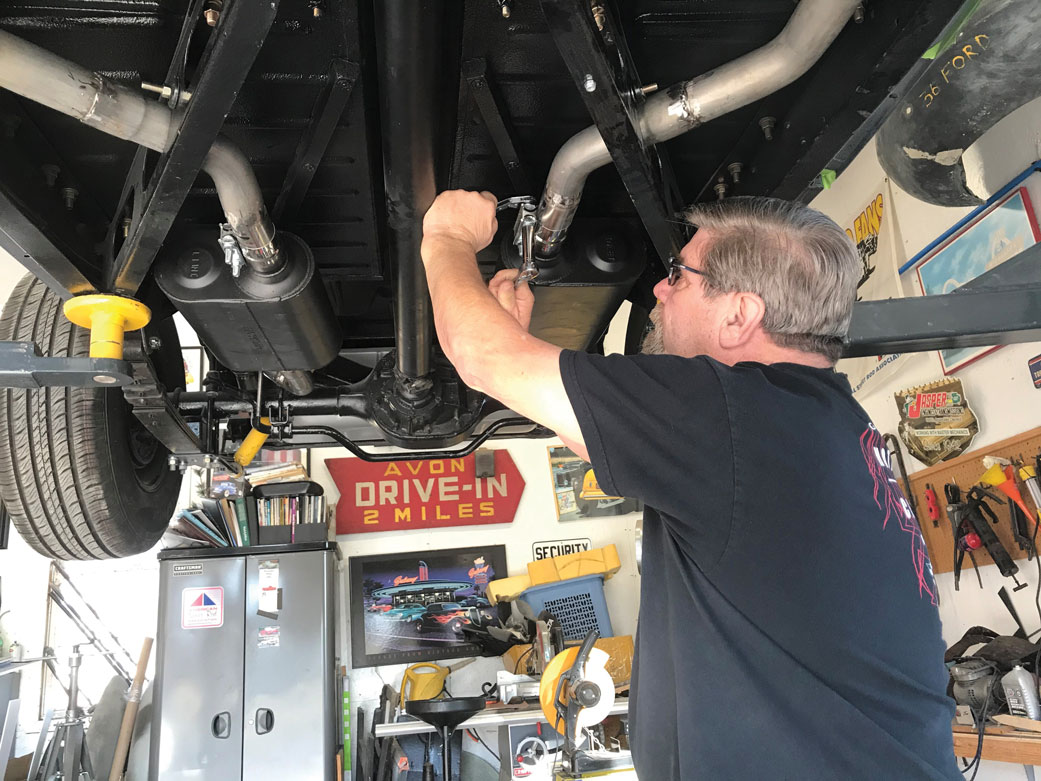
Moving along on our project 1936 Ford it is now time to take a serious look at its exhaust system and where we can run tubing—in fact, more importantly knowing where not to run tubing or locate the mufflers.
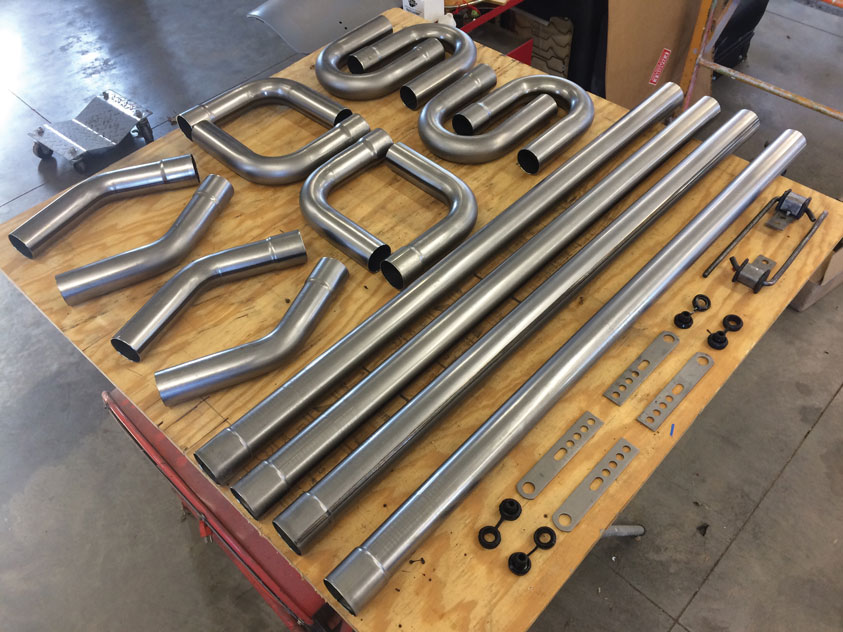
The Speedway Motors (SM) universal mild steel dual exhaust kit features 2-1/4-inch tubing (PN 91013822) and is the basis for our custom exhaust system.
Every hot rod lives or dies by the sound of its exhaust system. In fact, many hot rodders don’t even bother running a stereo as that’s considered “noise” likened to the “good vibrations” that come from a well-tuned exhaust note. It doesn’t really matter what type of car you build. If it doesn’t sound right, you will not enjoy driving it.
To aid project owner John Winter in making his custom exhaust system he opted for several items from the exhaust section of Speedway Motors’ (SM) catalog. He based his custom exhaust system on the SM universal mild steel dual exhaust kit featuring 2-1/4-inch tubing (PN 91013822), a pair of MagnaFlow mufflers from SM (PN 37613254), a pair of SM 10-inch-long weld-on exhaust hanger brackets (PN 91602018), and four SM 7-inch-long exhaust hangers with bushing kit.
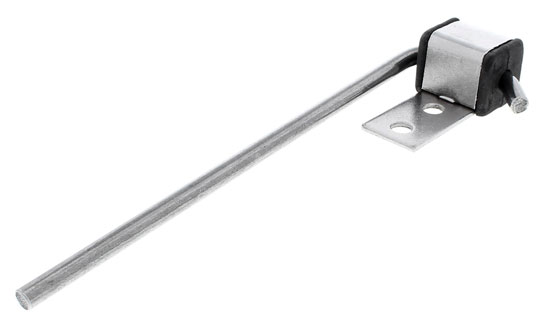
Also rounded up from SM are a pair of 10-inch-long with a 3/8-inch rod diameter weld-on hanger brackets (PN 91613254) that come with rubber isolators.
All of these components are used in conjunction with a pair of tubular block hugger-style headers. Since Winter is using the SM universal exhaust kit, he could have linked up to virtually any combination of exhaust manifolds, whether they be factory cast-iron or aftermarket headers.
Anyone who has built a hot rod can tell you the vast majority of the time (that would be all) you are better off having a custom exhaust system made for your particular car than most any other option. One would think that a 1932 Ford is a 1932 Ford or a 1962 Chevy is a 1962 Chevy and oftentimes that’s the case, but when it comes to an exhaust system there are so many little things that can cause an exhaust system to change from one vehicle to the next it’s best to go with a custom exhaust system.
More SM goodies include the 7-inch universal exhaust hangers with snap-in bushings kit (PN 91603043).
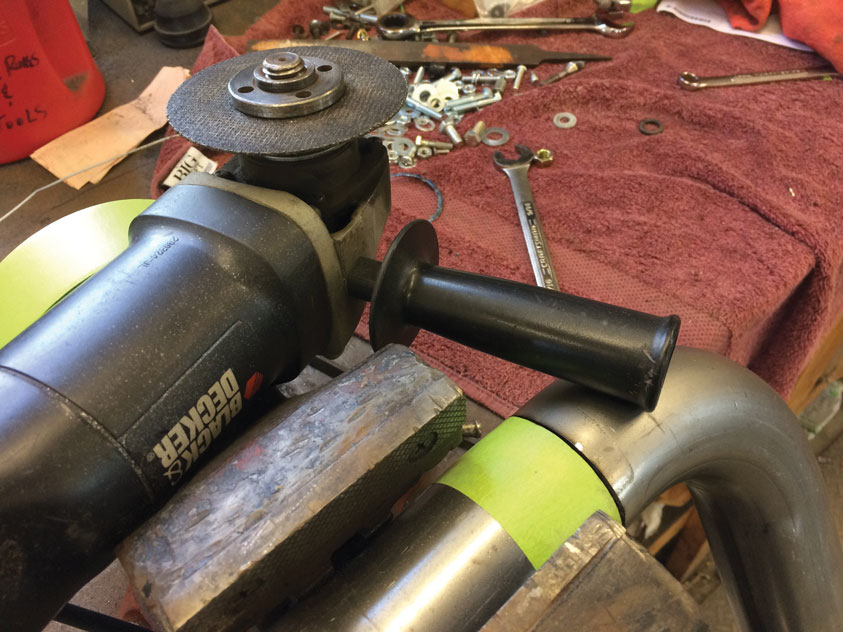
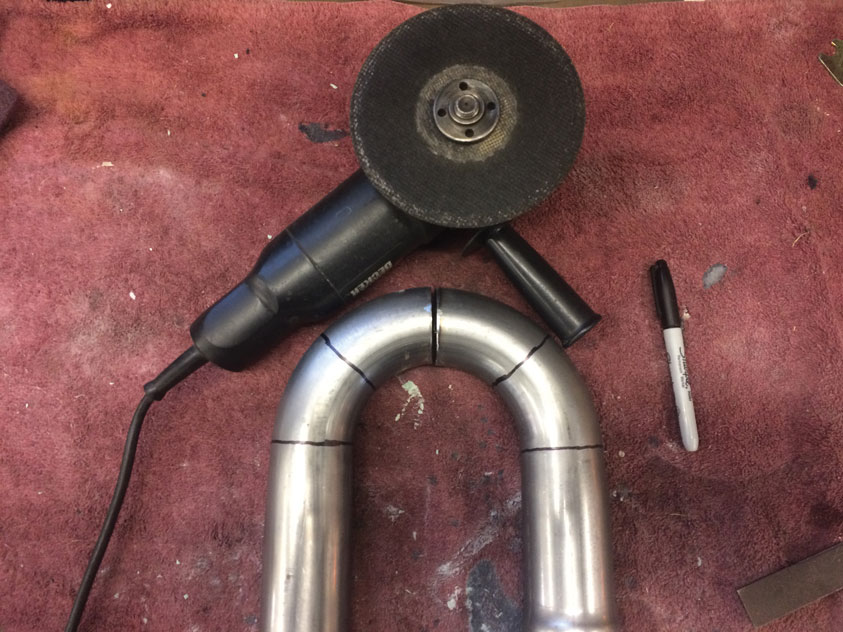
In our application we used a Lincoln MIG welder and set the amp range (25-125 amps) at setting “F,” which is just above halfway, while the wire feed was set at 3-1/2, which is at the lower end of the wire feed spectrum. With these settings we used a 20-gauge solid steel wire. We also kept a cutoff wheel handy and a magic marker so that we could mark where we would want to make straight or angled cuts.
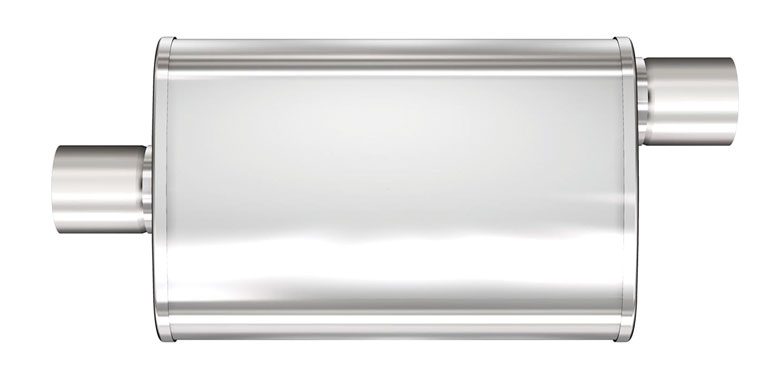
Any good street exhaust system is going to need mufflers, and in most cases a pair of them. We opted for a pair of the MagnaFlow XL mufflers (PN 37613254). Ours have the center inlet and offset exhaust ports.
Keep this in mind. Just because you have built the passenger side of the exhaust system, for instance, doesn’t mean you make a mirror example for the driver side. Nope, each side will be different; there will be some similarities but you will need to be careful as you will need to realize each side requires additional thought.
Dual Exhaust Kit
We have found over the years that nothing replaces a roll of masking tape, a black marker, and a cutting wheel to make alternations to the exhaust pipe.
The SM universal dual exhaust kit (PN 91013822) includes everything you should need in the way of 16-gauge steel (0.06-inch wall thickness) mandrel-bent 2-1/4-inch exhaust pipe bends and straights that will allow you to build your own custom exhaust system. Each of these kits included four each of 45-degree, 90-degree, and 180-degree bends (3-1/2-inch radius) along with four 46-inch lengths of straight exhaust pipe.
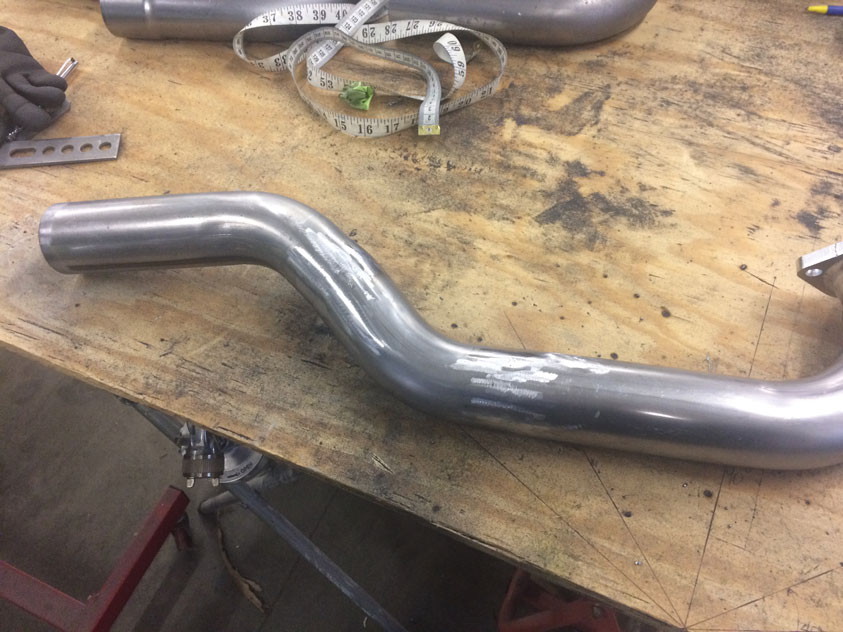
Here we took one of the U-bends and marked and cut it into several angled cuts to make less dramatic bends.
Often, we don’t give much thought to the tube being mandrel bent but this is an important aspect. Yes, it looks great and that’s cool but a properly bent tube will allow the exhaust to flow freely and create less restriction. Additionally, an improperly bent tube will have kinked bends, which can lead to weak spots. Hence, a mandrel-bent exhaust is the only way to go.
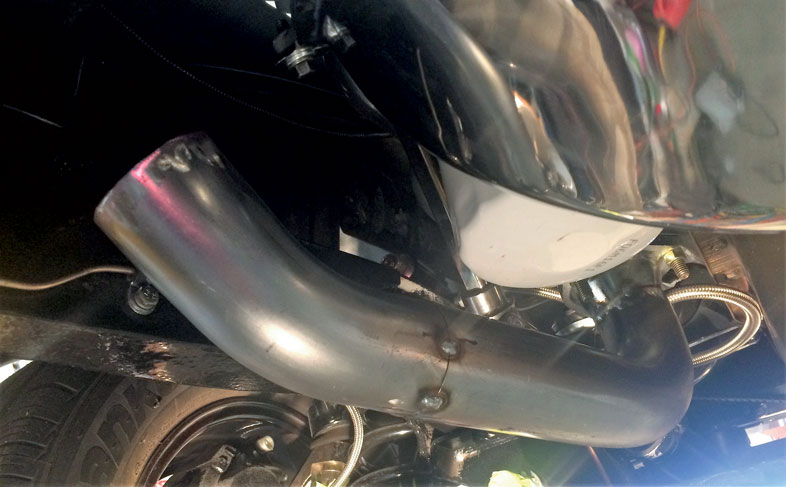
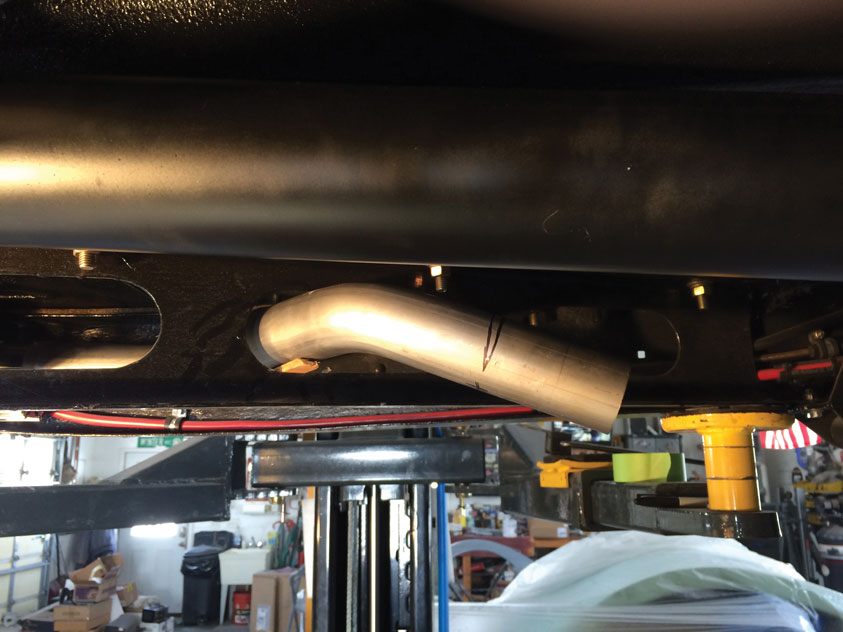
Driver side has taken two pieces to come down from the exhaust manifold (block hugger-style headers) and go beneath the oil filter and then back up. Remember, clearance around an exhaust system is always important—note the oil filter. You want to make sure you can easily remove and replace the filter with exhaust in place.
Performance Mufflers
Having plenty of pipe is necessary but you will need at least one, if not two, mufflers to complement your system. In our case we opted for a pair of the MagnaFlow XL mufflers (PN 37613254) also available through SM. These three-chamber mufflers are stainless steel construction with 2-inch inlet and outlet ports; we opted for the inlet location to be in the center while the outlet was offset. The physical dimensions are 24 inches in overall length with the body length at 18 inches, the overall muffler body height is 4 inches, and the body width is 9 inches. (Measure the space you have available before ordering any muffler!) Something else we noted that helped with clearance issues is the oval design of the MagnaFlow XL muffler.
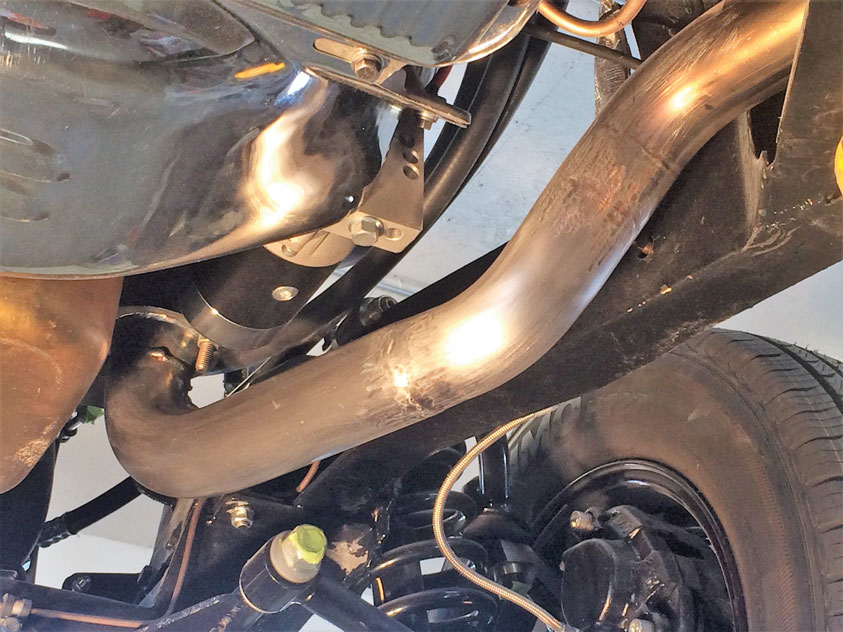
Passenger side shows tubing attaching to the header as well as sweeping down and leaving room to work around the starter. Mini starters come in handy—easy to remove and replace as long as you have accounted for clearance around the exhaust system.
Exhaust Hangers
We ordered two different types of hangers to cover our bases should we need to make a modification here and there to get the exhaust pipe properly located. We ordered a pair of 10-inch-long with a 3/8-inch rod diameter weld-on hanger brackets (PN 91613254) that come with rubber isolators and two mounting holes.
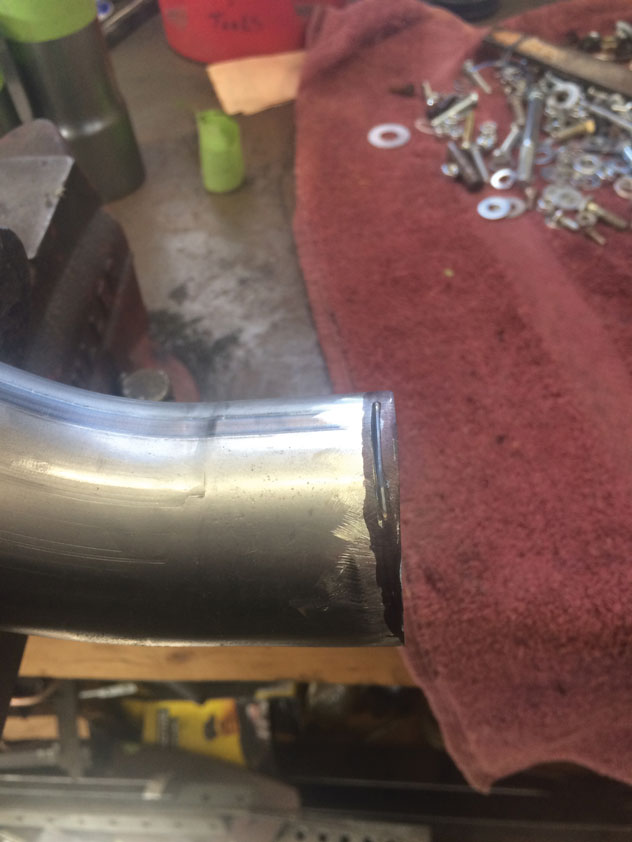
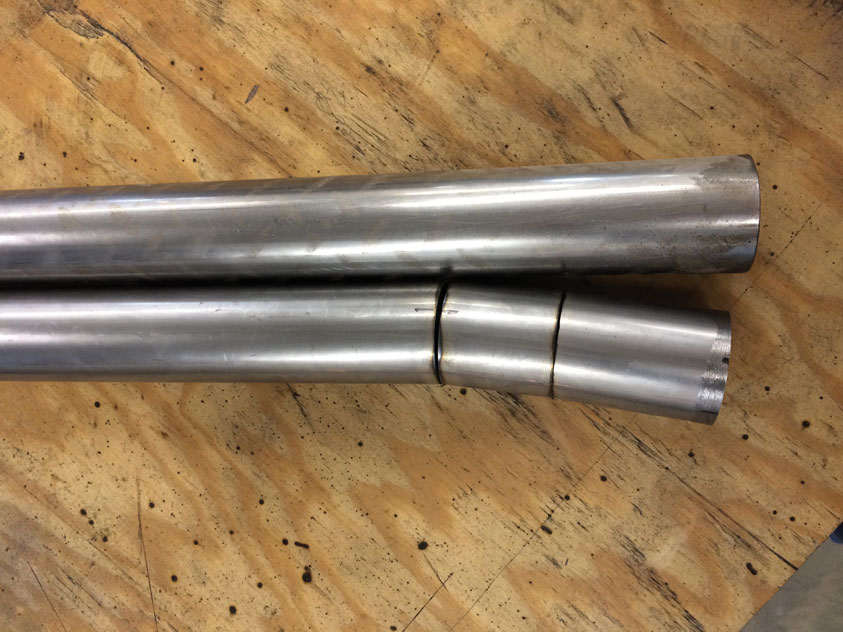
Look closely—the tip of the pipe is marked in black and there’s an angle cut, which allows for some movement to position the pipe “just” where you want it.
We also ordered a pair of 7-inch-long with 3/8-inch mounting hole and polyurethane exhaust hanger grommets (PN 91603043) to help with vibration isolation.
A Few Tips
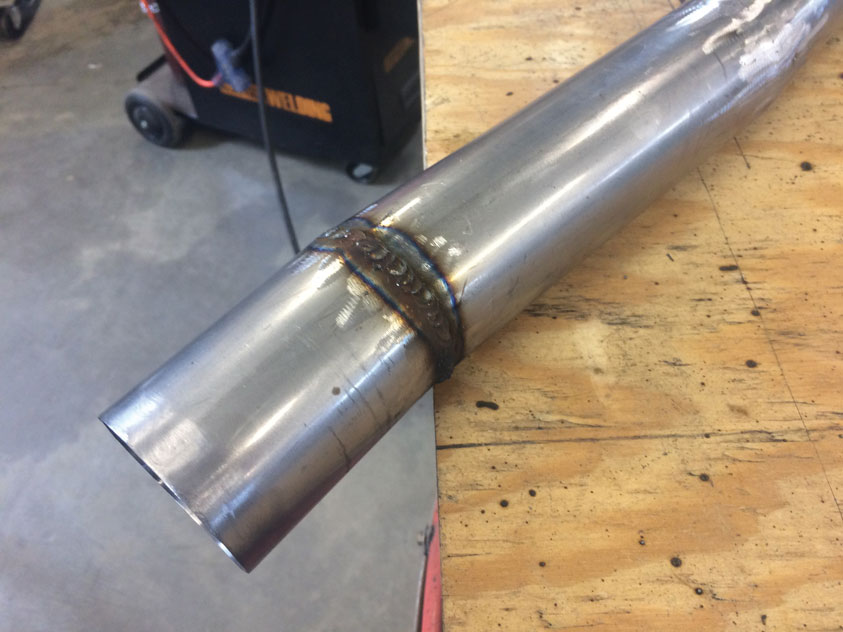
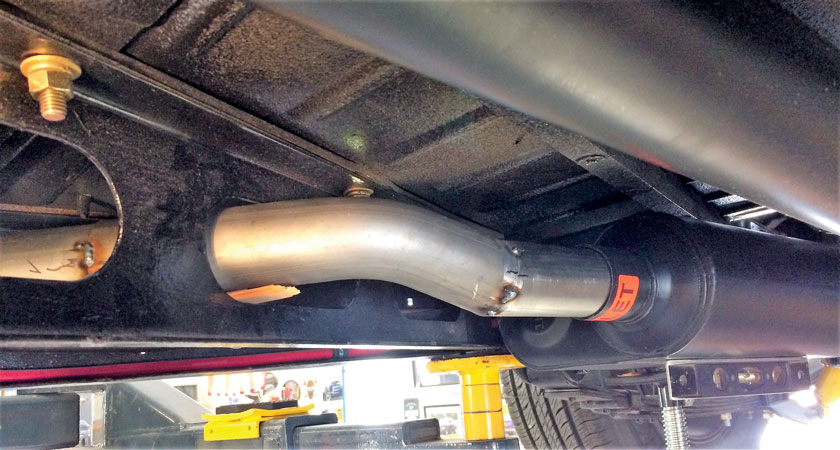
Here’s a finished segment of pipe that conforms to the space requirements, is finish welded, and the weld is ground smooth. Remember not to get carried away when grinding welds—take off too much and the weld will fatigue and fail.
There’s nothing more frustrating than listening to exhaust pipe rattling when you are idling through the fairgrounds. And believe me everyone you idle by can hear it and wonders why you didn’t check your clearances while fabricating your exhaust. So, check your clearances.
Also remember that the reason the hangers have isolators is to allow your exhaust system to “move” through heat expansion and absorb vibration. An exhaust that starts in a “cold” position will grow or move when the metal gets hot. You never want your exhaust system to be solidly anchored throughout. It’s already attached firmly to the engine so you need to give the exhaust system a chance to move throughout the heat cycle.
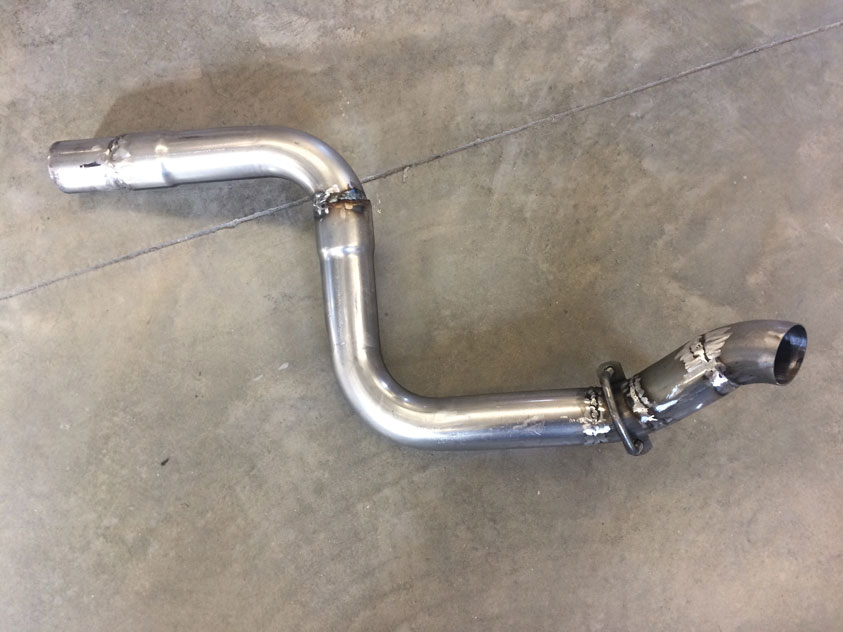
The top piece as it comes in the SM kit; while the bottom piece is marked where it will need to be cut and welded to produce a new shape for routing.
Something else to keep in mind: exhaust pipes are very hot at the attachment point to the cylinder head; upwards of 400-600 degrees. (Cylinder temps can reach 800-1,100 degrees.) As the exhaust flows rearward it cools quickly, but you still want to keep the pipe and especially the mufflers away from touching the floorboards as this transference of heat will go directly into the passenger compartment. I’m sure all of us have been in one car or another where the floorboards were hot because the exhaust system ran too close.
The pipe was cut on an angle here and then fit and welded back together.
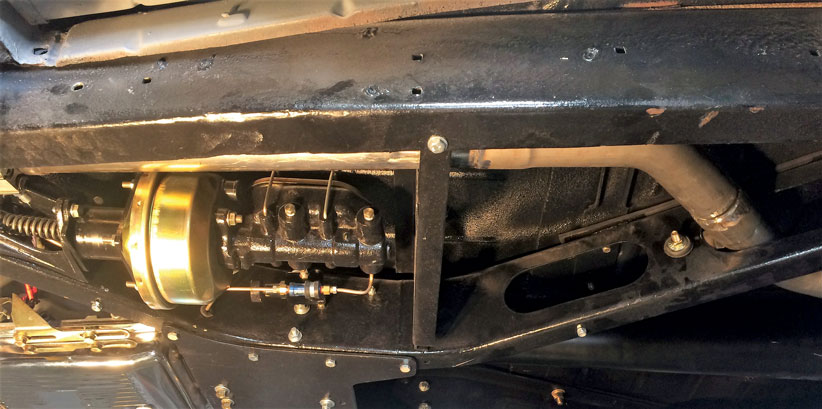
Still in the “watch out for heat realm” make sure to allow for as much space as you can between the exhaust system and the master cylinder, proportioning valve, brake lines, or other elements of the brake system. Oftentimes there’s no choice but to run the exhaust pipe near the master cylinder as it’s under the floorboards (rather than on the firewall where it belongs!) and the gap between the two is minimal. Here you can use a heat shield or heat wrap insulation material.
In both cases this will dramatically lower the temperatures and allow the brake system to not be affected by exhaust heat. This also holds true for gas lines. You don’t want to superheat the fuel lines and cause a vapor lock or other baddies. So, keep the exhaust system away from brake and fuel lines and related components.
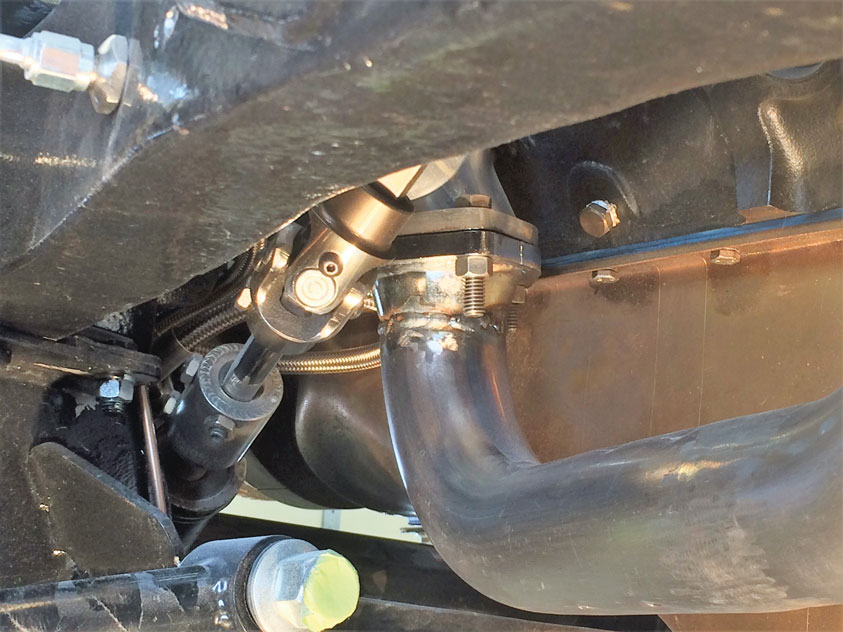
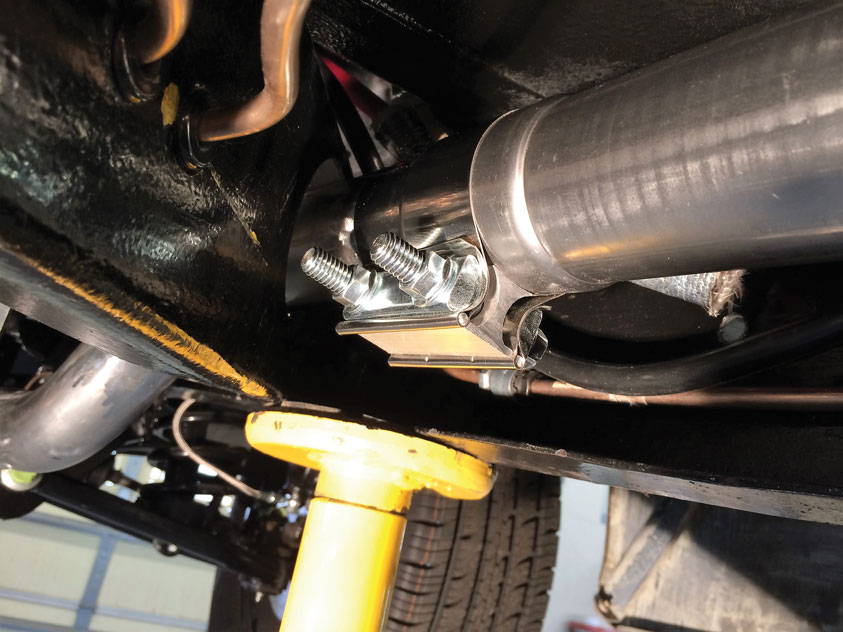
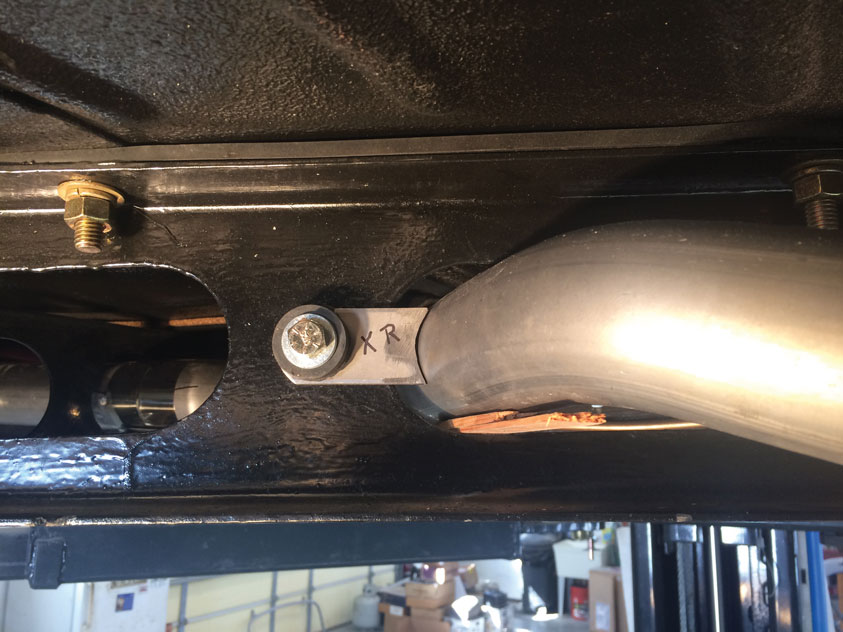
Note the passenger side (steering U-joint) where the flange that bolts the hugger-style header to the SM exhaust pipe and the placement to the anchor bolts. Make sure you can get to these bolts easily for tightening, removal, and replacement purposes.
Something else, should you notice a small hole drilled into the body of the muffler on one end or the other it’s there for a reason This hole should be at the lowest point of the muffler when installed as it will allow moisture that builds up while the car is parked to drip out. Why? Moisture that’s left in the exhaust system can lead to premature failure due to rust.
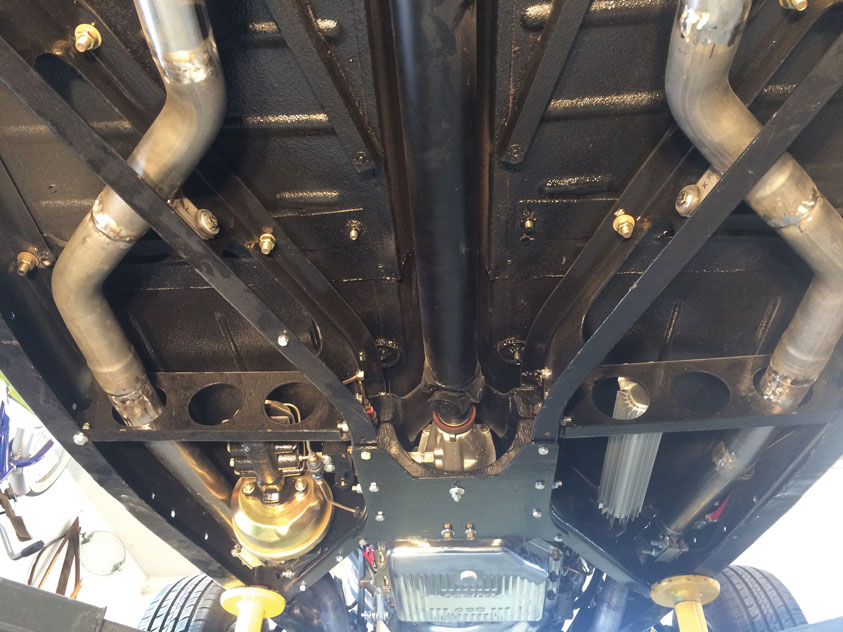
Example of where an exhaust pipe will pass through a hole in the center crossmember. Clearance is of particular importance here—you do not want the pipe to touch any of the crossmember creating a rattle, which can lead to pipe failure.
While it would be cool to run one beautifully bent and welded piece of exhaust pipe the full length of the car that’s not the best thing to do. You will want your system to “come apart” on demand. Frequently, the mufflers can be bolted into position so that the tailpipe section can be easily removed.
In this photo the exhaust pipe is passing down the center of the car and at a designated point the pipe passes through the center crossmember to run toward the outside and near the inner portion of the framerails.
It will also allow the mufflers to be easily removed as well as the forward section of the system. It will disassemble at the exhaust manifold header and at another point between exhaust manifold and the muffler so that you can take the system apart entirely or in segments to assist in engine and/or transmission removal. It will also allow you to repair or replace segments of your system should it become damaged through use.
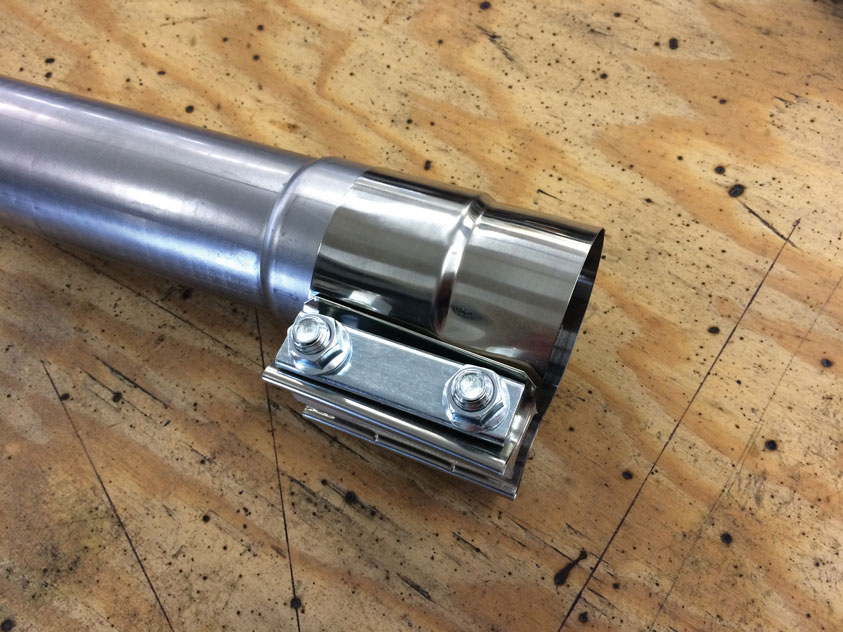
These clamps come in handy as they provide a good seal when joining two pipes but also allow for the removal of a section of pipe anytime maintenance is required. Examples might be when the exhaust system needs work or you need to remove the engine or transmission.
And, one last tidbit. While all of us may be familiar with dual exhaust as we have seen it in every magazine feature article, in every car movie, and all of us have stared at twice-pipes all of our hot-rodding lives, there is more. Once you have your coveted dual exhaust you should also give some consideration to whether or not you have the space for a X-pipe or an H-pipe. Why? Because they work.
These clamps come in handy as they provide a good seal when joining two pipes but also allow for the removal of a section of pipe anytime maintenance is required. Examples might be when the exhaust system needs work or you need to remove the engine or transmission.
Both of them are part of the crossover pipe system of your exhaust. Both balance the exhaust pulses (caused by the firing order of each cylinder), thereby creating a smooth exhaust flow and producing more power. Here’s where we take a subject that deserves more information and just give you the highlights as we could do an entire story on exhaust systems and how they work. But, the X-pipe yields a sharpened tone and increased power. If you like a throatier sound, such as you may have had with your ’60s-era hot rod then the H-pipe, which will give you performance, will also give you a loud sound. Your choice!
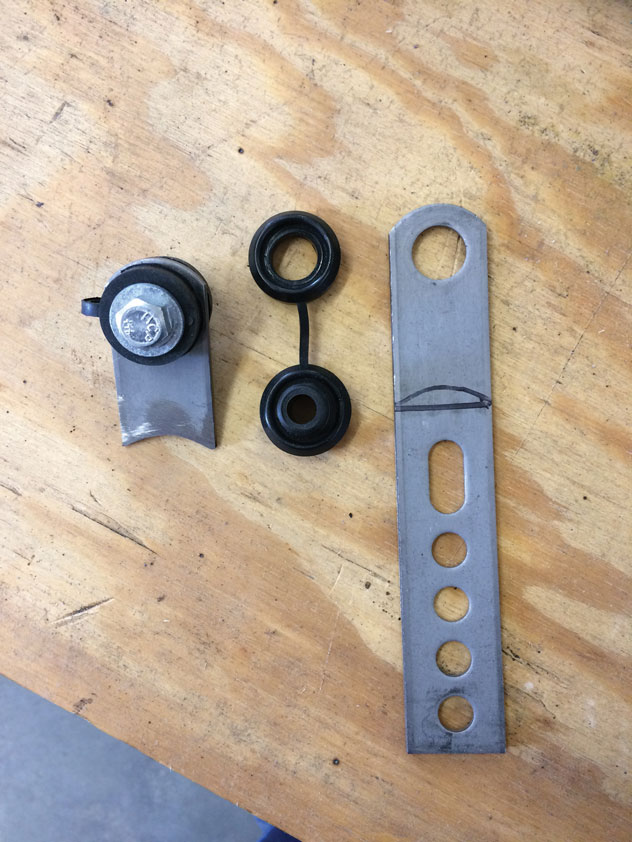
Here a 7-inch universal exhaust hanger with snap in bushings kit (PN 91603043) is modified for use on our system. Black marking on the hanger to the right shows where the hanger will be cut and also shows the curvature so that bracket may be welded to the radius of the pipe.
Let’s follow along with Winter and see how he tackles the job at hand for the custom exhaust system on his 1936 Ford. MR
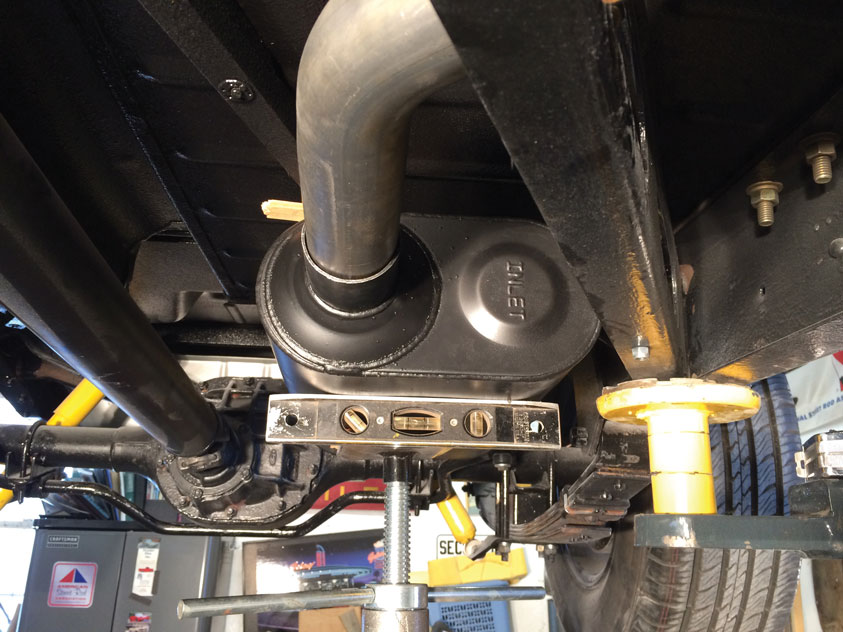
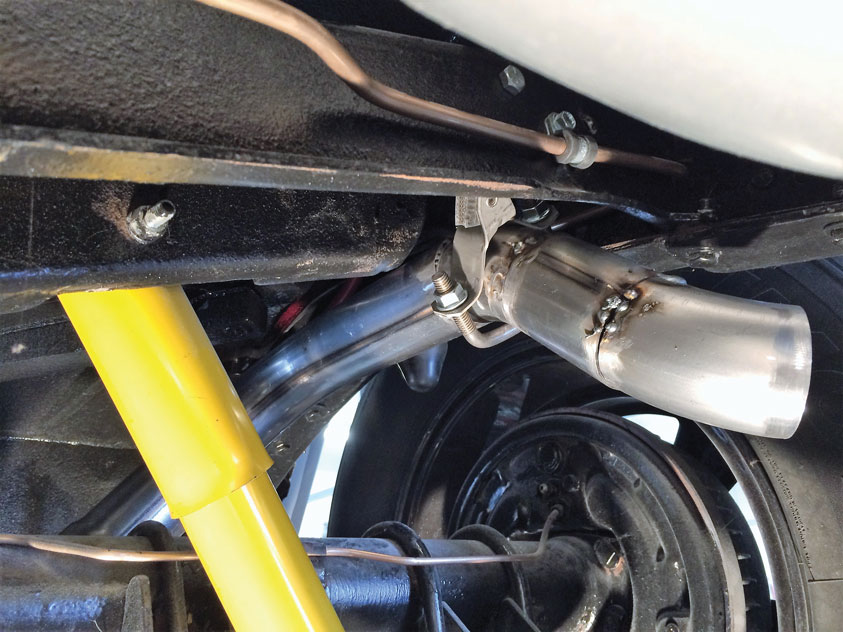
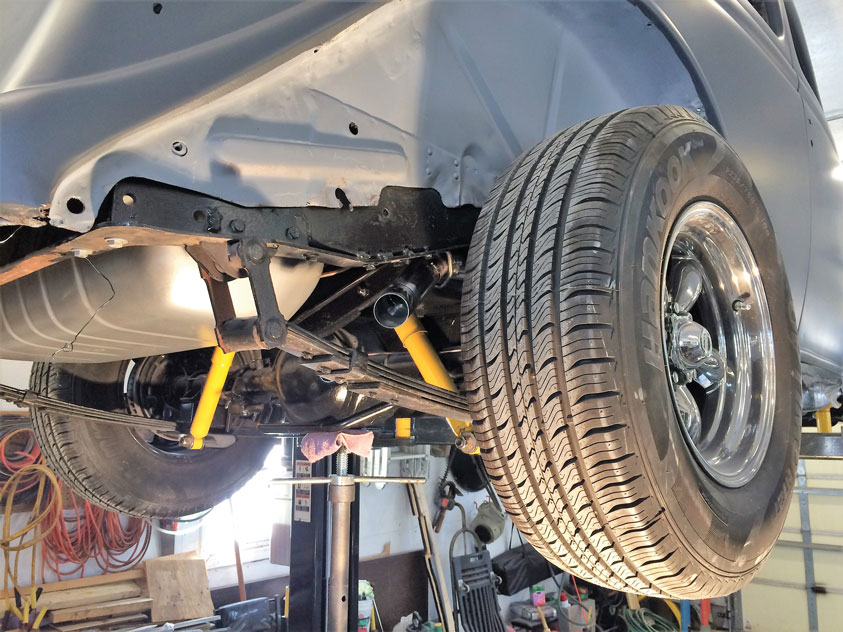
The Speedway Motors (SM) universal mild steel dual exhaust kit features 2-1/4-inch tubing (PN 91013822) and is the basis for our custom exhaust system.Also rounded up from SM are a pair of 10-inch-long with a 3/8-inch rod diameter weld-on hanger brackets (PN 91613254) that come with rubber isolators.More SM goodies include the 7-inch universal exhaust hangers with snap-in bushings kit (PN 91603043).Any good street exhaust system is going to need mufflers, and in most cases a pair of them. We opted for a pair of the MagnaFlow XL mufflers (PN 37613254). Ours have the center inlet and offset exhaust ports.We have found over the years that nothing replaces a roll of masking tape, a black marker, and a cutting wheel to make alternations to the exhaust pipe.Here we took one of the U-bends and marked and cut it into several angled cuts to make less dramatic bends.Driver side has taken two pieces to come down from the exhaust manifold (block hugger-style headers) and go beneath the oil filter and then back up. Remember, clearance around an exhaust system is always important—note the oil filter. You want to make sure you can easily remove and replace the filter with exhaust in place.Passenger side shows tubing attaching to the header as well as sweeping down and leaving room to work around the starter. Mini starters come in handy—easy to remove and replace as long as you have accounted for clearance around the exhaust system.Look closely—the tip of the pipe is marked in black and there’s an angle cut, which allows for some movement to position the pipe “just” where you want it.Here’s a finished segment of pipe that conforms to the space requirements, is finish welded, and the weld is ground smooth. Remember not to get carried away when grinding welds—take off too much and the weld will fatigue and fail.The top piece as it comes in the SM kit; while the bottom piece is marked where it will need to be cut and welded to produce a new shape for routing.The pipe was cut on an angle here and then fit and welded back together.Note the passenger side (steering U-joint) where the flange that bolts the hugger-style header to the SM exhaust pipe and the placement to the anchor bolts. Make sure you can get to these bolts easily for tightening, removal, and replacement purposes.Example of where an exhaust pipe will pass through a hole in the center crossmember. Clearance is of particular importance here—you do not want the pipe to touch any of the crossmember creating a rattle, which can lead to pipe failure.In this photo the exhaust pipe is passing down the center of the car and at a designated point the pipe passes through the center crossmember to run toward the outside and near the inner portion of the framerails.These clamps come in handy as they provide a good seal when joining two pipes but also allow for the removal of a section of pipe anytime maintenance is required. Examples might be when the exhaust system needs work or you need to remove the engine or transmission.Here a 7-inch universal exhaust hanger with snap in bushings kit (PN 91603043) is modified for use on our system. Black marking on the hanger to the right shows where the hanger will be cut and also shows the curvature so that bracket may be welded to the radius of the pipe.Here you can see the hanger bolted to the frame with its bushing kit and just before the hanger is welded to the exhaust tubing.Look closely and you will see a level positioned under the muffler. You will want to make sure that the system is level as this aids in determining proper clearance.Tubing as it passes from the center of the car through the holes in the crossmember and into the muffler. Note the Flowmaster muffler chosen has the exhaust side port to the outside. This helped greatly in maintaining clearance.Here’s a look of Winter’s exhaust system complete with mufflers. Look closely and you will see wooden spacers placed where the tubing passes through the center crossmember. But doing this you maintain clearance between the tubing and any part of the frame. Once everything is bolted and welded into position the system spacing will be held.Remember we spoke about paying careful attention to where the tubing passes by brake or fuel components. Heat isn’t a friend of either. In this case the exhaust pipe passes closely to the under-floorboard master cylinder. At a later date a fixed heat shield or exhaust wrap will be used to give the master cylinder (brake fluid) extra protection.Remember we spoke about paying careful attention to where the tubing passes by brake or fuel components. Heat isn’t a friend of either. In this case the exhaust pipe passes closely to the under-floorboard master cylinder. At a later date a fixed heat shield or exhaust wrap will be used to give the master cylinder (brake fluid) extra protection.Here’s a segment of pipe showing you the kinds of bends that are required to allow the exhaust tubing to pass by and around all of the underbody obstacles.This photo shows two critical clearance points to be accounted; the rearend itself and the shocks. The tubing most of the time will pass over the rearend but you need to be careful the tubing isn’t mounted too close to the body or the rearend housing. During suspension travel you do not want anything hitting the tubing.Once you have the tubing in place then you can work on what type of exhaust tip you would like and where you want it located and the direction it will point. Winter used one of the 10-inch weld-on hangers here and bent it to fit his needs.With the rear fender removed from the 1936 Ford you can see where the exhaust, minus tip, comes out in the rear below the framerail, behind the tire, and above the leaf spring package.
We use cookies to ensure that we give you the best experience on our website. If you continue to use this site we will assume that you are happy with it.